Type
Knitting
Difficulty
intermediate
Category
custom
AI Thinking Process
Planning
Verification
Pattern
007 Screen Test Bow Tie
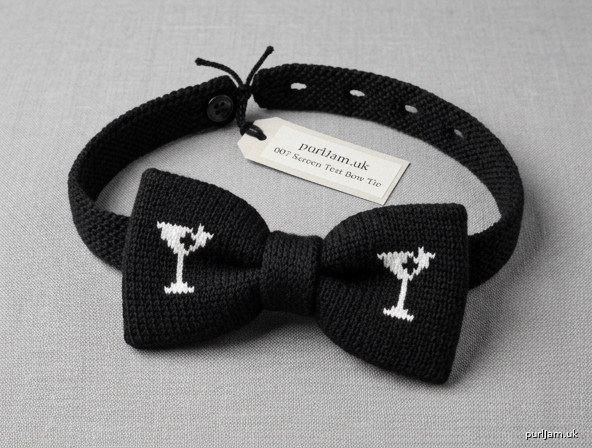
A compact pre-tied bow tie for evening wear, knitted in black DK with a small white martini glass on each wing. The marking is deliberate and discreet: high-contrast, as if caught in a black-and-white screen test, rather than a novelty print. The bow is assembled, not self-tied, so the dinner-jacket shape and the motif stay put under a collar.
Difficulty: Intermediate
Construction: Flat pieces, seamed and gathered
Terminology: UK
Finished measurements
- Each wing: 6.4 cm (2½ in) wide × 6 cm (2⅜ in) long, after seaming and folding
- Bow, tip to tip: 12.8 cm (5 in); the centre knot sits over the join and does not add width
- Centre knot: approximately 2 cm (¾ in) wide × 10 cm (4 in) long before wrapping
- Neckband: 2.7 cm (1 in) wide × 48 cm (19 in) long
- To fit neck: 36–44 cm (14¼–17¼ in), with three fastening positions at approximately 36 cm, 40 cm and 44 cm
One adjustable adult size.
Materials
- Main colour (MC): black DK (8-ply), 1 × 50 g ball, at least 100 m. The bow itself uses well under one ball; the extra covers the tension swatch and sewing.
- Contrast colour (CC): white DK (8-ply), about 5 m, for the motif only. A short leftover is enough.
- Needles: 4 mm (UK 8 / US 6) straight needles, or a circular needle of the same size used flat.
- Notions: tapestry needle; sewing needle and black thread; one black button, 10 mm (⅜ in); a few locking markers or short pieces of waste yarn, optional, to mark the fold line.
Tension (gauge)
After blocking:
- Stocking stitch: 22 stitches and 30 rows = 10 cm (4 in) on 4 mm needles
- Garter stitch: 22 stitches and 44 rows = 10 cm (4 in) on 4 mm needles
Knit a blocked stocking-stitch swatch of at least 12 cm square, and a garter-stitch strip on 6 stitches at least 12 cm long, before you begin. The wings use the stocking-stitch tension; the neckband uses the garter-stitch tension. If your stitch tension is larger than 22 stitches to 10 cm, the bow will be oversized and soft. Change to a smaller needle and swatch again. Row tension sets the wing length and the neck fits, so do not skip it.
Abbreviations
- k — knit
- p — purl
- st(s) — stitch(es)
- RS — right side
- WS — wrong side
- yo — yarn over
- k2tog — knit 2 stitches together
- MC — main colour
- CC — contrast colour
- cm — centimetres
- approx. — approximately
Pattern notes
- Instructions use UK terminology and metric measurements. Inch conversions are approximate.
- The bow is pre-tied. You knit two wings, a centre knot and a neckband, then sew them together. It is not a long self-tie strip.
- Wings and centre knot are stocking stitch, folded with wrong sides together so the reverse is enclosed and the edges do not curl.
- The neckband is garter stitch (knit every row) so it lies flat against the collar.
- The martini glass is added afterwards in Swiss darning (duplicate stitch), not stranded colourwork. Work it before the wings are folded, so the back of the embroidery is hidden inside.
- If a separate colourwork chart is supplied for this motif, use it only for the path of the glass, with the placement and colours given below. This pattern is complete without a chart: the glass can be darned by eye.
- Block before embroidering or seaming. A firm, even fabric holds a bow; a drapey one will not.
- Leave a tail of about 30 cm at the cast-on of each wing, for gathering.
Wings (make 2)
With MC and 4 mm needles, cast on 16 sts, leaving a 30 cm tail.
Row 1 (RS): Knit.
Row 2 (WS): Purl.
These 2 rows set stocking stitch. Work in stocking stitch for 36 rows in total, beginning with row 1. (16 sts on every row ✓)
Cast off knitwise. The cast-off ridge will sit in the centre gather, so it does not lengthen the outer tip.
Fold line: the midpoint is between rows 18 and 19. Mark it with a scrap of waste yarn. The cast-on half (rows 1–18) is the front of the wing. The cast-off half is the back and is not embroidered.
Unblocked, 36 rows at 30 rows to 10 cm is 12 cm; folded, 18 rows is 6 cm (18 × 10 / 30 = 6 ✓). Width is set after seaming, below.
Do not fold or seam yet. Block both wings and work the motif first.
Centre knot (make 1)
With MC and 4 mm needles, cast on 10 sts.
Work in stocking stitch for 30 rows, beginning with a RS knit row. (10 sts on every row ✓)
Cast off knitwise.
30 rows at 30 rows to 10 cm is 10 cm (30 × 10 / 30 = 10 ✓). Folding in half lengthwise gives 5 sts across the fold, 2.3 cm before seaming (5 × 10 / 22 = 2.3); after the seam, the knot is about 2 cm wide.
Block before seaming.
Neckband (make 1)
With MC and 4 mm needles, cast on 6 sts.
Knit every row (garter stitch).
- Work 167 rows.
- Buttonhole row: K2, yo, k2tog, K2. (6 sts ✓)
- Work 15 rows.
- Buttonhole row: K2, yo, k2tog, K2. (6 sts ✓)
- Work 17 rows.
- Buttonhole row: K2, yo, k2tog, K2. (6 sts ✓)
- Work 10 rows.
Cast off knitwise.
Row check: 167 + 1 + 15 + 1 + 17 + 1 + 10 = 212 rows ✓. At 44 rows to 10 cm, 212 rows is 48 cm (212 × 10 / 44 = 48.2, given as 48 cm). Width is 6 × 10 / 22 = 2.7 cm ✓.
On the row after each buttonhole, knit the yo as a normal stitch so the hole stays open. Mark the cast-on end: this is the button end. The first buttonhole (after 167 rows) is the smallest neck, about 36 cm; the second is about 40 cm; the third is about 44 cm. These fits are approximate, because a whole row cannot land on a fraction of a centimetre. Check a 10 mm button through each hole. If a hole is tight, ease it gently with a needle tip. Do not cut the yarn.
Block the band flat, taking care not to stretch the buttonholes.
Martini-glass motif
Work after blocking and before folding, on the right side of the front half of each wing only (the cast-on half). Use CC and a tapestry needle. Do not carry the contrast through the knitting.
Placement, both wings:
- Centre the glass on the cast-on half.
- Keep it at least 3 stitches in from each side edge, at least 3 rows below the fold, and at least 3 rows above the cast-on edge.
- Orient the glass upright on both wings: bowl toward the upper side edge, foot toward the lower side edge, stem vertical. Do not mirror one wing, and do not turn one glass toward the outer tip.
- The whole motif should stay small — clearly inside the wing, and no wider than about one-third of the wing — so it reads as a detail, not a logo.
- Ground is MC black. The glass is CC white. No other colours.
If you are using a separate colourwork chart: follow that chart for the stitch path of the glass, and apply the placement and colours above. Work each chart stitch as one Swiss-darned stitch over the black fabric.
If you are working without a chart: darn a small upright martini glass by eye. Make a shallow V-shaped bowl, a short straight stem of stacked stitches under the centre of the bowl, and a small horizontal foot. Keep the bowl wider than the foot, and the stem narrower than both. A single CC stitch at the rim may suggest an olive if you want one; omit it for a plainer glass. Step back after the first wing. The second wing should match in size and sit in the same place.
Swiss darning: bring CC up at the base of a knitted stitch, slide the needle under the two loops of the stitch above, and take it back down at the base, so the new yarn covers the old stitch and looks like a knit stitch. Work one fabric stitch at a time. Keep the tension even with the knitting. Do not pull so tightly that the wing puckers. Fasten CC ends on the wrong side; they will be enclosed when the wing is folded.
Finishing
Sew with MC on the wrong side unless stated otherwise. Mattress stitch should be firm but not tight enough to ruffle the edge.
Wings
- Fold each wing on the marked line, wrong sides together and right side out, so the cast-on edge meets the cast-off edge and the motif is on the outside. The fold is the outer tip.
- Mattress stitch each side seam, taking one full stitch from each edge into the seam. Visible width is 14 stitches, 6.4 cm (14 × 10 / 22 = 6.4 ✓). Visible length is the folded 6 cm.
- With the cast-on tail, run a line of gathering stitches through both layers along the short centre end (cast-on and cast-off held together). Draw the end up to about 1.5 cm and fasten securely. Do not gather the outer tip.
Join the bow
- Butt the two gathered ends, fronts upward, fold-tips pointing away from each other. Sew the gathered ends together firmly. Tip to tip is 6.4 + 6.4 = 12.8 cm ✓. The backs of the wings sit behind the fronts; a couple of small stitches at the back, catching only the inner layer, will stop the wings from twisting.
- Fold the centre knot lengthwise, wrong sides together. Mattress stitch the long edges, and tuck the seam to the inside. Wrap this band around the gathered centre so the join is hidden and the seam of the knot sits at the back. Overlap the ends at the back and sew them down. The knot should be snug enough to hold the gather, not so tight that it wrinkles the wings.
- Find the centre of the neckband. Sew that centre to the back of the knot with a short, firm bar of stitches, about 1.5 cm wide, so the bow cannot droop to one side. Do not let the stitches show on the front of the knot.
Button
- On the right side of the cast-on end, sew the button in the centre of the band, 2 cm from the end. The buttonhole nearest this end fastens the 36 cm neck; the middle hole, 40 cm; the hole nearest the cast-off end, 44 cm.
Final press
- Steam the finished bow lightly under a damp cloth. Do not press the motif flat, and do not stretch the neckband. Ease the wings into matching rectangles. If a wing still wants to collapse, run a discreet line of backstitch along the inside of the fold, through the inner layer only.
Weave in any remaining ends.
Wearing and care
Wear the knot centred under the collar, with the band fastening at the back of the neck. The glasses stand upright when the fold-tips point left and right.
Hand wash in cool water. Squeeze, do not wring. Dry flat, reshaping the wings and the knot. Steam lightly if needed. Do not tumble dry, and do not hang the bow by one wing.
Disclaimer: This pattern was generated by AI and should be reviewed for accuracy before use. While we strive for quality, AI-generated content may contain errors. Please verify measurements, stitch counts, charts, and instructions before beginning your project. Generated by purlJam.uk
Love this pattern?
Save this pattern to your free PurlJam libraryAccess your pattern anytime
Bookmark this page to access your pattern anytime