Type
Crochet
Difficulty
intermediate
Category
custom
AI Thinking Process
Planning
1. **Design Strategy**: Creating a patriotic American bunting for the 250th anniversary (Semiquincentennial). Will feature red, white, and blue triangular pennants in a classic bunting style. Beginner-friendly construction using simple stitches and modular design where triangular pennants are made separately and joined together.
2. **Construction Plan**: Each triangular pennant will be worked flat in rows from the bottom (wide edge) up to a point. Pennants will be made in an alternating color pattern (red, white, blue sequence). A connecting strip will be added across the top edge for hanging. This modular approach is perfect for beginners and allows for customizable length.
3. **Quality Assurance**: Key considerations include:
- Ensuring triangles are symmetrical with proper decrease placement
- Clear color change instructions
- Adequate stiffness for pennants to hang nicely
- Simple joining method that beginners can execute
- Clear yardage guidance for different lengths
4. **Final Calculations**:
- Each pennant base: 20 stitches (approximately 5 inches wide at gauge)
- Height: approximately 7 inches per pennant
- Standard gauge: 16 sc x 18 rows = 4 inches with worsted weight
- Pattern includes 9 pennants (3 red, 3 white, 3 blue) for approximately 45 inches of bunting
Verification
[PRE-FLIGHT CHECKS]
1. **Completeness**: ✓ All required sections included (title, materials, gauge, abbreviations, notes, instructions, finishing)
2. **Consistency**: ✓ Triangle decreases calculated: 20→18→16→14→12→10→8→6→4→2→1 = 11 rows total; math verified
3. **Constraints**: ✓ Beginner level maintained with basic sc and decreases; patriotic colors specified; modular construction
4. **Safety**: ✓ All stitch counts verified at each row; decrease pattern symmetrical; joining method clearly explained
Pattern
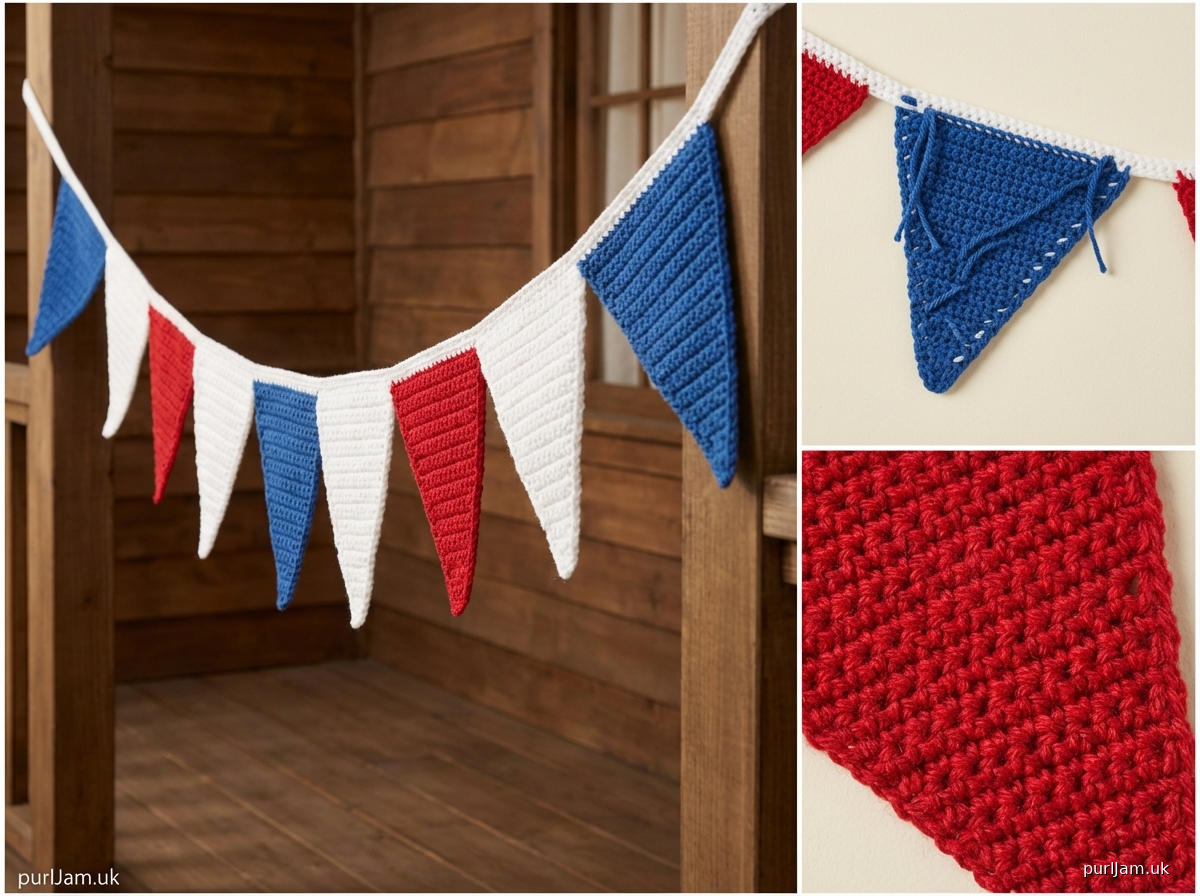
# 250th Anniversary American Bunting

Celebrate America's Semiquincentennial with this patriotic bunting! This beginner-friendly pattern creates a festive decoration featuring red, white, and blue triangular pennants. Perfect for display indoors or on a covered porch for Independence Day, Memorial Day, or the 250th anniversary celebrations in 2026.

## Finished Measurements
- Each pennant: approximately 5 inches wide x 7 inches tall
- Total bunting length (9 pennants): approximately 45 inches
- Easily customizable by making more or fewer pennants

## Materials

**Yarn:**
- Worsted weight (#4) acrylic yarn in Red, White, and Blue
- Approximately 50 yards of each color for 9 pennants (3 of each color)
- Sample uses Red Heart Super Saver or similar
- For longer bunting: add approximately 17 yards per additional pennant

**Hook & Notions:**
- Size H/8 (5.0 mm) crochet hook
- Yarn needle for weaving in ends
- Scissors
- Optional: Wooden dowel rod or twine for hanging

## Gauge
16 sc x 18 rows = 4 inches in single crochet
Gauge is not critical for this project, but will affect finished size.

## Abbreviations
- ch = chain
- sc = single crochet
- sc2tog = single crochet 2 together (decrease)
- st(s) = stitch(es)
- RS = right side
- WS = wrong side

## Pattern Notes
- Each pennant is worked flat in rows from bottom to top.
- Turning chain does NOT count as a stitch throughout.
- Stitch count is provided at the end of each row in parentheses.
- RS (odd-numbered rows) face outward when bunting is hung.
- To customize length: Make pennants in multiples of 3 to maintain color pattern balance, or create your own color arrangement.

## Special Stitches
**sc2tog (single crochet 2 together):** [Insert hook in next st, yo and pull up a loop] twice, yo and pull through all 3 loops on hook. (1 st decreased)

---

## PENNANT (Make 3 Red, 3 White, 3 Blue)

**Foundation:** Ch 21.

**Row 1 (RS):** Sc in 2nd ch from hook and in each ch across. (20 sc)

**Row 2 (WS):** Ch 1, turn, sc2tog, sc in each st across to last 2 sts, sc2tog. (18 sc)

**Row 3:** Ch 1, turn, sc in each st across. (18 sc)

**Row 4:** Ch 1, turn, sc2tog, sc in each st across to last 2 sts, sc2tog. (16 sc)

**Row 5:** Ch 1, turn, sc in each st across. (16 sc)

**Row 6:** Ch 1, turn, sc2tog, sc in each st across to last 2 sts, sc2tog. (14 sc)

**Row 7:** Ch 1, turn, sc in each st across. (14 sc)

**Row 8:** Ch 1, turn, sc2tog, sc in each st across to last 2 sts, sc2tog. (12 sc)

**Row 9:** Ch 1, turn, sc in each st across. (12 sc)

**Row 10:** Ch 1, turn, sc2tog, sc in each st across to last 2 sts, sc2tog. (10 sc)

**Row 11:** Ch 1, turn, sc in each st across. (10 sc)

**Row 12:** Ch 1, turn, sc2tog, sc in each st across to last 2 sts, sc2tog. (8 sc)

**Row 13:** Ch 1, turn, sc in each st across. (8 sc)

**Row 14:** Ch 1, turn, sc2tog, sc in each st across to last 2 sts, sc2tog. (6 sc)

**Row 15:** Ch 1, turn, sc in each st across. (6 sc)

**Row 16:** Ch 1, turn, sc2tog, sc in each st across to last 2 sts, sc2tog. (4 sc)

**Row 17:** Ch 1, turn, sc in each st across. (4 sc)

**Row 18:** Ch 1, turn, sc2tog twice. (2 sc)

**Row 19:** Ch 1, turn, sc2tog. (1 sc)

Fasten off, leaving a 6-inch tail for weaving in.

---

## CONNECTING STRIP

The connecting strip runs along the top edge of all pennants and provides structure for hanging.

**Foundation:** With White, ch the number of chains needed to span all pennants when laid side by side.
- For 9 pennants: Ch approximately 200 (measure by laying out pennants with about ½ inch spacing between them; the strip should be slightly longer than the total width).

**Row 1:** Sc in 2nd ch from hook and in each ch across.

**Row 2:** Ch 1, turn, sc in each st across.

**Row 3:** Ch 1, turn, sc in each st across.

Fasten off, leaving a 12-inch tail for sewing.

---

## ASSEMBLY

1. **Block pennants (optional but recommended):** Lightly steam or wet block each pennant to help them lay flat and maintain their triangular shape.

2. **Arrange pennants:** Lay out pennants in desired color order. Traditional pattern: Red, White, Blue, Red, White, Blue, Red, White, Blue. Or create your own arrangement.

3. **Attach pennants to connecting strip:**
   - Position the connecting strip horizontally with Row 3 facing up.
   - Place the first pennant with its Row 1 (wide edge) positioned approximately 1 inch from the end of the connecting strip, with the RS of the pennant facing up.
   - Using yarn needle and matching yarn, whip stitch the top edge of the pennant (Row 1) to the connecting strip, centering it on the strip width.
   - Space pennants approximately ½ inch apart.
   - Continue attaching all pennants in order.

4. **Weave in all ends** securely on the WS of work.

---

## FINISHING

**Hanging Options:**

**Option 1 - Loops:** With White, make small chain loops at each end of the connecting strip and attach securely for hanging on hooks or nails.

**Option 2 - Dowel Rod:** Thread a wooden dowel rod through the space between the pennants and connecting strip before attaching pennants (if strip is worked wider), or attach small yarn loops along the top edge of strip to slide over a dowel.

**Option 3 - Twine:** Weave decorative twine or rope through the top edge of the connecting strip, leaving extra length on each end for tying.

**Optional Edging:** For a more polished look, work a round of sc around the outer edges of each pennant before assembly. Work (sc, ch 1, sc) in the point of each triangle for a neat finish.

---

## Customization Ideas

- **Length:** Make any number of pennants to fit your space
- **Size:** Use DK weight yarn and smaller hook for miniature bunting, or bulky yarn and larger hook for oversized pennants
- **Colors:** Adapt for different holidays or events (orange/black for Halloween, pink/red for Valentine's Day, team colors for sports fans)
- **Embellishments:** Add embroidered stars to white pennants, or appliqué numbers "250" for anniversary celebrations
- **Texture:** Use different stitches like half double crochet for a different look

---

## Care Instructions

If using acrylic yarn: Machine wash gentle cycle, lay flat or hang to dry. Iron on low heat if needed to flatten pennants (test on a swatch first).

---

## Pattern Notes for Success

✦ Keep tension consistent throughout each pennant for uniform shapes.

✦ Count your stitches at the end of each row—this ensures symmetrical triangles.

✦ When working sc2tog, work loosely to avoid puckering at the edges.

✦ If pennants curl, blocking will help them lay flat.

✦ For outdoor display, consider using UV-resistant acrylic yarn to prevent fading.

---

**Happy Crocheting and Happy 250th Anniversary, America!** 🇺🇸

---

*Pattern designed for America's Semiquincentennial celebration. Share your finished bunting with #Crochet250 #AmericanBunting*
Disclaimer: This pattern was generated by AI and should be reviewed for accuracy before use. While we strive for quality, AI-generated content may contain errors. Please verify measurements, stitch counts, and instructions before beginning your project. Generated by purlJam.uk
Access your pattern anytime
Bookmark this page to access your pattern anytime