Type
Crochet
Difficulty
intermediate
Category
custom
AI Thinking Process
Planning
Verification
Pattern
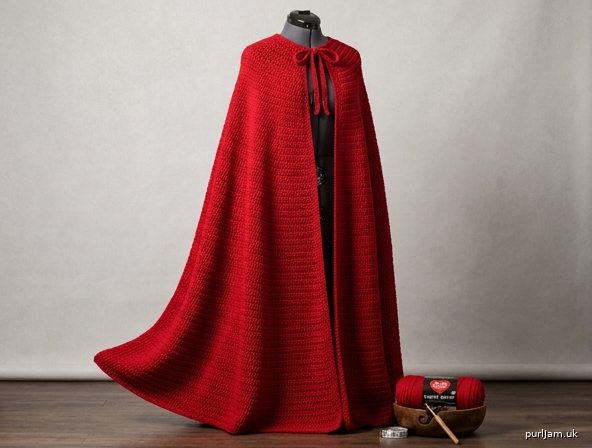
Ankle-Length Circular Cape
A sweeping beginner cape in worsted weight yarn, worked from the neck down in double crochet. Even increases every row form a half-circle that wraps around the body and falls to the ankles. A simple single-crochet border and two ties finish the front opening. Laid flat, the cape is a circular half-moon; worn, it drapes in a full circular silhouette.
Materials
Yarn: Worsted weight (category 4) yarn in red (or color of choice).
Approximate yardage (includes a small allowance for swatching):
| Length | Inches (cm) | Approx. rows | Yarn |
|---|---|---|---|
| Knee | 36" (91.5 cm) | 63 | 2,300 yd / 2,105 m |
| Mid-calf | 42" (106.5 cm) | 74 | 3,100 yd / 2,835 m |
| Ankle (as written) | 48" (122 cm) | 84 | 3,800 yd / 3,475 m |
Example: Red Heart Super Saver (100% acrylic; 7 oz / 198 g; 364 yd / 333 m), color Hot Red or Cherry Red — 11 skeins for ankle length (8 skeins knee; 9 skeins mid-calf). Wool or wool-blend worsted will drape more softly but costs more at this yardage.
Hook: US I/9 (5.5 mm), or size needed to obtain gauge.
Notions:
- 6 stitch markers (optional but recommended)
- Yarn needle
- Scissors
- Measuring tape
Gauge
12 dc and 7 rows = 4" × 4" (10 cm × 10 cm) in double crochet, blocked.
Gauge swatch: Ch 16. Dc in 4th ch from hook and in each ch across (14 dc). Ch 3, turn. Work 8 more rows of dc. Block, then measure the center 12 sts and 7 rows.
Matching gauge matters for length and yarn use. If you have more than 12 dc in 4" (10 cm), go up a hook size. If you have fewer, go down a hook size.
Size
One size — adult wrap cape (fits bust 32–52" / 81–132 cm because it is not fitted).
- Neck edge: 20" (51 cm)
- Length from neck to hem (center back): 48" (122 cm) as written, or work to desired length
- Hem arc: about 186" (472 cm)
To shorten or lengthen, stop when the center-back measurement (neck edge to live-row edge) is the length you want. Ankle length is typically 44–50" (112–127 cm) depending on height. Try the cape on as you go: drape it around your shoulders and measure down the back.
Abbreviations (US)
- ch — chain
- dc — double crochet
- inc — increase (2 dc in the same stitch)
- pm — place marker
- rep — repeat
- RS — right side
- sc — single crochet
- sl st — slip stitch
- st(s) — stitch(es)
- WS — wrong side
- * — repeat instructions following the asterisk as directed
- ( ) — stitch count at end of row
Pattern Notes
- US crochet terminology throughout.
- Cape is worked flat, in turned rows, from the neck down. The two short side edges are the front opening.
- Ch 3 at the beginning of every dc row counts as 1 dc. Do not work into the same stitch as the ch-3 unless the instructions say to increase there.
- Work through both loops of every stitch unless otherwise stated.
- You will increase 6 times on every row after Row 1. Stitch count rises by 6 each row.
- The number of dc between increases grows by 1 each row. That even spacing is what makes the fabric circular.
- Optional: place a marker in the second dc of each 2-dc increase and move it up every row so you can see the six increase points at a glance. Markers are a help, not a requirement — counting the stitches between increases is the real guide.
- Count stitches every few rows. Use the checkpoint table below. If you are off by a multiple of 6, you missed or added an increase; if you are off by 1–5, you skipped or doubled a regular dc.
- Turning: turn the work at the end of every row.
- The fabric will look like a widening fan or half-circle. It should lie reasonably flat; a little extra flare at the hem is expected and looks good when worn.
- This is a large project. Make a gauge swatch, weigh or note how much yarn it used, and check your remaining yarn when you are about two-thirds of the way down if you are close on yardage.
Stitch-count formula (for checking): After Row n, you should have 60 + 6 × (n − 1) dc.
Special Stitch
Increase (inc): Work 2 dc in the same stitch. That extra dc is one of the 6 increases on the row.
Pattern
Neck foundation
With red yarn, ch 62.
Row 1 (RS): Dc in 4th ch from hook (skipped 3 ch count as first dc) and in each ch across, turn. (60 dc)
Tip: Work into the back bump of each chain for a neater neck edge that matches the later edging. Count carefully — you need exactly 60 dc including the beginning ch-3.
Optional: pm in every 10th stitch of Row 1 (6 markers) as a visual reminder that Row 2’s increases fall in those 10-st groups. Remove and replace as needed.
Circular increase rows
On every row from here, you work 6 increases, evenly spaced. Each row has one more dc between increases than the row before.
Row 2: Ch 3 (counts as dc here and throughout), dc in next 8 sts, 2 dc in next st, *dc in next 9 sts, 2 dc in next st; rep from * to end, turn.
(66 dc) (6 increases → 60 + 6 = 66 ✓)
Check: you used 6 groups of 10 stitches from Row 1. Each group became 11 stitches.
Row 3: Ch 3, dc in next 9 sts, 2 dc in next st, *dc in next 10 sts, 2 dc in next st; rep from * to end, turn.
(72 dc) (6 increases → 66 + 6 = 72 ✓)
Row 4: Ch 3, dc in next 10 sts, 2 dc in next st, *dc in next 11 sts, 2 dc in next st; rep from * to end, turn.
(78 dc) (6 increases → 72 + 6 = 78 ✓)
Row 5: Ch 3, dc in next 11 sts, 2 dc in next st, *dc in next 12 sts, 2 dc in next st; rep from * to end, turn.
(84 dc) (6 increases → 78 + 6 = 84 ✓)
Row 6: Ch 3, dc in next 12 sts, 2 dc in next st, *dc in next 13 sts, 2 dc in next st; rep from * to end, turn.
(90 dc) (6 increases → 84 + 6 = 90 ✓)
Rows 7–84: Continue in the same manner: ch 3, work one more dc before the first increase than you did on the previous row, then work one more dc between later increases than you did on the previous row, always making exactly 6 increases, turn.
In other words, on Row n (n ≥ 2):
- Ch 3, dc in next (n + 6) sts, 2 dc in next st,
- *dc in next (n + 7) sts, 2 dc in next st; rep from * to end of row.
Examples of that formula: Row 7 uses (dc in next 13, inc) then (dc in next 14, inc) five times; Row 10 uses (dc in next 16, inc) then (dc in next 17, inc) five times.
Work until you have completed Row 84, or until the piece measures 48" (122 cm) from the neck edge to the working edge at center back (or your preferred length).
(Row 84: 558 dc) (60 + 6 × 83 = 558 ✓)
Do not fasten off if you will work the edging in the same yarn.
Stitch-count checkpoints
Use this table to confirm you are still on track. Counts are at the end of the listed row.
| Row | Length (approx.) | Stitch count | How the count is made |
|---|---|---|---|
| 1 | 0.6" (1.5 cm) | 60 | Foundation |
| 10 | 5.7" (14.5 cm) | 114 | 60 + 6 × 9 = 114 ✓ |
| 20 | 11.4" (29 cm) | 174 | 60 + 6 × 19 = 174 ✓ |
| 30 | 17.1" (43.5 cm) | 234 | 60 + 6 × 29 = 234 ✓ |
| 40 | 22.9" (58 cm) | 294 | 60 + 6 × 39 = 294 ✓ |
| 50 | 28.6" (72.5 cm) | 354 | 60 + 6 × 49 = 354 ✓ |
| 60 | 34.3" (87 cm) | 414 | 60 + 6 × 59 = 414 ✓ |
| 63 | 36" (91.5 cm) knee | 432 | 60 + 6 × 62 = 432 ✓ |
| 70 | 40" (101.5 cm) | 474 | 60 + 6 × 69 = 474 ✓ |
| 74 | 42.3" (107.5 cm) mid-calf | 498 | 60 + 6 × 73 = 498 ✓ |
| 80 | 45.7" (116 cm) | 534 | 60 + 6 × 79 = 534 ✓ |
| 84 | 48" (122 cm) ankle | 558 | 60 + 6 × 83 = 558 ✓ |
If you stop at a shorter length, your last-row count is 60 + 6 × (rows completed − 1). Edging numbers below assume 84 rows; if you stopped early, work 2 sc in each dc row-end along the fronts for whatever row count you actually made.
Edging
Rotate the cape so you can work around the entire outer edge. The last row (hem) is already facing you.
Edging round (RS): Ch 1, sc in each of the 558 hem dc to the last st of the hem, 3 sc in the last hem st (corner), rotate.
Work 2 sc in each row-end down the first front edge (84 rows → 168 sc) to the neck corner, 3 sc in the corner.
Sc in each st across the neck edge (60 sc), 3 sc in the next corner.
Work 2 sc in each row-end up the second front edge (168 sc) to the remaining hem corner, 3 sc in the corner, sl st to the first sc of the hem to join.
(hem 558 sc + 4 corners of 3 sc + 2 fronts of 168 sc + neck 60 sc)
Fronts: 84 × 2 = 168 ✓ per side.
Fasten off.
If the front edges ripple, you worked too many sc in the row-ends; if they pull in, you worked too few. Two sc per dc row-end is the target, but ease them to lie flat.
Ties (make 2)
Join yarn with sl st to the center sc of one neck corner (the 3-sc corner).
Ch 75 (about 22" / 56 cm). Sc in 2nd ch from hook and in each ch back to the cape. Sl st to the same corner st. Fasten off.
Repeat on the other neck corner.
For longer wrap-around ties, ch 100 instead of 75. For a sturdier cord, sl st in each ch on the way back instead of sc.
Finishing
- Weave in all ends on the WS with the yarn needle.
- Block the cape — this step shapes the circle. Soak in cool water (or spray thoroughly), press out water in a towel, and pin to a half-circle/arc on blocking mats or a clean floor. Pin the neck edge to a 20" (51 cm) arc, the fronts as two radii, and the hem to a smooth 186" (472 cm) outer arc. Let dry completely.
- Try on. Tie the cords at the throat, or wrap them once and bow. The fronts may overlap or sit slightly apart; both are correct for this shape.
Tips for success
- Count, then enjoy. After Row 6 the rhythm is obvious: one extra dc between the six increases, every single row.
- Measure length at center back, not along a front edge. In this construction those lengths are the same, but center back is the easiest place to set the tape.
- Yarn management: With 11 skeins, join new skeins at a side edge when possible so the join hides in the edging later. Alternate skeins every couple of rows if your red dye lots differ.
- If the piece cups (bowl-shaped): your increases are too few or your stitches are too tall — add the missed increases on the next row, spaced evenly, then resume the pattern. If it ruffles hard, you increased more than 6 times; skip increases for one row and continue.
- Warmth vs. drape: Solid dc is warm, which is why it was chosen for an ankle cape. If you prefer a lighter fabric, you may work the same increase scheme in dc, ch 1, skip 1 mesh after Row 1 (treat each dc and each ch-1 as a stitch when increasing). Mesh uses less yarn and grows faster but is less warm and changes the stitch counts; only do this if you are comfortable adjusting.
Wear it over dresses, coats, or pajamas — it is a full-coverage circle of red.
Disclaimer: This pattern was generated by AI and should be reviewed for accuracy before use. While we strive for quality, AI-generated content may contain errors. Please verify measurements, stitch counts, charts, and instructions before beginning your project. Generated by purlJam.uk
Love this pattern?
Save this pattern to your free PurlJam libraryAccess your pattern anytime
Bookmark this page to access your pattern anytime