Type
Crochet
Difficulty
beginner
Category
amigurumi
AI Thinking Process
Planning
Verification
Pattern
Art the Clown Crochet Plush (Beginner)
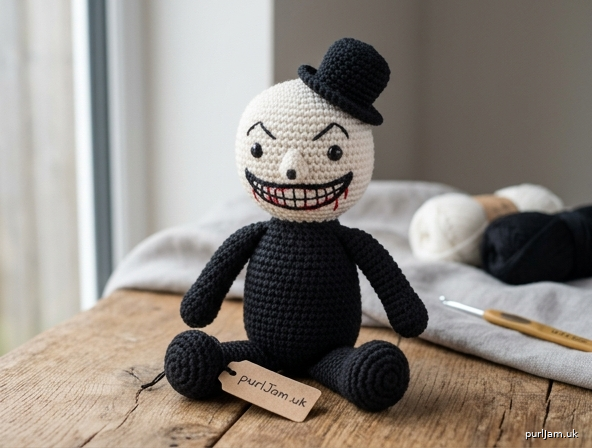
A simple amigurumi-style toy of Art the Clown made from basic spheres and cylinders. Pale head, black body and limbs, embroidered creepy grin. Finished size approximately 7–8 inches (18–20 cm) tall when made in worsted weight yarn.
Materials
- Worsted weight (4) yarn:
- White or off-white: ~40 yd (head)
- Black: ~80 yd (body, limbs, hat, face details)
- Small amount of red (optional mouth accent or “blood” drip embroidery)
- Crochet hook: US E-4 (3.5 mm) or US F-5 (3.75 mm) — use a hook 1–2 sizes smaller than yarn label for tight fabric
- Fiberfill stuffing
- Yarn needle
- Stitch marker
- Optional: 6–8 mm black safety eyes (or embroider eyes)
- Scissors
Gauge
5 sc and 5 rnds = 1 inch (2.5 cm) in continuous sc rounds. Exact gauge is not critical; work tightly so stuffing does not show.
Abbreviations (US terms)
- ch: chain
- sc: single crochet
- inc: 2 sc in same stitch
- dec: single crochet 2 stitches together (invisible decrease preferred)
- st(s): stitch(es)
- rnd(s): round(s)
- sl st: slip stitch
- MR: magic ring
- FO: fasten off
- [ ]: stitch count at end of round
Work in continuous rounds unless noted. Do not join. Mark the first stitch of each round.
Head (white)
Make 1.
Rnd 1: 6 sc in MR. [6] Rnd 2: inc in each st around. [12] Rnd 3: (sc, inc) around. [18] Rnd 4: (2 sc, inc) around. [24] Rnds 5–10: sc around. [24] (6 rounds) Rnd 11: (2 sc, dec) around. [18] Insert safety eyes (if using) between Rnds 6–7, about 5–6 sts apart. Begin stuffing firmly and continue stuffing as you close. Rnd 12: (sc, dec) around. [12] Rnd 13: dec around. [6] FO, leaving a long tail. Thread tail through remaining 6 sts and pull tight to close. Weave in end. (Head diameter ≈ 2.5 in / 6.5 cm)
Body (black)
Make 1.
Rnd 1: 6 sc in MR. [6] Rnd 2: inc in each st around. [12] Rnd 3: (sc, inc) around. [18] Rnd 4: (2 sc, inc) around. [24] Rnds 5–14: sc around. [24] (10 rounds) Stuff firmly as you go, keeping a cylindrical shape. Rnd 15: (2 sc, dec) around. [18] Rnd 16: (sc, dec) around. [12] Rnd 17: dec around. [6] FO, leave long tail for sewing. Close hole. (Body height ≈ 3 in / 7.5 cm)
Arms (black)
Make 2.
Rnd 1: 6 sc in MR. [6] Rnd 2: inc in each st around. [12] Rnds 3–12: sc around. [12] (10 rounds) Lightly stuff (do not overstuff so arms stay poseable). Flatten opening and sc across through both layers (6 sc) to close, or FO and sew closed. Leave long tail for sewing.
Legs (black)
Make 2.
Rnd 1: 6 sc in MR. [6] Rnd 2: inc in each st around. [12] Rnds 3–14: sc around. [12] (12 rounds) Stuff firmly, especially the bottom so they support the body. FO, leave long tail. Do not close top — sew open end to body.
Optional Top Hat (black)
Make 1.
Crown: Rnd 1: 6 sc in MR. [6] Rnd 2: inc around. [12] Rnd 3: (sc, inc) around. [18] Rnd 4: sc in back loops only around. [18] Rnds 5–7: sc around. [18] FO, leave tail. Lightly stuff crown.
Brim: Join black yarn to front loop of Rnd 4. Rnd 1: (2 sc, inc) around. [24] Rnd 2: (3 sc, inc) around. [30] Rnd 3: sc around. [30] FO, weave in ends. Sew crown to center of brim if worked separately; shape brim flat.
Face Embroidery (black yarn or embroidery floss)
Using yarn needle and black yarn:
- Eyes: If not using safety eyes, make two small vertical or slightly angled satin stitches or small French-knot/oval shapes between Rnds 6–7, spaced ~5–6 sts apart. Keep them dark and simple.
- Brows (optional): Short straight stitches angled above eyes for a menacing look.
- Nose: Tiny vertical stitch or small triangle in center.
- Mouth: Wide curved grin across lower face (approx. Rnds 8–10). Use backstitch or chain stitch for a long smile. Optional: a few short vertical stitches along the smile for teeth suggestion, or a thin red line inside the grin.
- Optional drip: Small red vertical stitch(es) from corner of mouth.
Keep embroidery tight and knotted securely on the inside/back so it cannot be pulled loose.
Assembly
- Pin head centered on top of body. Sew securely with black or white yarn, stitching all the way around.
- Pin legs to bottom of body, slightly apart and angled forward a little for stability. Sew firmly through both layers.
- Pin arms to sides of body at approx. Rnds 5–6 from the top of the body. Sew securely. Arms hang straight or can be posed slightly forward.
- If using hat, sew or tack lightly to top of head (slightly tilted for character).
- Weave in all remaining ends. Shape the plush with your hands so the head is round and body/limbs are even.
Finishing Notes
- Work all pieces tightly so the white head stays smooth and black fabric does not gap.
- Stuff head and body firmly; limbs medium-firm.
- For a keychain version, scale down by stopping head increases at 18 sts and shortening body/limb rounds, and add a jump ring to the hat or head.
- Spot clean only; do not machine wash if safety eyes or heavy embroidery are used.
Enjoy your beginner Art the Clown plush! Perfect for horror fans who like cute-creepy desk toys.
Disclaimer: This pattern was generated by AI and should be reviewed for accuracy before use. While we strive for quality, AI-generated content may contain errors. Please verify measurements, stitch counts, charts, and instructions before beginning your project. Generated by purlJam.uk
Love this pattern?
Save this pattern to your free PurlJam libraryAccess your pattern anytime
Bookmark this page to access your pattern anytime