Type
Knitting
Difficulty
intermediate
Category
custom
AI Thinking Process
Planning
Verification
Pattern
Ashford Ivy Cap
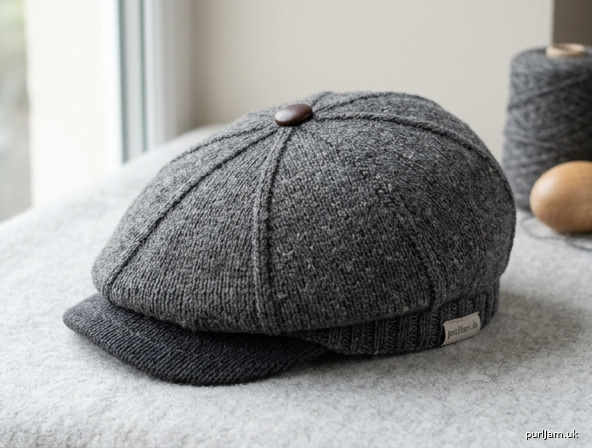
A classic eight-panel men’s ivy cap (flat cap) in DK wool. The crown is worked in the round from a snug 2×2 rib band, with purl lines marking traditional panels and a shallow decrease to a buttoned centre. A modest peak is knitted flat in two layers, stiffened, and sewn to the front of the band so the crown sits slightly over it — the hallmark ivy silhouette.
Skill level: Intermediate (working in the round, panel decreases, seaming a structured peak).
Sizes
S (M, L)
To fit head circumference: 56 (58, 60) cm [22 (22¾, 23½) in]
Finished measurements:
- Rib band: designed to sit with 0–2 cm negative ease
- Crown height (cast-on to crown, unstretched): approx 10.5 (11.5, 12) cm [4¼ (4½, 4¾) in]
- Peak width at join: approx 13.5 (14.5, 15.5) cm [5¼ (5¾, 6) in]
- Peak depth: approx 5 (5.5, 5.5) cm [2 (2¼, 2¼) in]
Shown as a fitted men’s cap. Choose the size closest to actual head circumference. If between sizes, choose the smaller for a closer ivy fit.
Materials
Yarn: DK (double knitting) wool, approx 180 (200, 220) m / 90 (100, 110) g. A springy wool or wool tweed holds the shape well (e.g. a British-breed DK such as Bluefaced Leicester, Romney, or a traditional tweed).
Needles:
- 3.25 mm circular needle, 40 cm, or double-pointed needles (band)
- 4 mm circular needle, 40 cm, or double-pointed needles (crown)
- 4 mm straight needles, or the circular needle used flat (peak)
Change to double-pointed needles or the magic-loop method when the crown becomes too small for the circular needle.
Notions:
- 8 stitch markers (one distinctive for beginning of round)
- Tapestry needle
- Sewing needle and matching thread
- 1 button, 15–20 mm, for the crown centre (optional but traditional)
- Peak stiffener: plastic canvas, millinery buckram, or firm recycled plastic, about 16 × 7 cm
- Optional: millinery wire for the peak rim
Tension (gauge)
22 sts and 30 rounds/rows = 10 cm over stocking stitch on 4 mm needles, after blocking.
Check tension on a 12 cm swatch in the round if possible. Change needle size to obtain the correct tension — fit depends on it.
Abbreviations
beg beginning
cm centimetre(s)
cont continue
dec decrease / decreasing
foll following
inc increase / increasing
k knit
k2tog knit 2 stitches together (1 st decreased)
m metre(s)
m1 make 1: lift the strand between stitches from front to back and knit into the back of it (1 st increased)
mm millimetre(s)
p purl
patt pattern
pm place marker
rem remain(ing)
rep repeat
rnd(s) round(s)
RS right side
sm slip marker
ssk slip 1 knitwise, slip 1 knitwise, insert left needle into the front of both slipped stitches and knit them together through the back loop (1 st decreased)
st(s) stitch(es)
st st stocking stitch (in the round: knit every round; flat: knit RS rows, purl WS rows)
WS wrong side
Pattern notes
- The beginning of the round is centre back. The peak is centred on the opposite side (centre front).
- Eight purl stitches form the panel lines. Keep them stacked on every round.
- The crown is deliberately shallow. Do not add extra length before decreasing or the cap will read as a beanie.
- The peak is attached only to the band, not to the crown. The front of the crown should sit slightly over the peak when worn.
- A stretchy cast-on (long-tail or tubular) is recommended for the rib band.
- Join to work in the round carefully, without twisting.
Cap
Band
Using 3.25 mm needles, cast on 120 (128, 136) sts. Join to work in the round, taking care not to twist, and pm for beg of rnd (centre back).
Rib rnd: *K2, p2; rep from * to end.
Cont in 2×2 rib until band measures 3 cm from the cast-on edge (about 10–12 rnds).
Crown body
Change to 4 mm needles.
Increase rnd: *K15 (16, 17), m1; rep from * to end.
128 (136, 144) sts (8 increases → 120 + 8 = 128; 128 + 8 = 136; 136 + 8 = 144 ✓).
Set-up rnd (establish 8 panels): *K15 (16, 17), p1, pm; rep from * to end, using the beg-of-rnd marker as the 8th marker.
Each panel is 16 (17, 18) sts — 8 × 16 (17, 18) = 128 (136, 144) ✓.
Panel patt: *K15 (16, 17), p1; rep from * to end.
Work even in panel patt until the piece measures 5.5 (6, 6.5) cm from the cast-on edge, including the band.
Crown shaping
Keep the purl panel line as the last stitch of every panel.
Dec rnd: *K to 2 sts before the purl st, k2tog, p1; rep from * to end.
8 sts decreased.
Work this dec rnd every round until 24 sts rem.
13 (14, 15) dec rnds: 128 − (13 × 8) = 24; 136 − (14 × 8) = 24; 144 − (15 × 8) = 24 ✓.
Each panel is now k2, p1.
Next rnd: *K2tog, p1; rep from * to end. 16 sts (8 decreases → 24 − 8 = 16 ✓).
Next rnd: *K2tog; rep from * to end. 8 sts (8 decreases → 16 − 8 = 8 ✓).
Break yarn, leaving a 20 cm tail. Thread through the remaining 8 sts, pull tight, and fasten off on the WS. The gathered centre will be covered by the button.
Peak (make 2)
Worked flat in stocking stitch. Make two identical pieces (upper and lining).
Using 4 mm needles, cast on 30 (32, 34) sts.
Row 1 (WS): Purl.
Row 2 (RS): K1, ssk, k to last 3 sts, k2tog, k1. 2 sts decreased.
Row 3: Purl.
Rep Rows 2–3 until 16 (16, 18) sts rem, ending with a WS purl row.
7 (8, 8) decrease rows: 30 − (7 × 2) = 16; 32 − (8 × 2) = 16; 34 − (8 × 2) = 18 ✓.
Cast off knitwise on the next RS row.
Each piece should measure approx 13.5 (14.5, 15.5) cm wide at the cast-on edge and 5 (5.5, 5.5) cm deep. Adjust blocking if needed.
Finishing
Block. Wet-block the crown over a plate, bowl, or hat block so the top is a shallow dome, not a point. Do not stretch the rib band. Block the two peak pieces flat.
Join the peak. Place the two peak pieces right sides together. Backstitch the two shaped side edges and the cast-off (outer) edge, taking a 5 mm seam. Leave the long cast-on edge open. Turn right side out and smooth the seam.
Stiffener. Using one knitted piece as a template, cut the stiffener about 5 mm smaller on all sides so it sits inside the seam line. Slide it into the peak. (Optional: stitch millinery wire along the inside of the outer rim before closing, for a crisper edge.)
If the open edge gapes, tack it closed with a few stitches, leaving it free enough to sew onto the band.
Attach the peak. Try the cap on and mark centre front (opposite the beg-of-rnd / centre-back marker). Pin the cast-on edge of the peak to the outside of the rib band, centred on the front. The peak width uses the central 30 (32, 34) sts of the front — roughly a quarter of the circumference.
Sew firmly with matching thread and small backstitches, working through the band only. Do not sew the peak to the crown body: the front of the crown should rest slightly over the top of the peak.
Button. Sew the button over the gathered stitches at the crown centre, catching the WS securely so the top sits flat.
Weave in all remaining ends. Steam the peak lightly if needed, avoiding a hot iron directly on the stiffener.
Wear and fit notes
The band should feel snug but not tight. The crown is meant to be low, with a little ease so it can sit forward over the peak. If the crown feels too tall, it has been worked past the stated 5.5 (6, 6.5) cm before decreasing — that length is important.
To store, push the crown gently into a shallow dome and lay the cap on its peak, or rest it over a small bowl so the shape holds.
Disclaimer: This pattern was generated by AI and should be reviewed for accuracy before use. While we strive for quality, AI-generated content may contain errors. Please verify measurements, stitch counts, charts, and instructions before beginning your project. Generated by purlJam.uk
Love this pattern?
Save this pattern to your free PurlJam libraryAccess your pattern anytime
Bookmark this page to access your pattern anytime