Type
Knitting
Difficulty
beginner
Category
cardigan
AI Thinking Process
Planning
Verification
Pattern
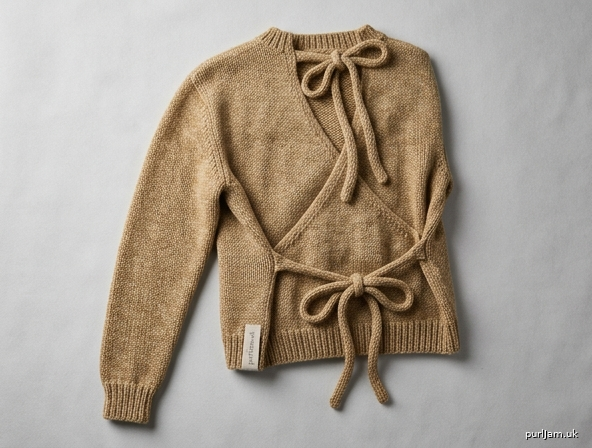
Back-Tie Wraparound Cardigan
A cozy, beginner-friendly worsted-weight cardigan with a twist: instead of buttoning up the front, this design wraps around the body and ties together at the center back for a modern, sculptural silhouette. Worked flat in four main pieces and seamed — no buttonholes required!
MATERIALS
- Worsted weight yarn (Medium, #4), approximately 1400 (1550, 1700, 1900, 2100) yards
- US 7 (4.5 mm) straight or circular needles (for main pieces)
- US 5 (3.75 mm) straight or circular needles (for ribbing and bands)
- Tapestry needle for seaming
- Stitch holders or waste yarn (4–6)
- Stitch markers
- Measuring tape
GAUGE
20 sts and 26 rows = 4" (10 cm) in Stockinette Stitch on US 7 (4.5 mm) needles, after blocking. Always swap needle sizes as needed to match gauge — accuracy here ensures the wrap panels meet correctly at the back.
SIZES
XS (S, M, L, XL)
Finished to fit body chest: 34 (38, 42, 46, 50)" Finished garment bust circumference (front + back main panels, before wrap overlap): 36 (40, 44, 48, 52)" Instructions are given for the smallest size, with larger sizes in parentheses. Where only one number is given, it applies to all sizes.
ABBREVIATIONS
- CO – cast on
- BO – bind off
- k – knit
- p – purl
- st(s) – stitch(es)
- RS / WS – right side / wrong side
- rep – repeat
- rem – remaining
- dec – decrease
- inc – increase
- k2tog – knit 2 together (right-leaning decrease)
- ssk – slip, slip, knit (left-leaning decrease)
- St st – stockinette stitch
- patt – pattern
- approx – approximately
NOTES
Construction overview (please read before starting): This cardigan flips the usual cardigan logic. Instead of two front pieces meeting at center front with buttons, this pattern has:
- One solid FRONT panel (like a traditional sweater back) that covers the chest, with a simple, shallow back-style neckline.
- Two long WRAP PANELS (worked in the BACK section) that cover the back of the body, extend around the sides, and continue with extra width so they cross and overlap at center back, where they are tied together with knitted I-cord ties.
Each wrap panel has armhole shaping on only ONE edge (the side-seam/armhole edge); the opposite edge (the "wrap edge") is shaped dramatically near the shoulder to taper down to the shoulder width, similar to a standard cardigan front neck shaping, just larger — this creates the diagonal wrap edge that crosses at the back.
Positive ease of approx. 2" is built into the finished bust measurement for a relaxed fit. To wear: put arms through sleeves, then cross the two wrap panels behind your back and tie the ties in front of each other or at the side, whichever is comfortable.
BACK (Wrap Panels – make 2, worked as mirror images)
CO 65 (70, 75, 80, 85) sts using US 5 (3.75 mm) needles.
Ribbing: Work k1, p1 rib for 1.5", ending with a WS row.
Change to US 7 (4.5 mm) needles. Work in St st until piece measures 14 (14.5, 14.5, 15, 15)" from cast-on, ending with a WS row.
Shape armhole edge (side seam edge only):
- BO 4 (4, 5, 5, 6) sts once at beg of next RS row, at armhole edge.
- Dec 1 st at armhole edge every RS row 4 (4, 5, 5, 6) times.
- Sts remaining: 57 (62, 65, 70, 74) sts.
Work even until armhole measures 8 (8, 8.5, 8.5, 9)", ending with a WS row.
Shape wrap edge & shoulder (opposite edge from armhole):
- BO 27 (30, 31, 34, 36) sts once at wrap edge.
- Dec 1 st at wrap edge every RS row 8 times.
- Sts remaining (shoulder): 22 (24, 26, 28, 30) sts.
BO all remaining shoulder sts.
Work second wrap panel identically, but reverse all shaping (mirror image), so you have a Left Wrap Panel and a Right Wrap Panel.
FRONTS (Single Solid Front Panel – make 1)
CO 90 (100, 110, 120, 130) sts using US 5 (3.75 mm) needles.
Ribbing: Work k1, p1 rib for 1.5", ending with a WS row.
Change to US 7 (4.5 mm) needles. Work in St st until piece measures 14 (14.5, 14.5, 15, 15)" from cast-on, ending with a WS row (should match wrap panel length).
Shape armholes (both edges):
- BO 4 (4, 5, 5, 6) sts at beg of next 2 rows.
- Dec 1 st each end every RS row 4 (4, 5, 5, 6) times.
- Sts remaining: 74 (84, 90, 100, 108) sts.
Work even until armhole measures 8 (8, 8.5, 8.5, 9)", ending with a WS row (should match wrap panel armhole depth).
Shape neck & shoulders:
- BO center 24 (30, 32, 38, 42) sts. Place remaining sts on 2 holders and work each side separately.
- At each neck edge, dec 1 st every RS row 3 times.
- Sts remaining per shoulder: 22 (24, 26, 28, 30) sts — matches wrap panel shoulder count ✓.
BO remaining shoulder sts on each side.
SLEEVES (make 2)
CO 32 (34, 36, 38, 40) sts using US 5 (3.75 mm) needles.
Cuff: Work k1, p1 rib for 3", ending with a WS row.
Change to US 7 (4.5 mm) needles. Work in St st, and at the same time inc 1 st each end every 6th row, 14 (15, 16, 17, 18) times.
- Sts after all increases: 60 (64, 68, 72, 76) sts.
Work even until sleeve measures 17 (17, 17.5, 17.5, 18)" from cast-on, ending with a WS row.
Shape cap:
- BO 4 (4, 5, 5, 6) sts at beg of next 2 rows.
- Sts remaining: 52 (56, 58, 62, 64) sts.
- Dec 1 st each end every RS row 15 times.
- Sts remaining: 22 (26, 28, 32, 34) sts.
BO all remaining sts.
BUTTON_BANDS (Adapted: Back Wrap Edging & Ties)
This pattern has no front button bands. Instead, the wrap edges of the back panels are finished with a simple edging and knitted I-cord ties.
Wrap Edging (worked on each wrap panel): With US 5 (3.75 mm) needle and RS facing, pick up and knit approximately 3 sts for every 4 rows along the entire wrap edge (from hem corner to shoulder/neck corner). Work garter stitch (knit every row) for 1", ending after a WS row. BO all sts knitwise.
I-Cord Ties (make 4 total — 2 per wrap panel): CO 3 sts. Do not turn. Slide sts to opposite end of needle, k3, pulling yarn snugly across the back. Rep from * until cord measures 28". BO.
Attach one tie securely to the lower hem corner of each wrap panel, and one tie to the upper neck corner of each wrap panel (4 ties total), using tapestry needle and matching yarn.
FINISHING
- Weave in ends loosely first, then block all pieces to measurements before seaming.
- Shoulder seams: Sew each wrap panel's shoulder sts to the corresponding front panel shoulder sts (22/24/26/28/30 sts each), using mattress stitch.
- Side seams: Sew the front panel's side edges to the wrap panels' armhole-side edges, from hem up to the start of armhole shaping.
- Set in sleeves: Matching sleeve cap to the combined armhole opening (front panel armhole edge + wrap panel armhole edge), pin and sew sleeves into armholes.
- Sleeve seams: Sew sleeve seams from cuff to underarm.
- Neckband: With US 5 (3.75 mm) needle and RS facing, pick up sts evenly around the front panel's neck bind-off and the upper edges of the wrap panels near the shoulders (approx. 3 sts for every 4 rows/sts). Work k1, p1 rib for 1", BO in rib.
- Wrap edges & ties should already be finished per BUTTON_BANDS section above — check that all 4 ties are securely attached.
- Wearing the sweater: Put arms through sleeves, then bring the two wrap (back) panels around your sides to the center back, crossing them over one another, and tie the neck-corner ties together, then the hem-corner ties together, adjusting overlap for desired fit.
- Weave in any remaining ends and give the finished garment a final light steam block.
Customization tips: Shorten or lengthen the ties as desired; add 1–2" to the wrap panel overlap for a more dramatic cross-back look; work sleeves in 3/4 length by ending 4–5" earlier and adjusting cuff ribbing length to taste.
Disclaimer: This pattern was generated by AI and should be reviewed for accuracy before use. While we strive for quality, AI-generated content may contain errors. Please verify measurements, stitch counts, and instructions before beginning your project. Generated by purlJam.uk
Love this pattern?
Save this pattern to your free PurlJam libraryAccess your pattern anytime
Bookmark this page to access your pattern anytime