Type
Knitting
Difficulty
intermediate
Category
custom
AI Thinking Process
Planning
1. **Design Strategy**: A bandana-style knit accessory worked flat in a triangular shape, featuring a simple knit/purl stitch pattern (likely seed stitch or a basic textured pattern) suitable for an easy difficulty level. The bandana will be worked top-down from the neck edge, increasing to a point at the bottom.
2. **Construction Plan**: Worked flat from the top edge down to a center point, with simple garter or seed stitch borders and a knit/purl body pattern, using symmetrical increases on each right-side row.
3. **Quality Assurance**:
- Increase placement must be consistent and symmetrical to maintain the triangular shape.
- The knit/purl pattern must align correctly as stitch count grows with each increase row.
- Bind-off must be stretchy enough for comfortable neck wear.
4. **Final Calculations**:
- Gauge: 18 sts × 24 rows = 4 inches (10 cm) in stockinette on US 8 / 5 mm needles (worsted weight).
- Top edge cast-on: 3 sts, increasing by 2 sts every RS row.
- Finished top edge (neck tie area): approx. 22 inches (56 cm) total with ties.
- Finished triangle body: approx. 14 inches (35.5 cm) wide × 10 inches (25.5 cm) deep.
- To reach ~63 sts (14 inches at gauge) at widest point: 30 increase rows from 3 cast-on sts → 3 + (30×2) = 63 sts. ✓
- Tie length: cast on 40 sts each side tie + 3 center = 83 sts total cast-on, OR work ties as attached i-cord / knitted strip. For simplicity: cast on 83 sts total (40 + 3 + 40), work a few rows flat, then decrease to center triangle. Revised approach: cast on 83 sts, work tie rows, then shape triangle with center panel only — this is cleaner for easy level.
- Revised: Cast on 83 sts. Ties = first and last 40 sts; center 3 sts begin triangle. Each RS row: work 40 tie sts, increase section grows by 2 sts (kfb or M1 each side of center). After 30 RS rows: center section = 3 + 60 = 63 sts ≈ 14 inches. Total rows ≈ 60 rows ≈ 10 inches deep. ✓
Verification
[PRE-FLIGHT CHECKS]
1. **Completeness**: ✅ All required sections present — title, description, materials, gauge, sizes, abbreviations, pattern notes, step-by-step instructions, finishing.
2. **Consistency**:
- Cast-on: 83 sts (40 tie + 3 center + 40 tie) ✅
- After 30 RS increase rows: center section = 3 + (30 × 2) = 63 sts ✅
- Width at gauge: 63 ÷ 18 × 4 = 14 inches ✅
- Depth: 30 RS rows = 60 total rows; 60 ÷ 24 × 4 = 10 inches ✅
- Tie length: 40 sts ÷ 18 × 4 = approx. 8.9 inches each tie; total bandana width with ties = ~8.9 + 14 + 8.9 = ~31.8 inches ✅ (suitable for tying behind head)
3. **Constraints**: ✅ Worsted weight, easy difficulty, knit/purl pattern incorporated, US terminology, imperial measurements primary.
4. **Safety**: ✅ Stitch pattern (seed stitch on center triangle) works on odd stitch counts as center grows — confirmed: center section starts at 3 sts (odd) and grows by 2 each RS row, so center is always odd — seed stitch maintains correctly. Tie sts worked in garter stitch (simple, easy level). No errors detected.
Pattern
---
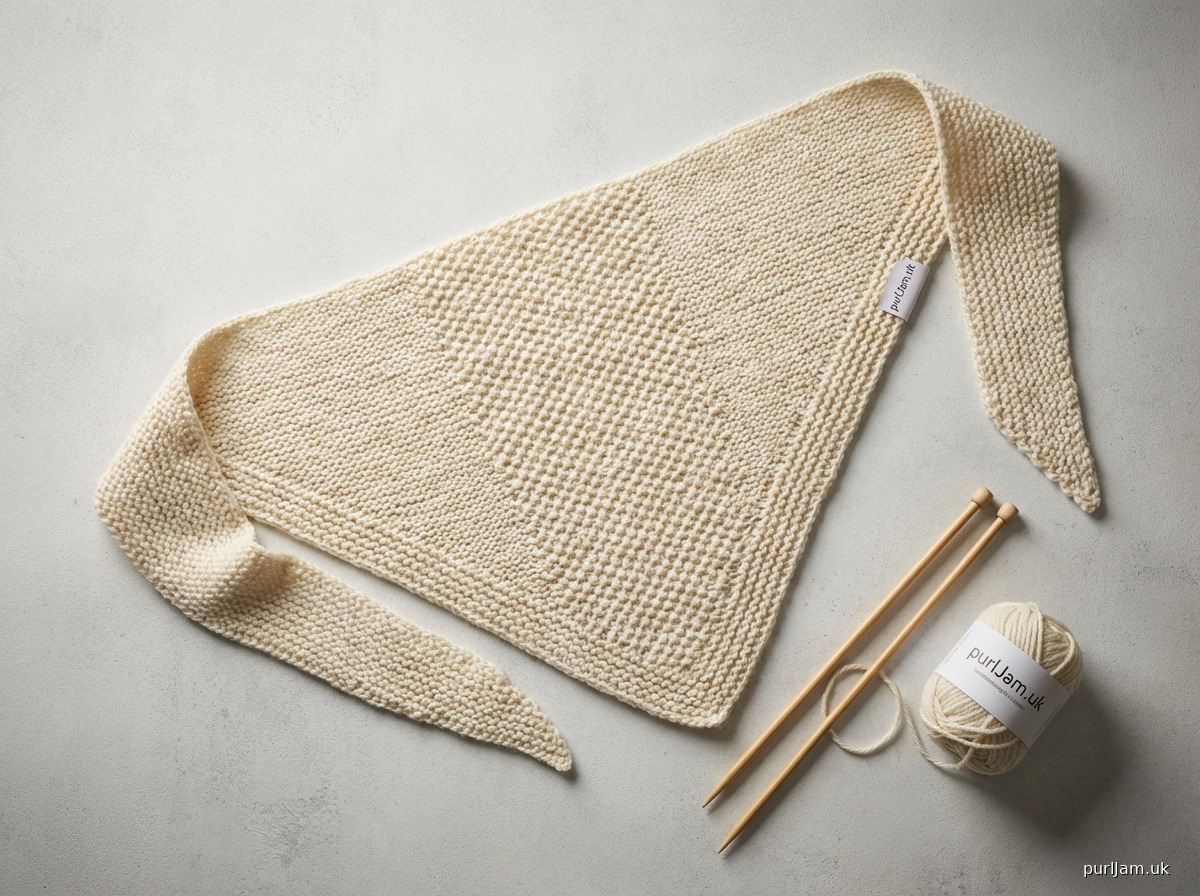
# Bandana Knit & Purl — A Knitted Triangle Bandana
**A simple, stylish bandana worked flat in one piece, featuring a seed stitch center triangle and garter stitch ties. Perfect for beginners looking to practice knit and purl combinations. Ties behind the neck for a classic bandana look.**
---
## Materials
| Item | Details |
|---|---|
| **Yarn** | Worsted weight; approx. 120–150 yards (110–137 m) |
| **Yarn Sample** | Lion Brand Yarn Pound of Love (100% acrylic, 1 lb / 897 yds) or similar worsted weight |
| **Needles** | US 8 / 5 mm straight or circular needles, at least 24 inches (60 cm) long |
| **Notions** | Tapestry needle for weaving in ends, scissors |
| **Optional** | Stitch markers (2) |
> **Yarn Notes:** This pattern uses approximately 120–150 yards of worsted weight yarn. Almost any worsted or aran-weight yarn will work. Choose a yarn with good stitch definition to show off the seed stitch texture.
---
## Gauge
**18 sts × 24 rows = 4 inches (10 cm)** in stockinette stitch on US 8 / 5 mm needles (or size needed to obtain gauge).
> **Note:** Gauge is not critical for this accessory, but it will affect finished size. A looser gauge will produce a larger bandana; a tighter gauge will produce a smaller one.
---
## Finished Measurements
- **Total Width (including ties):** approx. 32 inches (81 cm) laid flat
- **Tie Length:** approx. 9 inches (23 cm) each
- **Triangle Width at widest point:** approx. 14 inches (35.5 cm)
- **Triangle Depth (center point):** approx. 10 inches (25.5 cm)
> **Sizing Note:** This bandana is designed as a one-size-fits-most adult accessory. To make it larger, cast on more sts for the ties (adding sts in multiples of 1 to each tie) and work additional increase rows. To make it smaller, reduce tie sts and work fewer increase rows.
---
## Abbreviations
| Abbreviation | Meaning |
|---|---|
| **k** | knit |
| **p** | purl |
| **k2tog** | knit 2 stitches together (right-leaning decrease) |
| **ssk** | slip, slip, knit (left-leaning decrease) |
| **kfb** | knit into front and back of stitch (increase — makes 1 extra st) |
| **RS** | right side |
| **WS** | wrong side |
| **st(s)** | stitch(es) |
| **rep** | repeat |
| **pm** | place marker |
| **sm** | slip marker |
| **BO** | bind off |
| **CO** | cast on |
---
## Pattern Notes
1. **Construction:** The bandana is worked flat (back and forth in rows) as a single piece. You cast on all 83 stitches at once — this includes the two tie sections and the starting center stitches. The ties are worked straight throughout in garter stitch, while the center triangle section grows wider with every right-side row.
2. **Right Side vs. Wrong Side:** Row 1 is the Right Side (RS). The public-facing side of the bandana features seed stitch texture on the triangle. Garter stitch (knit every row) looks the same on both sides, so the ties will look neat from all angles.
3. **Seed Stitch:** Seed stitch is worked by alternating knit and purl stitches across the row, and then on the next row, knitting the purl stitches and purling the knit stitches (i.e., the stitches are always "mismatched" — you always work the opposite stitch from what you see). This creates a bumpy, textured fabric.
4. **Stitch Markers:** Placing stitch markers between the tie sections and the center triangle is strongly recommended. The markers travel with your work and help you remember where to place increases.
5. **Increases:** Two increases are worked on every RS row — one on each side of the center triangle section, just inside the markers. This adds 2 stitches per RS row (1 stitch each side), growing the triangle evenly.
6. **Center Stitch Count:** The center triangle begins with 3 stitches and gains 2 stitches every RS row. After 30 RS rows (60 total rows), the center section reaches 63 stitches. *(Math check: 3 + [30 × 2] = 63 sts ✓)*
7. **Seed Stitch on Growing Stitches:** Because the center section always has an odd stitch count (3, 5, 7, 9 … 63), seed stitch is simple to maintain: every row begins and ends with k1, and stitches alternate k1, p1 across. New stitches added by the increases are incorporated into the seed stitch pattern naturally on the following row.
---
## Instructions
### Setup: Cast On
Using the long-tail cast-on method (or your preferred method), **CO 83 sts**.
**Stitch breakdown at cast-on:**
- Sts 1–40: Left tie
- Sts 41–43: Center triangle (3 sts)
- Sts 44–83: Right tie
> **Tip:** Place a stitch marker after stitch 40 and after stitch 43 as you cast on (or add them on Row 1). This gives you clear boundaries between the tie sections and the center triangle.
---
### Section 1: Establish Pattern (Rows 1–2)
**Row 1 (RS — Establish Pattern):**
K40, pm, (k1, p1, k1), pm, k40.
*(83 sts total; center section: 3 sts)*
**Row 2 (WS):**
K40, sm, (p1, k1, p1), sm, k40.
*(83 sts total; center section: 3 sts)*
> **Notes on Row 2:** The ties are worked in garter stitch (knit every row), so you knit the 40 tie stitches on both RS and WS rows. In the center section, you work the opposite of what you see to maintain seed stitch: the RS showed k1, p1, k1, so the WS shows p1, k1, p1.
---
### Section 2: Increase Rows (Rows 3–62)
You will now work 30 RS increase rows and 30 WS plain rows (60 rows total).
**On every RS row:** Work ties in garter, increase 1 st at each side of the center section (inside the markers), and continue seed stitch across center.
**On every WS row:** Work ties in garter, continue seed stitch across center (no increases).
---
**RS Increase Row (worked on Rows 3, 5, 7, 9 … 61 — all odd-numbered rows):**
K40, sm, **kfb**, work in seed stitch to 1 st before marker, **kfb**, sm, k40.
*(Center section increases by 2 sts on each RS row)*
> **How to maintain seed stitch after increases:** The kfb creates 2 stitches from 1. Treat both new stitches as part of the seed stitch pattern on the following WS row. Since the center section always remains an odd number of stitches, seed stitch always starts and ends with a knit stitch from the RS.
---
**WS Plain Row (worked on Rows 4, 6, 8, 10 … 62 — all even-numbered rows):**
K40, sm, work in seed stitch across center sts to next marker, sm, k40.
*(No increases; stitch count stays the same as previous row)*
> **Seed stitch reminder on WS rows:** Look at each stitch as you come to it. If it looks like a knit stitch (V shape), purl it. If it looks like a purl stitch (bump), knit it. The ties are simply knitted.
---
### Stitch Count Progress (for reference)
| After RS Row # | Center Sts | Total Sts |
|---|---|---|
| Row 1 (setup) | 3 | 83 |
| Row 3 (1st increase RS) | 5 | 85 |
| Row 5 | 7 | 87 |
| Row 11 | 13 | 93 |
| Row 21 | 23 | 103 |
| Row 31 | 33 | 113 |
| Row 41 | 43 | 123 |
| Row 51 | 53 | 133 |
| Row 61 (30th increase RS) | 63 | 143 |
*(Math check after all increases: 3 + [30 × 2] = 63 center sts; 83 + [30 × 2] = 143 total sts ✓)*
---
### Section 3: Work Even (Optional, Rows 63–64)
*This section is optional.* If you would like a slightly deeper triangle, work 2 additional rows without increases:
**Row 63 (RS):** K40, sm, work in seed stitch across center sts, sm, k40.
**Row 64 (WS):** K40, sm, work in seed stitch across center sts, sm, k40.
*(Stitch count remains 143 sts)*
---
### Section 4: Bind Off
After completing Row 62 (or Row 64 if you worked the optional rows), you are ready to bind off.
**Bind Off Row (RS):**
Using a **stretchy bind-off** method, bind off all 143 stitches in pattern as follows:
- Bind off the 40 tie stitches **knitwise** (k1, *k1, insert left needle tip into 2 front sts, k2tog-tbl; rep from * until all tie sts are bound off).
- Bind off the center triangle stitches **in seed stitch pattern** (knit the knit sts and purl the purl sts as you bind off).
- Bind off the remaining 40 tie stitches **knitwise**.
> **Stretchy Bind-Off Tip:** For a neat, elastic edge, try the "knit 2, slip back, knit together" method: *K2, slip both sts back to left needle, k2tog-tbl; rep from * to end. This creates a stretchy, tidy edge.
---
## Finishing
1. **Weave in ends:** Thread the cast-on and bind-off tails onto a tapestry needle and weave them into the wrong side of the work for at least 1 inch (2.5 cm) in two different directions to secure. Trim excess yarn.
2. **Block (optional but recommended):** Wet blocking will open up the seed stitch texture and even out any irregularities. Soak the bandana in cool water for 15–20 minutes, gently squeeze out excess water (do not wring), lay flat on a blocking mat or clean towel, and shape to measurements. Allow to dry completely.
3. **Wear:** Fold the bandana in half diagonally if desired (the triangle shape naturally creates the classic bandana fold), place the straight edge along the back of your neck, and tie the two ends at the back or side of your neck.
---
## Schematic
```
[Left Tie]———[Left Edge of Triangle]
~9 in \
(23 cm) \
\ ~10 in deep
\ (25.5 cm)
\
[Point at bottom]
Total width laid flat: ~32 in (81 cm)
Triangle base: ~14 in (35.5 cm)
```
---
## Quick Reference
| Section | Rows | Action |
|---|---|---|
| Setup | CO 83 sts | Cast on and place markers |
| Establish Pattern | Rows 1–2 | Set up garter ties + seed stitch center |
| Increase Section | Rows 3–62 | kfb each side of center on every RS row |
| Optional Extra Rows | Rows 63–64 | Work even, no increases |
| Bind Off | Row 63 or 65 | Stretchy BO in pattern |
---
## Pattern Tips for Success
> 💡 **New to seed stitch?** Just remember: *if it looks like a knit, purl it. If it looks like a purl, knit it.* On the right side, the first stitch is always a knit, and stitches alternate across. You cannot go wrong as long as you follow what you see.
> 💡 **Losing track of rows?** Use a row counter or place a small piece of contrast yarn in the work every 10 rows to make counting easier.
> 💡 **Markers shifting?** If your markers slip out, you can use a small piece of scrap yarn tied in a loose loop as a locking stitch marker alternative.
> 💡 **Tension inconsistency?** If your ties look loopy or loose compared to the center seed stitch section, try holding the yarn a little more firmly or going down a half needle size. Both fabrics should feel similar in density.
---
*Pattern designed for personal use. Feel free to share your finished bandana with the knitting community!*
Disclaimer: This pattern was generated by AI and should be reviewed for accuracy before use. While we strive for quality, AI-generated content may contain errors. Please verify measurements, stitch counts, and instructions before beginning your project. Generated by purlJam.uk
Access your pattern anytime
Bookmark this page to access your pattern anytime