Type
Crochet
Difficulty
intermediate
Category
custom
AI Thinking Process
Planning
Verification
Pattern
Barre Warm-Up Hip Wrap
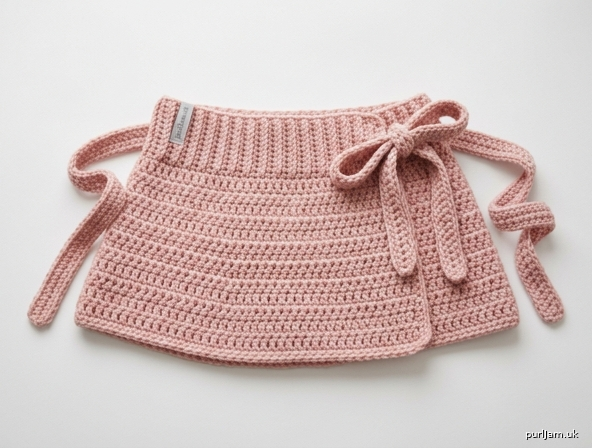
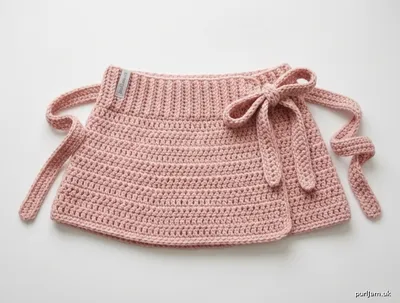
A wrap-around hip warmer for ballet studio warm-up. Chunky yarn works up quickly into a cozy layer that sits at the natural waist or high hip and covers the seat to the upper thigh. A stretchy ribbed waistband, gentle A-line flare, long ties, and a crab-stitch hem keep it looking polished over a leotard and tights.
Skill level: Intermediate
Materials
Yarn: Chunky / bulky weight (category 5), approx. 400 (475, 550, 650) yd / 365 (435, 505, 595) m. Wool or wool-blend recommended for warmth and recovery; a soft acrylic is fine if you prefer easy care. Sample look: matte ballet pink, charcoal, black, or ivory.
Hook: US L/11 (8 mm), or size needed to obtain gauge. A larger hook gives a softer, drapier wrap; a smaller hook gives a denser, warmer fabric.
Notions:
- Tapestry needle
- 9 stitch markers (for dividing the pickup edge)
- 2 additional stitch markers (optional, for increase edges)
- Scissors
- Measuring tape
Gauge
10 hdc and 8 rows = 4" × 4" (10 × 10 cm) in half double crochet, using US L/11 (8 mm) hook.
Work a 6" (15 cm) swatch, then measure the center 4" (10 cm). Change hook size until you match this gauge—fit depends on it.
Waistband check: 8 sc should measure about 3" (7.5 cm) wide. If your 8 sc are much narrower or wider, adjust the starting chain so the strip is 3" (7.5 cm) across.
Sizes
S (M, L, XL)
Instructions are written for S, with M, L, and XL in parentheses. When only one number is given, it applies to all sizes.
To fit waist: 26–28 (30–32, 34–36, 38–40)" / 66–71 (76–81.5, 86.5–101.5) cm
Choose the size whose waist range includes where you will wear the wrap (natural waist or high hip). The finished waistband is about 8" (20.5 cm) longer than the top of that range so the wrap overlaps and ties at the side.
Finished measurements
| S | M | L | XL | |
|---|---|---|---|---|
| Waistband length (wrap, unstretched) | 36" (91.5 cm) | 40" (101.5 cm) | 44" (112 cm) | 48" (122 cm) |
| Waistband height | 3" (7.5 cm) | 3" (7.5 cm) | 3" (7.5 cm) | 3" (7.5 cm) |
| Body length below waistband | 11" (28 cm) | 11" (28 cm) | 11" (28 cm) | 11" (28 cm) |
| Total length (waist to hem) | 14" (35.5 cm) | 14" (35.5 cm) | 14" (35.5 cm) | 14" (35.5 cm) |
| Hem width | 44" (112 cm) | 48" (122 cm) | 52" (132 cm) | 56" (142 cm) |
| Tie length (each) | 22" (56 cm) | 24" (61 cm) | 26" (66 cm) | 28" (71 cm) |
| Tie width | 1½" (4 cm) | 1½" (4 cm) | 1½" (4 cm) | 1½" (4 cm) |
Abbreviations (US)
- BLO — back loop only
- ch — chain
- hdc — half double crochet
- hdc2tog — half double crochet 2 together (yarn over, insert hook in next st, yarn over, pull up a loop, yarn over, insert hook in following st, yarn over, pull up a loop, yarn over, pull through all 5 loops)
- rep — repeat
- RS — right side
- sc — single crochet
- sc2tog — single crochet 2 together
- sl st — slip stitch
- st(s) — stitch(es)
- WS — wrong side
- yo — yarn over
Special stitches
Reverse single crochet (crab stitch): Do not turn. Working from left to right (the opposite of the usual direction), insert the hook in the next stitch to the right, yo, pull up a loop, yo, pull through both loops on the hook. Keep these stitches relaxed so the edge does not tighten.
Pattern notes
- US crochet terminology throughout.
- The wrap is made in three pieces: waistband, body, and two ties. There is no seaming except attaching the ties.
- Turning chains do not count as stitches. For hdc rows, ch 1 at the start of the row and work the first hdc in the first stitch (the stitch at the base of the turning chain). For sc rows, ch 1 and work the first sc in the first stitch.
- Work in both loops unless the pattern says BLO.
- Stitch counts appear at the end of rows in parentheses, in size order S (M, L, XL).
- The waistband is worked sideways so the ribs run vertically when worn and the band stretches around the body.
- Work the first and last stitch of every waistband row through both loops. Work all remaining stitches BLO. This keeps the long edges firm and even for picking up body stitches.
- Place a marker in the first and last stitch of each increase row if you tend to lose edge stitches.
- Do not fasten off until instructed; move between sections only where stated.
Instructions
Waistband
Worked sideways in rows.
Ch 9.
Row 1 (RS): Sc in 2nd ch from hook and in each ch across. (8 sc)
Row 2: Ch 1, turn. Sc in first st through both loops, sc BLO in each st to last st, sc in last st through both loops. (8 sc)
Rep Row 2 until the strip measures 36 (40, 44, 48)" / 91.5 (101.5, 112, 122) cm unstretched, ending with a WS row. Do not fasten off.
The number of rows will vary with your row gauge. Measure the long edge flat, without stretching. The 8-st width should be about 3" (7.5 cm).
Body
The body is worked onto one long edge of the waistband, then down toward the hem.
Set-up — mark the pickup edge: Lay the waistband flat with RS facing and the working yarn at the upper-right short end. The long edge farthest from the starting chain (the left-hand long edge as you look at RS) is the pickup edge. Place 9 stitch markers on that edge, dividing it into 10 equal segments.
Row 1 (RS): Ch 1. Working into the row-ends along the marked long edge, hdc 9 (10, 11, 12) times in each of the 10 segments, skipping a row-end or working 2 hdc in the same row-end as needed so each segment is even. Remove markers as you come to them. (90 (100, 110, 120) hdc; 10 × 9 = 90 ✓, 10 × 10 = 100 ✓, 10 × 11 = 110 ✓, 10 × 12 = 120 ✓)
The fabric should lie flat at the join. If it cups, you picked up too few stitches; if it ruffles, you picked up too many. Adjust on this row before continuing.
Row 2 (WS): Ch 1, turn. Hdc in each st across. (90 (100, 110, 120) hdc)
Row 3 (increase, RS): Ch 1, turn. 2 hdc in first st, hdc in each st to last st, 2 hdc in last st. (92 (102, 112, 122) hdc; 90 + 2 = 92 ✓)
Row 4 (WS): Ch 1, turn. Hdc in each st across. (92 (102, 112, 122) hdc)
Rows 5–22: Rep Rows 3–4 nine more times. (10 increase rows total × 2 sts = +20 sts → 110 (120, 130, 140) hdc ✓)
You will have worked increase rows on Rows 3, 5, 7, 9, 11, 13, 15, 17, 19, and 21, and even rows on all WS rows plus Row 1. After Row 22 the piece should measure about 11" (28 cm) from the pickup row to the last hdc row, and about 14" (35.5 cm) from the top of the waistband to the last hdc row.
Do not fasten off.
Row 23 (hem, RS): Ch 1, turn so RS is facing. Work reverse sc (crab stitch) in each st across, keeping the stitches relaxed. (110 (120, 130, 140) reverse sc)
If the hem draws in, go up one hook size for this row only, or redo it more loosely. Fasten off.
Side edges
With RS facing, join yarn with sl st at the hem corner of one angled side. Sc evenly up the body side edge to the waistband (about 3 sc for every 2 hdc row-ends; you should have roughly 33 sc along the 22 hdc rows). Stop at the waistband; do not sc across the waistband short end (the tie covers that edge). Fasten off.
Rep on the other angled side, working from waistband down to hem or hem up to waistband—whichever keeps RS facing.
Weave in those ends before attaching the ties.
Ties (make 2)
Ch 6.
Row 1: Hdc in 3rd ch from hook and in each remaining ch. (4 hdc; turning ch does not count)
Row 2: Ch 1, turn. Hdc in each st across. (4 hdc)
Rep Row 2 until the tie measures 22 (24, 26, 28)" / 56 (61, 66, 71) cm. Fasten off, leaving a 12" (30.5 cm) tail for sewing.
Finishing
Attach the ties: Center one tie on each short end of the waistband (the 3" / 7.5 cm edges). Overlap the tie about 1" (2.5 cm) onto the waistband so it sits at waist level, not dropping onto the body. Using the long tail, whipstitch through both layers all the way around the overlap. Work extra passes at the top corners—these take the strain of tying. Repeat for the second tie.
Weave in remaining ends.
Block: Steam-block or wet-block gently to the finished measurements. Pin the waistband to 36 (40, 44, 48)" / 91.5 (101.5, 112, 122) cm long and 3" (7.5 cm) high—do not stretch the ribbing taller. Pin the hem to 44 (48, 52, 56)" / 112 (122, 132, 142) cm and the side edges so the A-line is even. Let dry fully. Do not flatten the waistband ribs.
Wearing
Wrap the piece around the waist or high hip so the edges overlap at the side or slightly in front (about 8" / 20.5 cm of overlap). Tie in a bow at the side. The ribbed waistband should feel secure over a leotard and tights without digging in. Traditional studio wrap is overlap toward one hip with the bow on that same side; wear it however it stays put through pliés.
This is a warm-up layer, not performance costume. Take it off before center work if it interferes with your line.
Customization
Longer wrap (more thigh coverage): After Row 22, work extra even hdc rows (ch 1, hdc in each st) before the crab-stitch hem. Every 2 rows adds about 1" (2.5 cm) of length with no extra flare.
More flare: Work the Row 3 increase on every row instead of every other row for 8–10 rows, then continue even. Recheck that the hem still lies flat.
Custom waistband length: Work the waistband to your waist (or high-hip) measurement plus 8" (20.5 cm). For pickup, place 9 markers to make 10 equal segments and pick up stitches at 2½ hdc per inch (1 hdc per cm) along that edge. Then increase 2 stitches every RS row 10 times, as written.
Firmer waistband: Use a hook one size smaller for the waistband only, then return to the gauge hook for the body.
Denser, warmer body: Use a hook one size smaller for the whole wrap and recast the stitch counts from the customization note above so the waistband still hits your target length.
Disclaimer: This pattern was generated by AI and should be reviewed for accuracy before use. While we strive for quality, AI-generated content may contain errors. Please verify measurements, stitch counts, charts, and instructions before beginning your project. Generated by purlJam.uk
Love this pattern?
Save this pattern to your free PurlJam libraryAccess your pattern anytime
Bookmark this page to access your pattern anytime