Type
Knitting
Difficulty
intermediate
Category
custom
AI Thinking Process
Planning
Verification
Pattern
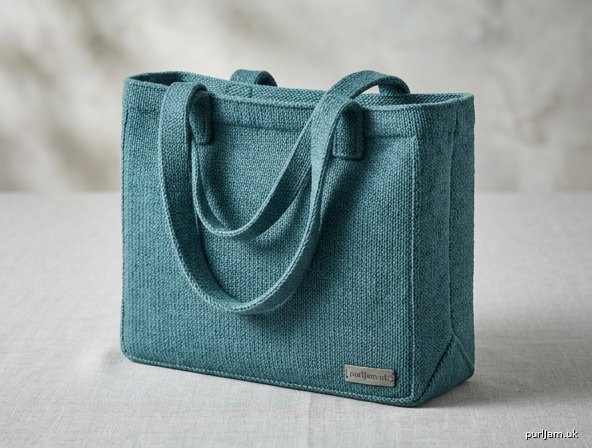
Beginner’s Boxy Everyday Purse
A machine-knit handbag in worsted stockinette
A neat, structured purse knitted entirely in plain stockinette on a mid-gauge or bulky knitting machine. You knit one long rectangle and two short straps — no punchcard, no ribber, no shaping while you knit. Side seams and boxed corners turn the rectangle into a 10 × 8 × 3 inch bag with short handbag handles. Ideal as a first garment-style machine project.
Skill level: Beginner (machine knitting) Skills used: E-wrap cast-on, plain knitting (stockinette), chain or backstitch bind-off, mattress stitch, boxed corners
Size
One size.
Finished measurements (after seaming and boxing corners):
- Width: 10 inches (25.5 cm)
- Height: 8 inches (20.5 cm), not including handles
- Depth: 3 inches (7.5 cm)
- Handle length: 16 inches (40.5 cm) before attaching; about 6 inches (15 cm) drop once sewn
To widen or narrow the bag, add or subtract 5 stitches for every 1 inch (2.5 cm) of width. Recalculate the boxed-corner width if you change the depth.
Materials
Yarn
- Worsted weight yarn: 400 yards (366 m)
- Two 220-yard (201 m) skeins is plenty; one high-yardage skein (360+ yards / 330+ m) may be enough if you knit to gauge and skip a lining
Smooth, tightly plied acrylic, wool, or wool-blend worsted is easiest on a machine and holds the boxy shape. Very fuzzy or loosely spun yarns shed in the carriage and are not recommended for a first machine bag.
Machine
- Mid-gauge knitting machine (approx. 6.5–7 mm needle pitch, ~150 needles) or bulky/chunky machine (approx. 8–9 mm pitch)
- Standard-gauge machines (4.5 mm / 200 needles) are too fine for worsted at this gauge — do not use one for this pattern
- No ribber, punchcard, or lace carriage required
Notions
- Cast-on comb and claw weights (or your machine’s equivalent)
- Transfer tool
- Tapestry needle
- Measuring tape and scissors
- Row counter (built-in or external)
- Optional: ½ yard (0.5 m) lining fabric, sewing needle and thread, magnetic snap or sew-in purse snap, 2 small purse feet
Gauge
20 stitches and 28 rows = 4 inches (10 cm) in stockinette stitch, measured on a blocked or at least rested swatch.
That is 5 stitches per inch and 7 rows per inch.
Swatch: Bring 30 needles to work, e-wrap cast on, hang weights, and knit 40 rows at your chosen stitch size (tension). Rest the swatch. Measure 20 stitches and 28 rows in the center.
Set the stitch-size / tension dial so you match this gauge. As a starting point only:
- Many mid-gauge machines: T5–T8
- Many bulky machines: T3–T6
If your swatch is too wide (fewer than 20 sts in 4 inches), go down one stitch-size number (tighter). If it is too narrow, go up one number (looser). Do not start the purse until gauge matches. A 1-stitch-per-inch miss changes the finished width by more than 2 inches.
Knit the handles one stitch-size number tighter than the body if you want firmer straps.
Abbreviations (US)
| Abbr. | Meaning |
|---|---|
| BO | bind off |
| CO | cast on |
| COL | carriage on left |
| COR | carriage on right |
| RC | row counter |
| RS | right side (knit/purl-smooth face of stockinette as it hangs on the machine) |
| st(s) | stitch(es) |
| T | stitch size / tension dial setting |
| WP | working position |
| WS | wrong side |
| WY | waste yarn |
All knitting is stockinette (plain knitting in one direction). There are no increases, decreases, or pattern stitches.
Pattern Notes
- Read the whole pattern before you cast on.
- Center the work on the needle bed so the carriage travels evenly.
- Hang the cast-on comb, then claw weights. Move the weights up every 20–30 rows so the fabric does not lift the needles.
- Do not pull down hard on the knitting; let the weights do the work.
- Stockinette fabric curls to the knit side at the cast-on and bind-off. The folded hem and optional lining control this. Do not skip the hem.
- The body is knitted as a rectangle larger than the finished bag. Boxed corners remove 1½ inches from each bottom corner, which is what creates the 3-inch depth and the final 10 × 8 inch face. Do not “correct” the 13-inch width down to 10 inches on the machine.
- Seams are structural. Use mattress stitch and a firm boxed-corner seam so the bag holds its box shape.
- Metric equivalents are rounded to the nearest 0.5 cm.
Instructions
Body (make 1)
Bring 65 needles to working position, centered on the bed. (65 stitches = 13 inches at gauge ✓)
Cast on: E-wrap CO from left to right. Hang the cast-on comb and weights. COR. Set RC to 000.
Hem
- Knit 7 rows. (7 rows = 1 inch ✓)
- RC 007.
First side (this will be the back)
- Knit 67 rows. (67 rows = 9.5 inches ✓)
- RC 074. (7 + 67 = 74 ✓)
Second side (this will be the front)
- Knit 67 rows. (67 rows = 9.5 inches ✓)
- RC 141. (74 + 67 = 141 ✓)
Hem
- Knit 7 rows. (7 rows = 1 inch ✓)
- RC 148. (141 + 7 = 148 ✓)
Bind off loosely with a transfer-tool chain bind-off, or with a tapestry needle using a backstitch bind-off. Keep this edge as elastic as the cast-on so the two hems match.
Cut yarn, leaving a 24-inch (61 cm) tail for seaming if you like, or a 6-inch (15 cm) tail if you will seam with a separate length.
Body piece measures about 13 inches wide × 21 inches long (33 × 53.5 cm) before seaming (13 × 21 at 5 sts and 7 rows per inch ✓).
Handles (make 2)
Use the same stitch size as the body, or one number tighter for a firmer strap.
Bring 10 needles to working position. (10 stitches = 2 inches at gauge ✓)
E-wrap CO 10 sts. Hang a small weight. COR. RC 000.
Knit 112 rows. (112 rows = 16 inches ✓)
BO loosely.
Each handle measures about 2 inches wide × 16 inches long (5 × 40.5 cm).
Finishing
Lightly steam-block or wet-block the three pieces to the measurements above. Let them dry flat. Do not stretch the width of the body past 13 inches.
1. Fold and sew the side seams
Lay the body rectangle WS up, with the two 13-inch edges (cast-on and bind-off) at the top and bottom of your table.
Fold in half so the cast-on hem meets the bind-off hem, RS together or RS facing you if you prefer to mattress-stitch from the right side. The fold is the bottom of the bag. Each layer is 67 body rows + 7 hem rows.
With mattress stitch (or backstitch if you prefer to sew WS together), join each side from the fold up to the start of the hem — sew 67 rows / 9.5 inches on each side, and leave the 7-row hems free. (You will fold those in Step 3.) Fasten off firmly at the top of each side seam.
You now have a flat pouch 13 inches wide and 9.5 inches tall, plus 1-inch free hems.
2. Box the corners (this creates the 3-inch depth)
Turn the pouch WS out so the side seams are on the outside.
At one bottom corner, flatten the corner into a triangle so the side seam lies exactly along the bottom fold, forming a T. The point of the triangle is the original corner.
Measure 1½ inches (4 cm) from that point along the seam. Draw a line across the triangle, perpendicular to the seam. This line should be 3 inches (7.5 cm) long (1½ inches on each side of the seam ✓).
Sew firmly across that line, through both layers, two or three times. Trim the triangle to a ⅜-inch (1 cm) seam allowance if it feels bulky, or leave it in place for extra structure.
Repeat on the other bottom corner.
Turn RS out and push the corners into a box. Finished bag body: 10 inches wide × 8 inches high × 3 inches deep (13 − 1.5 − 1.5 = 10 inches width ✓; 9.5 − 1.5 = 8 inches height ✓; 1.5 × 2 = 3 inches depth ✓).
3. Hem the top
Fold each 7-row hem to the inside along the row where you stopped the side seams. The hem is 1 inch. Pin. Whipstitch or herringbone-stitch the raw edge to the inside of the bag, hiding the cast-on and bind-off. Do not let stitches show on the RS.
The top opening is now 10 inches wide with a clean 1-inch facing.
4. Make and attach the handles
Fold each handle in half lengthwise, WS together, so it becomes a 1-inch-wide × 16-inch strap (10 sts folded in half = 1 inch ✓). Whipstitch the long edge closed.
On the inside of the bag, place one handle on the front: each end sits 1½ inches (4 cm) in from a side seam, with 1½ inches (4 cm) of strap overlapping the hem. The free loop is 13 inches (16 − 1.5 − 1.5 = 13 ✓). Sew each end firmly through the hem and the bag wall with a small rectangle or X of stitches. Repeat with the second handle on the back, matching placement so the bag hangs level.
5. Weave in ends
Weave all remaining tails into seams or hems. Trim.
Optional lining
A lining hides the inside of stockinette, adds strength, and tames curl.
Cut a fabric rectangle 11 inches × 19 inches (28 × 48.5 cm). Fold in half (11 × 9.5 inches), sew the two short sides with a ½-inch (1.3 cm) seam, and box the corners the same 1½ inches as the knit bag. Fold ½ inch of the lining’s top edge to the WS. Drop the lining into the bag, WS of lining against WS of knitting. Whipstitch the lining’s folded edge to the knit hem. If you are adding a magnetic snap, install it on the lining before you sew the lining in, centered 1 inch below the top edge.
Optional closure and feet
Sew a magnetic snap or purse snap at the center of the opening, through lining and hem (not through the RS unless the snap is decorative). Sew purse feet to the four outside corners of the base if you want the bag to sit cleanly.
Care
Follow the yarn label. Most machine-knit worsted bags do well with a gentle hand wash, reshape to the box, and dry flat. If the yarn is acrylic, a very light steam (iron hovering, no pressure) will set the seams. Do not crush the boxed corners while damp.
Disclaimer: This pattern was generated by AI and should be reviewed for accuracy before use. While we strive for quality, AI-generated content may contain errors. Please verify measurements, stitch counts, charts, and instructions before beginning your project. Generated by purlJam.uk
Love this pattern?
Save this pattern to your free PurlJam libraryAccess your pattern anytime
Bookmark this page to access your pattern anytime