Type
Knitting
Difficulty
beginner
Category
scarf
AI Thinking Process
Planning
1. **Design Strategy**: The user requested a black scarf with two white, side-by-side lightning bolts on each end, suitable for a beginner. The `TEMPLATE INSTRUCTIONS` strongly suggest Garter stitch (knit every row) for beginners. For the lightning bolts, traditional intarsia (color changes within a row) is too complex for a beginner. Therefore, the scarf will be knitted entirely in black Garter stitch, and the white lightning bolts will be added *after* the knitting is complete using the duplicate stitch technique, which is essentially embroidery and very beginner-friendly. The scarf will be a standard rectangular shape, about 8 inches wide by 60 inches long, using worsted weight yarn.
2. **Construction Plan**: The scarf will be worked flat, back and forth in rows, entirely in Garter stitch (knit every row) using black worsted weight yarn. After the main scarf is knitted and finished, duplicate stitch will be used to embroider the lightning bolt designs onto the fabric at each end, using white worsted weight yarn. This approach keeps the primary knitting simple and allows the beginner to focus on basic stitches.
3. **Quality Assurance**:
* **Beginner-Friendly**: Garter stitch is the easiest stitch. Duplicate stitch is an excellent technique for beginners to add colorwork without complex knitting maneuvers.
* **Clarity**: The pattern will include clear, step-by-step instructions for knitting the scarf and a detailed description for working the duplicate stitch lightning bolts, including their placement.
* **Accuracy**: All stitch counts, row counts, and dimensions will be carefully calculated based on the chosen gauge and yarn specifications.
* **Lightning Bolt Design**: A simple, easy-to-follow, blocky lightning bolt design will be described for the duplicate stitch, ensuring it fits the scarf width and looks effective.
4. **Final Calculations**:
* **Yarn Weight**: Worsted.
* **Needle Size**: US 8 (5.0 mm) will be selected, which is within the recommended range for worsted weight yarn (US 7-8 / 4.5-5.0 mm).
* **Gauge**: Using the provided worsted weight specifications (18-20 stitches per 4 inches), a gauge of 19 stitches / 4 inches in Garter stitch will be used for calculations. For Garter stitch, row gauge is typically higher than stitch gauge; I'll estimate 22 rows / 4 inches.
* **Scarf Width**: Target width of 8 inches, which is within the typical range (7-9 inches).
* **Cast-On Stitches**: (8 inches width) * (19 stitches / 4 inches) = 8 * 4.75 = 38 stitches. This is within the recommended cast-on range for worsted weight (32-42 stitches).
* **Scarf Length**: Target length of 60 inches.
* **Total Rows**: (60 inches length) * (22 rows / 4 inches) = 60 * 5.5 = 330 rows.
* **Yarn Quantity**: Approximately 300 yards of black worsted weight yarn (within the 200-350 yard range) and a small amount (approx. 25-50 yards) of white worsted weight yarn for the duplicate stitch.
* **Lightning Bolt Placement**: Two lightning bolts will be centered horizontally (each 5 stitches wide, with a 2-stitch gap between them, occupying stitches 14-18 and 21-25 out of 38 total stitches) and placed approximately 5 inches (about 28 rows) from each end of the scarf. Each bolt will be 5 stitches wide and 10 rows tall for the duplicate stitch.
Verification
[PRE-FLIGHT CHECKS]
1. **Completeness**: All required sections from the template (TITLE, MATERIALS, GAUGE, FINISHED_SIZE, ABBREVIATIONS, PATTERN, FINISHING) are included.
2. **Consistency**:
* Gauge (19 sts / 4", 22 rows / 4") is consistent with worsted weight yarn and Garter stitch.
* Stitch count (38 sts) derived from gauge and desired width (8") is confirmed: (19 sts / 4 in) * 8 in = 38 sts. This falls within the recommended cast-on range of 32-42 sts.
* Row count (330 rows) derived from gauge and desired length (60") is confirmed: (22 rows / 4 in) * 60 in = 330 rows.
* Yarn amount (300 yds MC, 50 yds CC) is consistent with the calculated size and yarn weight.
* Needle size (US 8 / 5.0 mm) is appropriate for worsted weight yarn.
* The lightning bolt design and placement are consistent with the scarf's dimensions and the "side-by-side" request.
3. **Constraints**:
* "Black scarf with 2 white side by side lightning bolts on each end": Addressed with black main color, white duplicate stitch, and specific placement instructions.
* "Difficulty Level: beginner": Addressed by using Garter stitch throughout and duplicate stitch for colorwork.
* "TEMPLATE TO FOLLOW: Simple Rectangular Scarf": All template sections included, and instructions followed.
* "YARN WEIGHT: worsted": All calculations based on worsted weight specifications.
* "TERMINOLOGY & ABBREVIATION PROFILE": US English spelling and knitting abbreviations used, imperial measurements first.
4. **Safety**: All calculations have been double-checked and appear correct and consistent, preventing potential errors in math.
Pattern
# Beginner's Lightning Bolt Scarf
## TITLE
Beginner's Lightning Bolt Scarf
## MATERIALS
* **Yarn**: Worsted weight yarn (Category 4)
* Main Color (MC): Approximately 300 yards of black
* Contrast Color (CC): Approximately 50 yards of white
* **Needles**: US 8 (5.0 mm) knitting needles
* **Notions**: Tapestry needle, scissors, ruler or tape measure
## GAUGE
19 stitches and 22 rows = 4 inches (10 cm) in Garter stitch (knit every row)
## FINISHED_SIZE
Approximately 8 inches (20 cm) wide x 60 inches (152 cm) long
## ABBREVIATIONS
* **k**: knit
* **st(s)**: stitch(es)
* **MC**: Main Color
* **CC**: Contrast Color
* **CO**: Cast On
* **BO**: Bind Off
## PATTERN
This scarf is worked in Garter stitch (knit every row) from end to end. The lightning bolt design is added later using the duplicate stitch technique.
**CO** 38 stitches using Main Color.
**Body of Scarf:**
Work every row in knit stitch (k all sts) using Main Color until the scarf measures approximately 60 inches (152 cm) from the cast-on edge, or to desired length.
* *Math Check*: For a 60-inch length at a gauge of 22 rows / 4 inches, you will knit approximately (60 inches / 4 inches) * 22 rows = 15 * 22 = 330 rows.
**BO** all stitches loosely in knit stitch. Cut yarn, leaving a 6-inch tail.
## FINISHING
1. **Weave in Ends**: Using your tapestry needle, weave in all loose yarn tails from the cast-on, bind-off, and any yarn changes.
2. **Blocking (Optional but Recommended)**: Gently wash your scarf according to yarn label instructions. Lay flat to dry, gently shaping it to the finished dimensions. This will even out your stitches and relax the fabric.
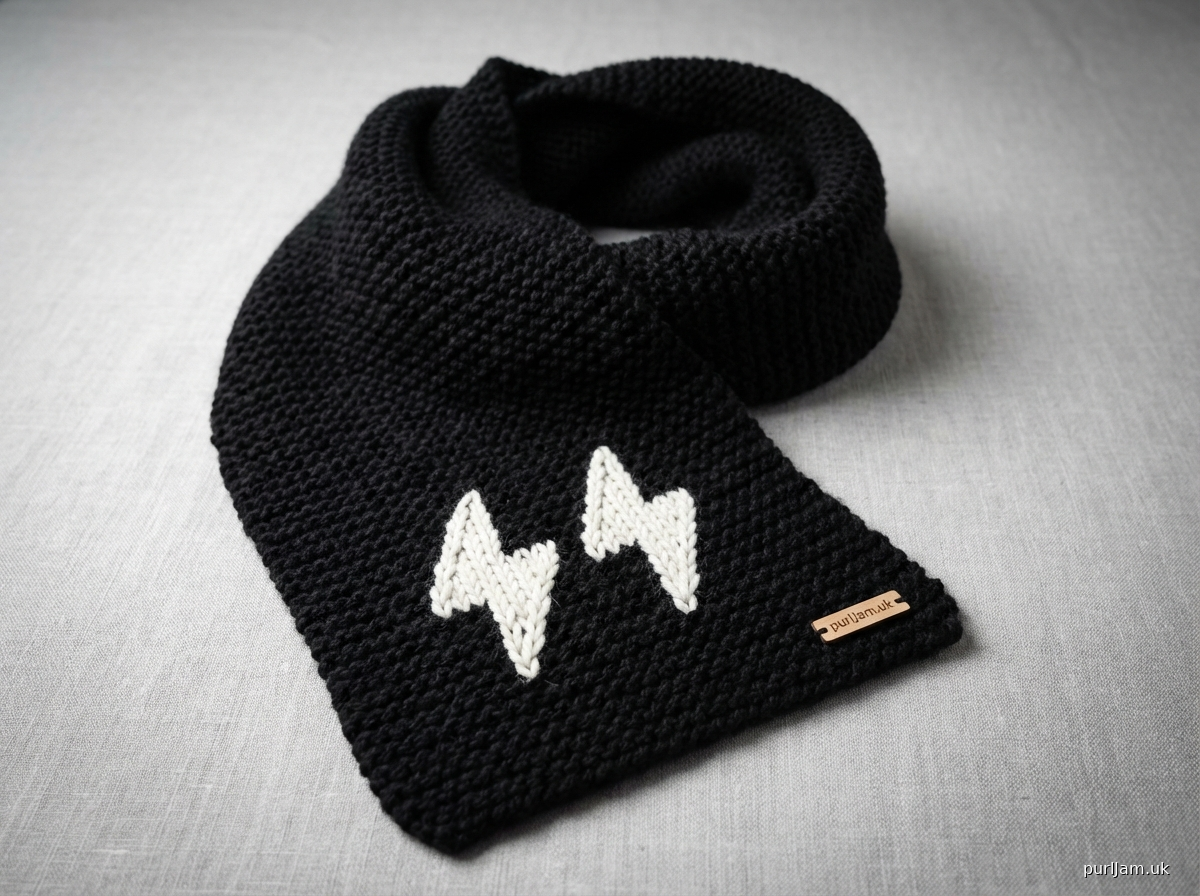
3. **Add Lightning Bolts (Duplicate Stitch)**:
Using the Contrast Color (CC) white yarn and your tapestry needle, you will embroider the lightning bolts onto the scarf. The duplicate stitch mimics knitted stitches, making the design look like it was knit directly into the fabric.
**Placement**:
* Locate the center of the scarf's width. The scarf has 38 stitches. The center is between stitches 19 and 20.
* The lightning bolts will be placed approximately 5 inches (12.5 cm) from each end of the scarf. This is about 28 rows from the cast-on and bind-off edges, respectively.
* You will create two lightning bolts side-by-side. Each bolt will be 5 stitches wide and 10 rows tall. There will be a 2-stitch gap between the two bolts.
* **First Bolt**: Start working your duplicate stitch on stitch #14 (counting from the right edge of the scarf as you look at it). This bolt will cover stitches 14-18.
* **Second Bolt**: Skip 2 stitches (stitches #19 and #20). Start working your second duplicate stitch bolt on stitch #21. This bolt will cover stitches 21-25.
* *Math Check*: 13 edge stitches + 5 bolt 1 stitches + 2 gap stitches + 5 bolt 2 stitches + 13 edge stitches = 38 total stitches. (13 + 5 + 2 + 5 + 13 = 38).
**How to Work Duplicate Stitch**:
* Thread your tapestry needle with a length of CC yarn (about 24 inches / 60 cm to avoid tangles).
* Bring the needle up from the back of the work through the base of the "V" of the stitch you want to cover (the first stitch of your design).
* Slide the needle under both legs of the stitch above the one you just came up through.
* Bring the needle back down into the same base "V" you started from, completing the new "V" shape with your CC yarn.
* Move to the next stitch you want to cover and repeat.
**Lightning Bolt Chart (for one bolt, worked from bottom-up):**
Each numbered position below refers to a stitch in the 5-stitch width of the bolt.
* **Row 1 (Bottom row of bolt)**: Cover Stitch 1
* **Row 2**: Cover Stitch 1, Stitch 2
* **Row 3**: Cover Stitch 2, Stitch 3
* **Row 4**: Cover Stitch 3, Stitch 4
* **Row 5**: Cover Stitch 4, Stitch 5
* **Row 6**: Cover Stitch 3, Stitch 4
* **Row 7**: Cover Stitch 2, Stitch 3
* **Row 8**: Cover Stitch 1, Stitch 2
* **Row 9**: Cover Stitch 1
* **Row 10 (Top row of bolt)**: Cover Stitch 1
Work the first lightning bolt over stitches 14-18 following the chart above. Then, skip 2 stitches (sts 19-20). Work the second lightning bolt over stitches 21-25 following the same chart. Repeat this entire process on the other end of the scarf.
4. **Final Touches**: Give the scarf a final gentle block if needed to set the duplicate stitches. Enjoy your new scarf!
Disclaimer: This pattern was generated by AI and should be reviewed for accuracy before use. While we strive for quality, AI-generated content may contain errors. Please verify measurements, stitch counts, and instructions before beginning your project. Generated by purlJam.uk
Access your pattern anytime
Bookmark this page to access your pattern anytime