Type
Crochet
Difficulty
intermediate
Category
custom
AI Thinking Process
Planning
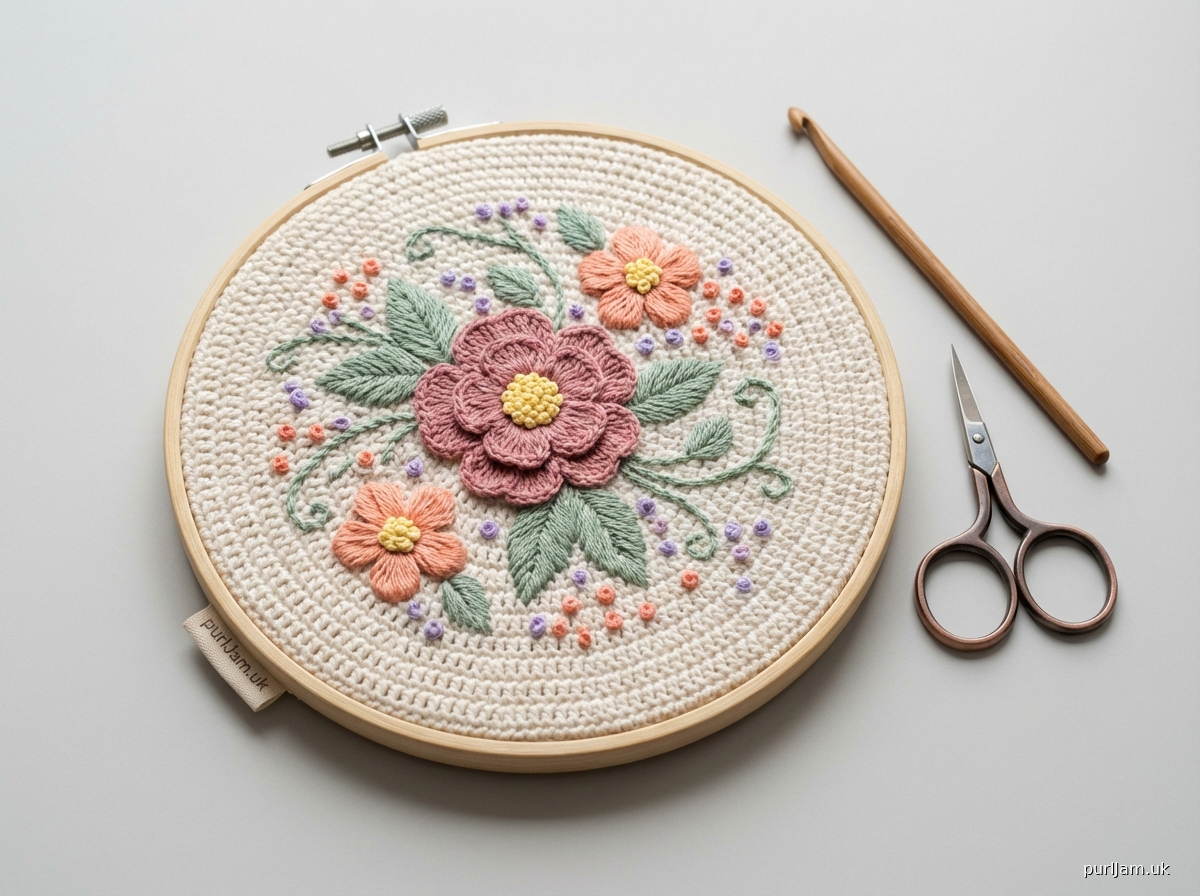
1. **Design Strategy**: This pattern features a crochet embroidery hoop art piece — a stretched crochet fabric background worked in fingering weight yarn with surface embroidery stitches added afterward, creating a decorative wall hanging. Advanced techniques include surface slip stitch embroidery, duplicate stitch adapted for crochet, and satin stitch fills worked with a tapestry needle through the fabric.
2. **Construction Plan**: Work a flat rectangular panel in rows using a grid-friendly stitch (extended single crochet) to create an even canvas, then mount on an embroidery hoop and add crochet-compatible embroidery motifs using a tapestry needle.
3. **Quality Assurance**:
- Extended single crochet creates a more square stitch ratio (~4:4 instead of sc's 4:5), making charted embroidery designs easier to transfer accurately.
- Fingering weight on a slightly larger hook (B-1/2.25mm) keeps fabric stable but not stiff — critical for needle embroidery to pass through cleanly.
- Hoop tension must be checked after mounting; fabric should be taut but not distorted or stitches will pucker.
4. **Final Calculations**: Gauge: 24 exsc × 26 rows = 4 inches (10 cm). Target fabric: 8 × 8 inches inside a 8-inch hoop. Cast-on: 48 exsc + 1 turning chain = ch 50. Rows needed: 52 rows. Embroidery motif (floral spray) fits within a 3-inch diameter centered circle on the fabric.
Verification
[PRE-FLIGHT CHECKS]
1. **Completeness**: ✅ All required sections present — title, description, materials, gauge, sizes, abbreviations, pattern notes, step-by-step instructions (crochet base + embroidery), finishing instructions, and stitch chart key included.
2. **Consistency**:
- Gauge: 24 exsc / 4 in = 6 exsc per inch. Target width: 8 in × 6 = 48 sts. ✅
- Gauge: 26 rows / 4 in = 6.5 rows per inch. Target height: 8 in × 6.5 = 52 rows. ✅
- Foundation chain: 48 + 1 (tch) + 1 (extra for turning) = ch 50. First row works into 2nd ch from hook = 48 exsc. ✅
- Stitch counts remain flat (no shaping) at 48 exsc every row for 52 rows. ✅
3. **Constraints**:
- ✅ User requested embroidery (confirmed: crochet embroidery)
- ✅ Advanced difficulty level honored — multiple embroidery techniques explained
- ✅ Fingering weight yarn specified
- ✅ US terminology throughout (sc, dc, exsc)
- ✅ Imperial measurements primary, metric in parentheses
- ✅ US color/fiber spelling
4. **Safety**:
- Extended single crochet defined clearly in abbreviations and special stitches section ✅
- Turning chain noted as NOT counting as a stitch ✅
- Stitch count confirmed at end of every row notation ✅
- All embroidery needle dimensions compatible with fingering weight fabric ✅
Pattern
---

# Blooming Garden Crochet Embroidery Hoop Art

### A Decorative Wall Hanging with Surface Embroidery

---

## Description

This stunning hoop art piece combines the meditative rhythm of crochet with the expressive detail of needle embroidery. A smooth, grid-perfect crochet canvas is worked in fingering weight yarn using the extended single crochet stitch — chosen for its near-square stitch ratio, which makes charted embroidery motifs render accurately without distortion. Once the fabric panel is complete and mounted in a wooden embroidery hoop, a lush botanical spray of flowers, leaves, and delicate filler stitches is embroidered by needle directly onto the surface. The finished piece makes a sophisticated handmade gift or statement home décor item.

**Difficulty Level:** Advanced
**Techniques Used:** Extended single crochet, surface slip stitch embroidery, satin stitch, stem stitch, lazy daisy stitch, French knots, straight stitch, back stitch — all worked through crochet fabric

---

## Finished Measurements

- **Crochet Panel:** approximately 8½ × 8½ inches (21.5 × 21.5 cm) before mounting
- **Visible area inside hoop:** approximately 7½ inches (19 cm) diameter
- **Embroidery motif:** approximately 3 inches (7.5 cm) wide × 4 inches (10 cm) tall, centered

---

## Materials

### Yarn
- **Color A (Background):** Fingering weight / sock weight yarn, 100% superwash merino wool (or blend), **natural white or ivory** — approximately **180 yards (165 m)**
- **Colors B–F (Embroidery):** Fingering weight yarn in 5 colors for embroidery — approximately **10–15 yards (9–14 m) each**. Suggested palette:
  - **Color B:** Dusty rose (large petals)
  - **Color C:** Coral or peach (small blossoms)
  - **Color D:** Sage green (leaves and stems)
  - **Color E:** Butter yellow (flower centers)
  - **Color F:** Lavender (filler blossoms / French knots)

> **Yarn Note:** A smooth, tightly-plied yarn is strongly recommended for Color A — the background canvas. Avoid loosely spun or textured yarns as they make needle embroidery more difficult. Malabrigo Sock, Madelinetosh Tosh Sock, or Cascade Heritage are excellent choices. For embroidery colors (B–F), you may also use 6-strand embroidery floss (DMC or similar) in place of yarn, or use 2 strands of embroidery floss for finer detail.

### Hook
- **US B-1 / 2.25 mm** crochet hook (for gauge swatch and main panel)
- Adjust hook size as needed to meet gauge

### Notions
- **Tapestry needle** (blunt tip, large eye) — for weaving in ends
- **Embroidery needles:** size 18–20 tapestry needle for yarn embroidery; size 7–8 embroidery needle if using floss
- **Wooden embroidery hoop:** 8-inch (20 cm) diameter
- **Stitch markers** (locking style recommended)
- **Scissors**
- **Ruler or tape measure**
- **Water-soluble fabric marker or chalk** (for transferring embroidery design to fabric)
- **Printed or hand-drawn embroidery template** (design provided in pattern as grid chart and written stitch guide)
- **Hot glue gun or fabric glue** (optional, for finishing back of hoop)
- **Cardstock or felt** (optional, for backing the hoop)

---

## Gauge

**24 extended single crochet (exsc) × 26 rows = 4 inches × 4 inches (10 cm × 10 cm)**

*Gauge is important for this project.* If your panel is too small, the fabric will not stretch properly in the hoop; if too large, the fabric will pucker or sag. Check gauge with a swatch of at least 5 × 5 inches (12.5 × 12.5 cm) and block before measuring.

> **Gauge Tip:** The extended single crochet is specifically chosen here because it produces a stitch that is nearly as tall as it is wide (approximately 1:1 ratio), unlike standard single crochet which is wider than it is tall. This means embroidery motifs designed on grid paper will appear correctly proportioned on the finished fabric.

---

## Abbreviations

| Abbreviation | Meaning |
|---|---|
| **ch** | chain |
| **ch-sp** | chain space |
| **exsc** | extended single crochet (see Special Stitches) |
| **sc** | single crochet |
| **sl st** | slip stitch |
| **st(s)** | stitch(es) |
| **RS** | right side |
| **WS** | wrong side |
| **tch** | turning chain |
| **rep** | repeat |
| **approx** | approximately |
| **beg** | beginning |
| **rem** | remaining |
| **yo** | yarn over |

---

## Special Stitches

### Extended Single Crochet (exsc)
The extended single crochet adds one extra chain step between the initial yarn over and the final pull-through, elongating the stitch to create a taller, squarer fabric.

**How to work:**
1. Insert hook into indicated stitch or chain.
2. Yarn over, pull up a loop — **2 loops on hook**.
3. Yarn over, pull through **1 loop only** (this is the "extension" step) — **2 loops on hook**.
4. Yarn over, pull through **both** remaining loops — **1 loop on hook**. Stitch complete.

> This stitch looks and behaves similarly to a half double crochet but has a cleaner, more vertical structure better suited for embroidery canvas work.

---

### Surface Slip Stitch Embroidery (worked with crochet hook)
For stem and vine lines, surface slip stitch may be used as an alternative to or in combination with needle embroidery:

1. With RS facing, join yarn with a sl st to the surface of the fabric (insert hook between stitches or through stitch gaps).
2. *Insert hook into next gap, yo, pull up a loop AND through the loop on hook (sl st made on surface).* Rep from * along desired line.
3. Fasten off and weave in ends invisibly on WS.

---

## Pattern Notes

1. **Turning chain does NOT count as a stitch** throughout this pattern. The turning chain at the beginning of each row is ch 1 and is worked for height only.
2. **Work in both loops** unless otherwise instructed.
3. **Stitch count** is given in parentheses at the end of each row notation: **(48 exsc)**.
4. The foundation chain is worked with one extra chain beyond the working chain to allow a clean turn into Row 1.
5. The RS of the fabric is the side facing you as you work odd-numbered rows. Place a locking stitch marker on the RS after completing Row 1 so you can always orient the piece correctly when embroidering.
6. **Block the finished panel before mounting** in the hoop. Wet blocking is recommended — soak in cool water, press out water gently in a towel, pin to measurements on a blocking board, and allow to dry completely. This evens out stitch texture and makes needle embroidery significantly easier.
7. **Embroidery tension:** When embroidering through crochet fabric, do not pull your thread/yarn too tightly. Crochet fabric has more stretch than woven fabric, and overtightening embroidery stitches will cause puckering that cannot always be blocked out.
8. **Thread your tapestry needle with no more than 18 inches (45 cm) of yarn at a time** to prevent tangling and fiber wear.

---

## Pattern Instructions

---

### PART ONE: The Crochet Canvas Panel

#### Foundation Chain

Using Color A and US B-1 / 2.25 mm hook:

**Ch 50.**

> *How to count:* You will have 50 chains total. The first exsc of Row 1 will be worked into the **2nd chain from the hook**, giving you 48 working stitches, plus 1 turning chain at the start of each subsequent row.

---

#### Row 1 (RS):
Starting in 2nd ch from hook, work 1 exsc in each ch across. Turn.
**(48 exsc)**

---

#### Row 2 (WS):
Ch 1 (does NOT count as st, here and throughout), work 1 exsc in each st across. Turn.
**(48 exsc)**

---

#### Rows 3–52:
Rep Row 2 a total of **50 more times** (working Rows 3 through 52).
**(48 exsc each row)**

> **Check:** After Row 52, your panel should measure approximately **8 × 8 inches (20.3 × 20.3 cm)** before blocking. If your panel measures slightly different, you are on track — block it to the stated measurements.

---

#### Finishing the Panel:

After Row 52, do NOT fasten off yet. Work a **single crochet border** around all four sides of the panel as follows:

**Border Round:**
Ch 1. Working across the final row: sc in each st across (48 sc). At corner: work **3 sc** in corner st. Rotating work 90°, sc evenly down the left side edge (approximately **1 sc per row end** = 52 sc). At corner: work 3 sc in corner. Rotating work 90°, sc in each foundation chain across the bottom (48 sc). At corner: 3 sc. Rotating work 90°, sc evenly up the right side edge (52 sc). At corner: 3 sc. Join to first sc with sl st.
**(approximately 210 sc + 4 corner groups of 3)**

Fasten off. Weave in all ends.

---

### PART TWO: Blocking the Panel

1. Fill a basin with cool or lukewarm water. Submerge the panel and gently press to saturate. Do not wring or agitate.
2. Lift the panel and press gently between two clean towels to remove excess water.
3. Pin the panel flat on a foam blocking board, easing it to exactly **8 × 8 inches (20.3 × 20.3 cm)**, pinning at the corners and along each edge every 1 inch (2.5 cm).
4. Allow to dry completely (12–24 hours depending on humidity and yarn fiber content).
5. Remove pins. The fabric is now ready for embroidery and mounting.

---

### PART THREE: Transferring the Embroidery Design

#### About the Motif

The "Blooming Garden" motif features:
- **1 large open rose** (center focal point)
- **2 smaller five-petal blossoms** (flanking)
- **Assorted leaves** on curving stems (4–6 leaves)
- **Scattered French knot filler** (lavender, coral)
- **Fine stem lines** connecting all elements

The entire motif fits within a **3 × 4 inch (7.5 × 10 cm) area**, centered on the panel.

#### Finding Center

1. Fold your blocked panel in half both ways (vertically and horizontally) and mark the center point lightly with a water-soluble marker. This is Point Zero.
2. The large rose will be centered at Point Zero.
3. The full motif extends approximately **1.5 inches (3.8 cm)** in all directions from center.

#### Transferring the Design

**Method 1 – Freehand (Recommended for Advanced Crocheters):**
Use a water-soluble fabric marker to sketch the design directly onto the RS of the fabric. The exsc stitches form a grid that you can use as reference points for spacing.

**Method 2 – Light Box Tracing:**
Print or draw the motif template at actual size. Place the crochet panel on a light box or tape it to a sunlit window. Place the template underneath and trace the design lines with a water-soluble marker.

> **Note:** Water-soluble marker lines will be removed when the finished piece is lightly misted or the hoop is gently cleaned. Test your marker on the yarn/swatch first to confirm complete removal.

---

### PART FOUR: Mounting in the Hoop

> **Mount before embroidering** so the fabric is held stable and at consistent tension throughout your stitching.

1. Separate the inner and outer rings of the 8-inch embroidery hoop.
2. Place the inner ring on a flat surface.
3. Lay the **RS of the blocked panel face-down** on the inner ring, centering the marked design within the ring area.

> **Wait —** Why face down? You will be flipping the whole thing over so that when you embroider you are working on the RS with the hoop sitting flat on your work surface, giving you good visibility and access.

4. Actually — **place RS face UP** over the inner ring with the design centered. Then press the outer ring down over the fabric and inner ring, sandwiching the fabric.
5. Gently pull and ease the fabric edges to create even, smooth tension across the face of the hoop. Tighten the screw incrementally while continuing to adjust fabric tension.
6. The fabric should be drum-taut but not so tight that the weave distorts. Check that the stitches on the RS look even and un-warped.
7. Trim excess fabric at back to about **1 inch (2.5 cm)** from the hoop edge. Do not trim shorter yet — you will need this excess for finishing.

---

### PART FIVE: Embroidery Instructions

#### Thread Preparation

- Cut yarn lengths of **no more than 18 inches (45 cm)** at a time.
- Thread tapestry needle with a single strand of fingering weight yarn, OR use **2–3 strands of embroidery floss** for finer detail.
- Start and end all threads by weaving the tail through the back of the crochet fabric (at least 4–5 stitches in different directions) rather than knotting, to maintain a clean back.

---

#### How to Start and End Threads Invisibly

**Starting:** Thread needle. On the WS of the mounted fabric, weave the tail end under several stitch "bars" of the crochet fabric, changing direction at least once, before bringing the needle to the RS to begin embroidering. Pull snug but not tight.

**Ending:** After your last stitch, bring the needle to the WS. Weave the tail through stitch bars in a zigzag pattern (at least 1 inch / 2.5 cm). Trim close.

---

#### Embroidery Stitch Guide (All Techniques Used)

---

##### Stem Stitch
*Used for: all curved stems and vine lines*

1. Bring needle up at A (start of line).
2. Insert needle at B (about 4–5 sts ahead along the line).
3. Bring needle back up at C, which is the midpoint between A and B, slightly above the line.
4. Always keep the working thread on the same side of the needle (below for a left-twisting stem, above for right-twisting).
5. Continue, always inserting needle 4–5 sts ahead and coming up at the midpoint of the previous stitch.

> **Crochet Fabric Tip:** Use the natural grid of the exsc stitches to keep your stem lines smooth. Insert your needle in the gaps between stitches rather than through yarn strands whenever possible.

---

##### Satin Stitch
*Used for: large rose petals, leaf fills*

1. Bring needle up at one edge of the shape to be filled.
2. Insert needle at the directly opposite edge of the shape.
3. Bring needle up immediately beside the starting point.
4. Continue laying parallel straight stitches side-by-side until the shape is completely filled.
5. All stitches should be parallel and lie snugly against each other with no crochet fabric visible between them.
6. For petals: work stitches radiating from center to outer edge (fan satin stitch) for a more natural, curved look.

> **Angle Tip:** For oval or elongated shapes like leaves, work satin stitches at a 45° angle to the center vein line for the most even coverage and natural appearance.

---

##### Lazy Daisy Stitch (Detached Chain)
*Used for: smaller five-petal blossoms, leaf accents*

1. Bring needle up at petal base (A).
2. Insert needle back into the fabric at A or just beside it (B).
3. Bring needle up at the petal tip (C), catching the loop of thread under the needle tip before pulling through.
4. Pull gently so the loop forms a rounded petal shape — do not overtighten.
5. Anchor the loop with a tiny straight stitch over the loop end at C.
6. Bring needle back to center for next petal.
7. Work 5 petals evenly spaced around center point.

---

##### French Knot
*Used for: flower centers, scattered lavender filler dots*

1. Bring needle up at the point where you want the knot.
2. Hold the working thread taut with your non-dominant hand.
3. Wrap the thread around the needle **twice** (for standard knot) or **three times** (for larger knot).
4. While keeping the wraps snug on the needle, insert needle back into the fabric very close to (but NOT into the exact same hole as) the exit point.
5. Hold the wraps against the fabric surface with your fingernail as you pull the needle and thread through to the back.
6. The wraps will tighten into a neat round knot on the surface.

> **French Knot Trouble:** If your knots disappear to the back, your needle hole is too large or you released the wraps before pulling through. Hold those wraps firmly until the very last moment.

---

##### Back Stitch
*Used for: fine detail lines, petal outlines if desired*

1. Bring needle up at A (one stitch-length ahead on the line).
2. Insert needle at B (back at the START of the line).
3. Bring needle up at C (one stitch-length AHEAD of A).
4. Insert needle at A (the previous exit point).
5. Continue: each stitch travels backward to fill the gap, creating a continuous unbroken line.

---

##### Straight Stitch
*Used for: short leaf veins, tiny radiating details around flower centers*

1. Bring needle up at A.
2. Insert needle at B.
3. Each stitch is individual — bring needle up at new start point for each stitch.

---

#### Embroidery Sequence (Work in This Order)

Working from background to foreground prevents later stitches from being obscured by earlier ones.

---

**Step 1: Stems and Vines (Color D – Sage Green)**

Using stem stitch and Color D:
- Work the **main center stem** rising from the base of the motif to the center rose.
- Work **two branching stems** curving to the left and right, ending where the smaller blossoms will sit.
- Work **2–3 smaller stem offshoots** for leaf placement.
- Each stem line should be **4–5 rows (approx. ¼ inch / 6 mm) wide** of stem stitch lines laid side by side for a fuller look, OR a single line of stem stitch for delicate stems.

---

**Step 2: Leaves (Color D – Sage Green)**

Using satin stitch and Color D:
- Work **4–6 leaves** in pairs along the stem lines.
- Each leaf: approximately **8–10 sts long × 4–5 sts wide**.
- Fill with satin stitch at 45° angle to center vein.
- After filling, optionally add a **single straight stitch center vein** in a slightly darker green or the same color for definition.

---

**Step 3: Large Rose (Color B – Dusty Rose)**

The large rose is worked as a series of overlapping petal layers.

**Outer petals (5 petals):**
Using fan satin stitch and Color B:
- Mark 5 evenly spaced petal positions around center point.
- Each petal: approximately **12 sts long × 8 sts wide** at the widest point.
- Work satin stitch from outer petal tip toward center, fanning stitches to follow petal curve.
- Leave center area (approx. 5 × 5 sts) open for inner petals and center.

**Inner petals (3–4 petals):**
Using fan satin stitch and Color B (or a slightly lighter pink if desired):
- Work 3–4 smaller petals inside and slightly overlapping the outer ring.
- Each inner petal: approximately **7 sts long × 5 sts wide**.
- Work with slightly lighter touch on thread tension to give a raised, overlapping appearance.

**Rose center:**
Using Color E (butter yellow):
- Fill the center circle (approx. 4–5 sts diameter) with tightly packed **French knots**, 2-wrap.

---

**Step 4: Small Blossoms (Color C – Coral/Peach)**

Using lazy daisy stitch and Color C:
- Work **one 5-petal lazy daisy flower** at each end of the branching stems (2 flowers total).
- Each blossom: approx. **6–8 sts** petal length from center.
- Space the 5 petals evenly (72° apart).
- Add **3 French knots** in Color E at center of each small blossom.

---

**Step 5: Filler French Knots (Color F – Lavender, and Color C – Coral)**

Scatter **10–15 French knots** (mix of 2-wrap and 3-wrap) loosely through the open spaces of the composition:
- Cluster **3–5 knots** close together near each blossom.
- Place **2–3 isolated knots** along open sections of the stems.
- Use Color F for lavender tones and Color C for tiny coral accents.
- Step back and assess balance before adding more — less is often more.

---

**Step 6: Final Details**

- Using Color D, add **short straight stitch "grass" blades** or radiating short stitches at the very base of the main stem if desired, to ground the composition.
- Using Color E, add **tiny straight stitch stamens** (4–6 stitches radiating from rose center outward between petals) for additional detail.
- If any outline definition is desired, add **back stitch outlines** in a darker shade of the corresponding color (e.g., deeper rose for the large petals).

---

### PART SIX: Finishing the Hoop

#### Step 1: Check and Remove Marker Lines
Lightly mist the embroidered surface with clean water (or use a cotton swab dampened with water) to remove any remaining water-soluble marker lines. Allow to dry fully before proceeding.

#### Step 2: Secure the Fabric Back

1. Thread a tapestry needle with a long length of **matching color or neutral yarn**.
2. Work a **running stitch** through the fabric edge approximately ½ inch (1.3 cm) from the hoop rim, all the way around the circle.
3. Pull the running stitch gently to gather the fabric edges neatly behind the hoop, distributing the gathers evenly.
4. Secure with a few anchoring stitches and weave in end.

#### Step 3: Back Finishing (Optional but Recommended)

**Option A – Cardstock Backing:**
Trace the inner hoop ring onto cardstock or thin felt. Cut out the circle slightly inside the traced line. Apply a thin line of hot glue or fabric glue around the inside back edge of the outer hoop ring, and press the cardstock/felt circle in place to cover all gathered fabric and thread ends. Hold until set.

**Option B – Felt Backing:**
Cut a circle of felt approximately ½ inch (1.3 cm) larger than the inner hoop diameter. Using a sewing needle and thread, whip stitch the felt circle to the gathered fabric edges on the back, enclosing all raw edges and thread tails.

#### Step 4: Tighten and Display

Re-tighten the hoop screw one final time to ensure the embroidered panel is perfectly taut and centered. The hoop screw itself can be positioned at the top as a built-in hanger, or attach a small ribbon or cord to the screw mechanism for hanging.

---

## Embroidery Motif Reference Chart

The following is a simplified text grid representing the embroidery layout, where each cell = approximately 1 exsc stitch width × 1 row height. The motif is centered on the panel.

```
Key:
 .  = background (unembroidered)
 S  = stem stitch (Color D)
 L  = leaf/satin stitch (Color D)
 R  = large rose petal (Color B)
 r  = rose center French knot (Color E)
 B  = small blossom lazy daisy (Color C)
 b  = small blossom center knot (Color E)
 *  = filler French knot (Color F or C)

Rows shown = center 20 rows of the panel (rows 17–36 of 52)
Columns shown = center 20 sts (sts 15–34 of 48)

Col: 15 16 17 18 19 20 21 22 23 24 25 26 27 28 29 30 31 32 33 34
R36:  .  .  .  .  .  .  .  .  .  .  .  .  .  .  .  .  .  .  .  .
R35:  .  .  .  .  .  B  B  B  .  .  .  .  .  B  B  B  .  .  .  .
R34:  .  .  .  .  B  b  b  b  B  .  .  .  B  b  b  b  B  .  .  .
R33:  .  .  .  .  .  B  B  B  .  .  .  .  .  B  B  B  .  .  .  .
R32:  .  .  .  *  .  .  S  .  .  .  .  .  .  S  .  .  .  *  .  .
R31:  .  .  .  .  L  L  S  L  L  .  .  L  L  S  L  L  .  .  .  .
R30:  .  .  .  .  L  L  S  L  L  .  .  L  L  S  L  L  .  .  .  .
R29:  .  .  .  .  .  L  S  L  .  .  .  .  L  S  L  .  .  .  .  .
R28:  .  .  .  .  .  .  S  .  .  .  .  .  .  S  .  .  .  .  .  .
R27:  .  .  .  .  .  R  R  R  .  .  .  .  .  .  R  .  .  .  .  .
R26:  .  .  .  .  R  R  R  R  R  .  .  .  R  R  R  R  .  .  .  .
R25:  .  .  .  R  R  R  r  R  R  R  .  R  R  R  r  R  R  .  .  .
R24:  .  .  .  .  R  R  R  R  R  .  .  .  R  R  R  R  .  .  .  .
R23:  .  .  .  .  .  R  R  R  .  .  .  .  .  R  R  .  .  .  .  .
R22:  .  .  .  .  .  .  S  .  .  .  .  .  .  S  .  .  .  .  .  .
R21:  .  .  .  *  .  .  S  .  .  *  .  *  .  .  S  .  .  .  *  .
R20:  .  .  .  .  .  .  S  .  .  .  .  .  .  .  S  .  .  .  .  .
R19:  .  .  .  .  .  .  S  .  .  .  .  .  .  .  S  .  .  .  .  .
R18:  .  .  .  .  .  .  S  .  .  .  .  .  .  .  S  .  .  .  .  .
R17:  .  .  .  .  .  .  S  S  S  S  S  S  S  S  S  .  .  .  .  .
```

> **Note:** This chart is a schematic guide only. Your actual embroidery should flow naturally following the curves and inspiration of real botanical illustration. Use the chart for general placement reference and allow yourself creative freedom in the fine details, petal shapes, and leaf positions.

---

## Yarn Substitution Guide

| Yarn Brand | Yarn Name | Weight | Fiber |
|---|---|---|---|
| Madelinetosh | Tosh Sock | Fingering | SW Merino |
| Malabrigo | Sock | Fingering | SW Merino |
| Cascade | Heritage | Fingering | SW Merino/Nylon |
| Drops | Fabel | Fingering | Wool/Nylon |
| WeCrochet | Stroll | Fingering | SW Merino/Nylon |

> A nylon blend (75/25 merino/nylon) is ideal for durability in a wall hanging that will be handled and displayed long-term.

---

## Troubleshooting

| Problem | Solution |
|---|---|
| Embroidery stitches puckering the fabric | Loosen thread tension; re-block after embroidering |
| Satin stitch not lying flat | Work at a consistent angle; anchor starting and ending stitches more securely |
| French knots disappearing to back | Use a slightly smaller needle; maintain wrap tension until needle fully through |
| Stems look wobbly | Mark the stem line with water-soluble marker before stitching |
| Panel too small for hoop | Check gauge; re-block to full 8 × 8 in measurement before mounting |
| Fabric distorting in hoop | Loosen outer hoop ring, redistribute fabric tension evenly, re-tighten gradually |

---

## Care Instructions

**Embroidered Hoop Art — Wall Hanging**
To clean, gently spot clean with a damp cloth and mild wool wash. Do not submerge after embroidery is complete (embroidery thread colors may bleed). Do not hang in direct sunlight to prevent fading. Keep away from excessive humidity.

---

*Pattern © [Designer Name]. For personal use only. Please do not redistribute or sell this pattern.*

---

**Finished size confirmation:**
- 48 exsc across × 52 rows = 8 in × 8 in at gauge ✓
- Gauge: 24 exsc / 4 in = 6 exsc/in × 8 in = 48 exsc ✓
- Gauge: 26 rows / 4 in = 6.5 rows/in × 8 in = 52 rows ✓
- Foundation chain: ch 50 → work into 2nd ch from hook → 48 exsc ✓
Disclaimer: This pattern was generated by AI and should be reviewed for accuracy before use. While we strive for quality, AI-generated content may contain errors. Please verify measurements, stitch counts, and instructions before beginning your project. Generated by purlJam.uk
Access your pattern anytime
Bookmark this page to access your pattern anytime