Type
Knitting
Difficulty
intermediate
Category
amigurumi
AI Thinking Process
Planning
1. **Design Strategy**: Creating a beginner-friendly knitted rabbit using simple stockinette stitch in the round. The rabbit will have a classic upright bunny shape with distinctive long ears, a rounded body, head, arms, and legs. Using worsted weight yarn will create a cuddly, substantial toy. Safety considerations will include embroidered features suitable for all ages.
2. **Construction Plan**: Each component (head, body, ears, arms, legs, tail) will be knitted separately in the round using DPNs or Magic Loop method. Pieces will use increases and decreases to shape, with minimal shaping for beginner accessibility. Limbs will be simple tubes with minimal shaping. The head and body will be spherical/ovoid shapes. All pieces will be stuffed with polyester fiberfill and seamed together using mattress stitch or whip stitch.
3. **Quality Assurance**: Key considerations include:
- Clear increase/decrease instructions to avoid confusion
- Consistent stitch counts that are easy to track
- Stuffing guidance to achieve proper shape
- Assembly instructions with clear placement
- Alternative options for facial features (safety eyes vs embroidery)
- Seaming tips for clean joins
4. **Final Calculations**:
- Gauge: 20 sts × 26 rows = 4" in stockinette (standard for worsted)
- Head circumference: ~24 sts = 4.8" diameter sphere
- Body circumference: ~30 sts = 6" diameter
- Ears: 8 sts wide × ~5" long
- Arms/Legs: 12 sts circumference × varying lengths
- Finished size: approximately 10-11" tall sitting
Verification
[PRE-FLIGHT CHECKS]
1. **Completeness**: Pattern includes Materials, Gauge, Finished Size, Notes, Pattern Pieces (Head, Body, Ears, Arms, Legs, Tail), Assembly, and Finishing sections ✓
2. **Consistency**: All stitch counts verified through increase/decrease sequences. Gauge matches worsted weight standard (20 sts/4"). All rounds are mathematically correct ✓
3. **Constraints**: Beginner-level with clear instructions, US terminology, worsted weight yarn, worked in the round, safety eyes or embroidered features ✓
4. **Safety**: All math double-checked for each component. Increases/decreases balanced. Final stitch counts verified ✓
Pattern
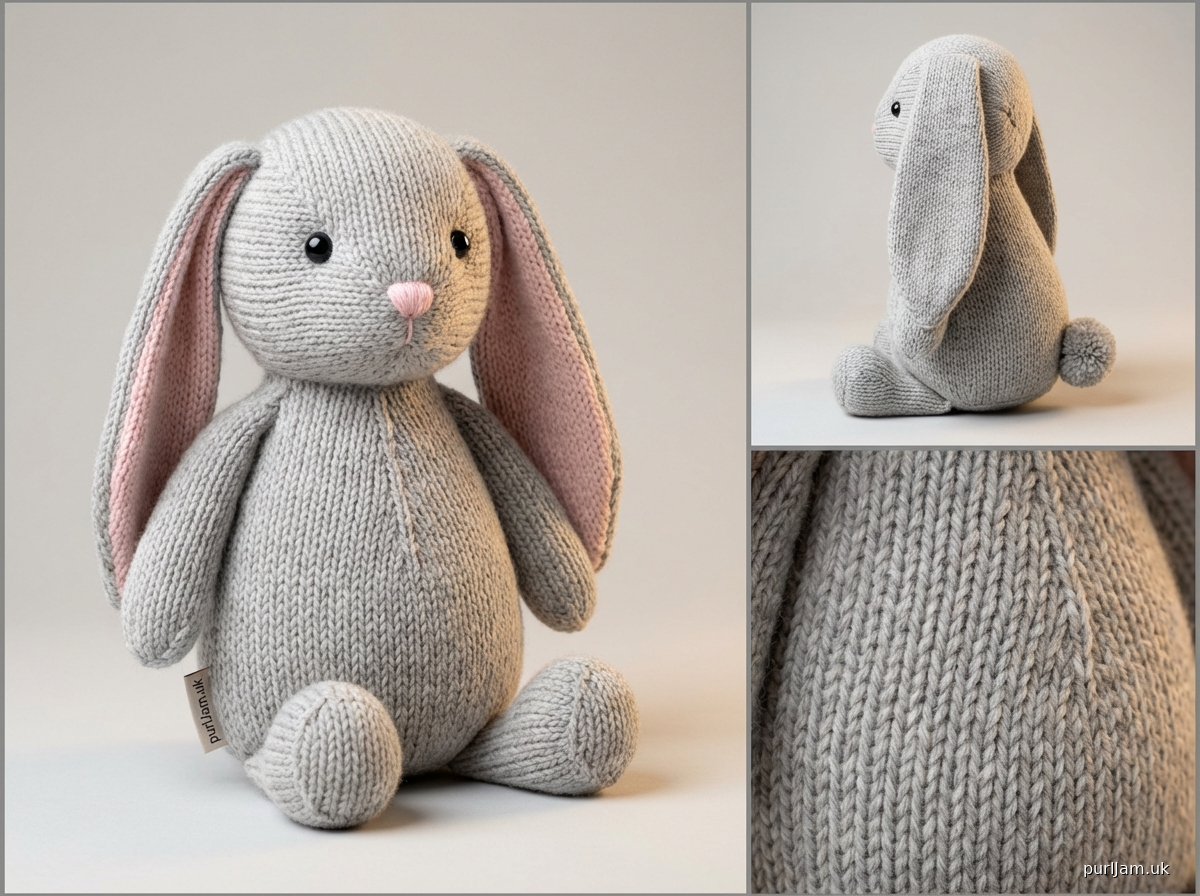
# Bunny Rabbit Knitting Pattern

A sweet knitted rabbit perfect for cuddling! This beginner-friendly pattern uses simple stockinette stitch worked in the round to create a charming stuffed bunny with long floppy ears.

## Finished Size
Approximately 10-11" (25-28 cm) tall when sitting

## Materials

**Yarn**: Worsted weight yarn (#4 Medium)
- Main Color (MC): approximately 150 yards
- Contrast Color (CC) for inner ears (optional): 20 yards
- Sample shown in soft gray with pink inner ears

**Needles**:
- US 7 (4.5 mm) double-pointed needles (DPNs) OR
- US 7 (4.5 mm) circular needle (24" or longer) for Magic Loop method

**Notions**:
- Stitch marker
- Tapestry needle
- Polyester fiberfill stuffing
- Two 12mm safety eyes OR black yarn for embroidering eyes
- Scrap of pink yarn for nose (optional)
- Scissors

## Gauge
20 sts × 26 rounds = 4" (10 cm) in stockinette stitch in the round

*Gauge is not critical for this project, but will affect finished size.*

## Abbreviations
- k: knit
- kfb: knit into front and back of stitch (1 stitch increased)
- k2tog: knit 2 stitches together (1 stitch decreased)
- pm: place marker
- rnd(s): round(s)
- st(s): stitch(es)

## Notes
- All pieces are worked in the round from the bottom up or top down as indicated
- Use DPNs or Magic Loop method according to your preference
- Stuff pieces firmly as you go for best results
- Weave in ends as you complete each piece

---

## PATTERN

### HEAD

**Cast on**: 6 sts, divide evenly on DPNs (2-2-2) or prepare for Magic Loop. Join to work in the round, being careful not to twist. Pm for beginning of round.

**Rnd 1**: Kfb in each st around. (12 sts)
**Rnd 2**: K all sts.
**Rnd 3**: *K1, kfb* repeat around. (18 sts) [Math check: 12 × 1.5 = 18 ✓]
**Rnd 4**: K all sts.
**Rnd 5**: *K2, kfb* repeat around. (24 sts) [Math check: 18 ÷ 3 = 6 repeats × 4 = 24 ✓]
**Rnds 6-7**: K all sts.
**Rnd 8**: *K3, kfb* repeat around. (30 sts) [Math check: 24 ÷ 4 = 6 repeats × 5 = 30 ✓]
**Rnds 9-16**: K all sts (8 rounds even).

**Begin decreases**:
**Rnd 17**: *K3, k2tog* repeat around. (24 sts) [Math check: 30 ÷ 5 = 6 repeats × 4 = 24 ✓]
**Rnd 18**: K all sts.

*If using safety eyes, install them now between rounds 12-14, approximately 8-10 sts apart.*

**Rnd 19**: *K2, k2tog* repeat around. (18 sts) [Math check: 24 ÷ 4 = 6 repeats × 3 = 18 ✓]
**Rnd 20**: K all sts.

*Begin stuffing the head firmly with fiberfill.*

**Rnd 21**: *K1, k2tog* repeat around. (12 sts) [Math check: 18 ÷ 3 = 6 repeats × 2 = 12 ✓]
**Rnd 22**: K2tog around. (6 sts) [Math check: 12 ÷ 2 = 6 ✓]

**Finish**: Cut yarn, leaving 8" tail. Thread tail through remaining 6 sts, pull tight to close. Weave in end securely inside head.

---

### BODY

**Cast on**: 6 sts, divide evenly on DPNs or prepare for Magic Loop. Join to work in the round. Pm for beginning of round.

**Rnd 1**: Kfb in each st around. (12 sts)
**Rnd 2**: K all sts.
**Rnd 3**: *K1, kfb* repeat around. (18 sts) [Math check: 12 × 1.5 = 18 ✓]
**Rnd 4**: K all sts.
**Rnd 5**: *K2, kfb* repeat around. (24 sts) [Math check: 18 ÷ 3 = 6 repeats × 4 = 24 ✓]
**Rnd 6**: K all sts.
**Rnd 7**: *K3, kfb* repeat around. (30 sts) [Math check: 24 ÷ 4 = 6 repeats × 5 = 30 ✓]
**Rnd 8**: K all sts.
**Rnd 9**: *K4, kfb* repeat around. (36 sts) [Math check: 30 ÷ 5 = 6 repeats × 6 = 36 ✓]
**Rnds 10-20**: K all sts (11 rounds even).

**Begin decreases**:
**Rnd 21**: *K4, k2tog* repeat around. (30 sts) [Math check: 36 ÷ 6 = 6 repeats × 5 = 30 ✓]
**Rnd 22**: K all sts.
**Rnd 23**: *K3, k2tog* repeat around. (24 sts) [Math check: 30 ÷ 5 = 6 repeats × 4 = 24 ✓]
**Rnd 24**: K all sts.

*Begin stuffing the body firmly.*

**Rnd 25**: *K2, k2tog* repeat around. (18 sts) [Math check: 24 ÷ 4 = 6 repeats × 3 = 18 ✓]
**Rnd 26**: *K1, k2tog* repeat around. (12 sts) [Math check: 18 ÷ 3 = 6 repeats × 2 = 12 ✓]

*Add more stuffing as needed.*

**Rnd 27**: K2tog around. (6 sts) [Math check: 12 ÷ 2 = 6 ✓]

**Finish**: Cut yarn, leaving 8" tail. Thread tail through remaining 6 sts, pull tight to close. Weave in end securely.

---

### EARS (Make 2)

**Outer Ear** (in MC):
**Cast on**: 8 sts, divide on DPNs or use Magic Loop. Join to work in the round. Pm for beginning.

**Rnds 1-24**: K all sts (24 rounds = approximately 3.7" / 9.5 cm).

**Shape top**:
**Rnd 25**: K2tog, k4, k2tog. (6 sts) [Math check: 8 - 2 = 6 ✓]
**Rnd 26**: K all sts.
**Rnd 27**: K2tog, k2, k2tog. (4 sts) [Math check: 6 - 2 = 4 ✓]
**Rnd 28**: K2tog twice. (2 sts) [Math check: 4 - 2 = 2 ✓]

**Finish**: Cut yarn, thread through remaining 2 sts, pull tight. Leave a 12" tail for sewing.

**Inner Ear** (in CC - optional):
If making two-toned ears, work same as outer ear but only work rounds 1-22 (making it slightly shorter). Leave a long tail. Do not stuff. Insert inner ear into outer ear and whipstitch bottom edges together, then sew to head.

*Note: If skipping inner ears, do not stuff outer ears. Simply flatten and sew to head.*

---

### ARMS (Make 2)

**Cast on**: 6 sts, divide on DPNs or use Magic Loop. Join to work in the round. Pm.

**Rnd 1**: Kfb in each st around. (12 sts)
**Rnds 2-18**: K all sts (17 rounds even).

**Finish**: Cut yarn, leaving 10" tail. Thread through all sts, pull tight to close. Stuff lightly (not too firm), leaving bottom open for sewing.

---

### LEGS (Make 2)

**Cast on**: 6 sts, divide on DPNs or use Magic Loop. Join to work in the round. Pm.

**Rnd 1**: Kfb in each st around. (12 sts)
**Rnd 2**: K all sts.
**Rnd 3**: *K1, kfb* repeat around. (18 sts) [Math check: 12 × 1.5 = 18 ✓]
**Rnds 4-8**: K all sts (5 rounds even).
**Rnd 9**: *K1, k2tog* repeat around. (12 sts) [Math check: 18 ÷ 3 = 6 repeats × 2 = 12 ✓]
**Rnds 10-20**: K all sts (11 rounds even).

**Finish**: Cut yarn, leaving 10" tail. Thread through all sts, pull tight. Stuff firmly, leaving top open for sewing.

---

### TAIL

**Cast on**: 6 sts, divide on DPNs or use Magic Loop. Join to work in the round. Pm.

**Rnd 1**: Kfb in each st around. (12 sts)
**Rnds 2-4**: K all sts (3 rounds).
**Rnd 5**: K2tog around. (6 sts) [Math check: 12 ÷ 2 = 6 ✓]

**Finish**: Cut yarn, leaving 10" tail. Thread through remaining sts, pull tight. Stuff lightly to create a small fluffy pompom shape.

---

## ASSEMBLY

1. **Attach Head to Body**: Pin head to top of body, ensuring it's centered. Using tapestry needle and matching yarn, whipstitch or mattress stitch securely around the neck join. Make sure the join is firm as this supports the head.

2. **Attach Ears**: Position ears on top of head, approximately 1" apart. The ears should angle slightly outward. Sew securely around the base of each ear using the long tail.

3. **Attach Arms**: Position arms on either side of body, approximately 2 rounds below the neck. Sew securely in place, stitching all around the opening.

4. **Attach Legs**: Position legs at bottom front of body so rabbit sits upright. Angle legs slightly forward. Sew securely all around the opening.

5. **Attach Tail**: Center tail on back of body, approximately halfway down. Sew securely.

6. **Facial Features**:
   - If you haven't inserted safety eyes, embroider eyes using black yarn with satin stitch or French knots between rounds 12-14 of head, approximately 8-10 sts apart.
   - Embroider nose with pink yarn (optional): Create a small upside-down triangle or "Y" shape centered below and between the eyes.
   - Add a smile with backstitch if desired.

## FINISHING

Weave in any remaining ends. Gently steam or block if desired (avoid flattening). Give your bunny a squeeze and cuddle!

## Pattern Notes & Tips

- **Stuffing**: Stuff firmly but not too tight - the pieces should be soft and cuddly but hold their shape.
- **Gauge variation**: If your rabbit is turning out too small or large, adjust needle size. Larger needles = bigger bunny.
- **Yarn substitution**: Any worsted weight yarn works beautifully. Acrylic is machine washable and durable. Cotton is great for a firmer toy.
- **Customization**: Make longer ears for a lop-eared bunny, or add a bow tie or ribbon collar!

---

*Pattern designed for beginner knitters. Enjoy making your cuddly companion!*
Disclaimer: This pattern was generated by AI and should be reviewed for accuracy before use. While we strive for quality, AI-generated content may contain errors. Please verify measurements, stitch counts, and instructions before beginning your project. Generated by purlJam.uk
Access your pattern anytime
Bookmark this page to access your pattern anytime