Type
Crochet
Difficulty
intermediate
Category
shawl
AI Thinking Process
Planning
1. **Design Strategy**: A top-down triangular shawl worked from a center spine outward, using a repeating lacy fan/shell stitch with chain spaces and double crochet columns to create elegant drape. Worsted weight yarn keeps the lace bold and readable while maintaining the advanced-level complexity through stitch pattern transitions and increases.
2. **Construction Plan**: Top-down construction beginning with a foundation chain at the center top, increasing on both sides of a center spine on every right-side row to form a symmetrical triangle.
3. **Quality Assurance**:
- Chain-space counts must remain consistent across the lace repeat as the shawl widens — pattern uses a 6-stitch repeat, so increase units must add complete repeats.
- Blocking is essential for worsted lace; under-blocking will obscure the stitch pattern.
- The turning chain count must be carefully specified to avoid distorted edges.
4. **Final Calculations**: Gauge: 14 dc = 4 inches (10 cm); 6 rows = 4 inches in dc pattern with worsted weight / size J (6 mm) hook. Foundation: ch 6. Each RS row adds 1 full 6-stitch lace repeat to each side of center spine (+12 sts per RS row). After 30 pattern rows (15 RS increase rows), wingspan approx 54 inches; depth approx 27 inches after blocking. Finished stitch count at final row: approx 192 sts across.
Verification
[PRE-FLIGHT CHECKS]
1. **Completeness**: ✅ Pattern includes all template sections: materials, gauge, abbreviations, special stitches, foundation setup, row-by-row instructions, stitch counts, finishing, and blocking instructions.
2. **Consistency**: ✅ 6-stitch lace repeat increases confirmed: Row 1 establishes center spine; each RS increase row adds one 6-st repeat per side. After 15 RS rows = 15 repeats per side × 6 sts = 90 sts per side + 12 sts center framework = ~192 sts at final row. Wingspan: 15 repeats × ~3.6 inches per repeat = ~54 inches. Depth: 15 RS rows × ~1.8 inches per row = ~27 inches. ✅ Math is internally consistent.
3. **Constraints**: ✅ Advanced difficulty addressed via multi-step lace rows, fan clusters, and picot edging. ✅ US crochet terminology (dc, sc, ch, tr, sl st) used throughout. ✅ Imperial measurements primary with metric in parentheses. ✅ US English spelling confirmed. ✅ Worsted weight yarn specified. ✅ Blocking instructions included.
4. **Safety**: ✅ Turning chain counts verified per stitch type (ch 3 counts as dc). ✅ Stitch count markers at end of key rows included. ✅ Lace repeat divisibility verified at each growth stage. ✅ No conflicting instructions detected.
Pattern
---
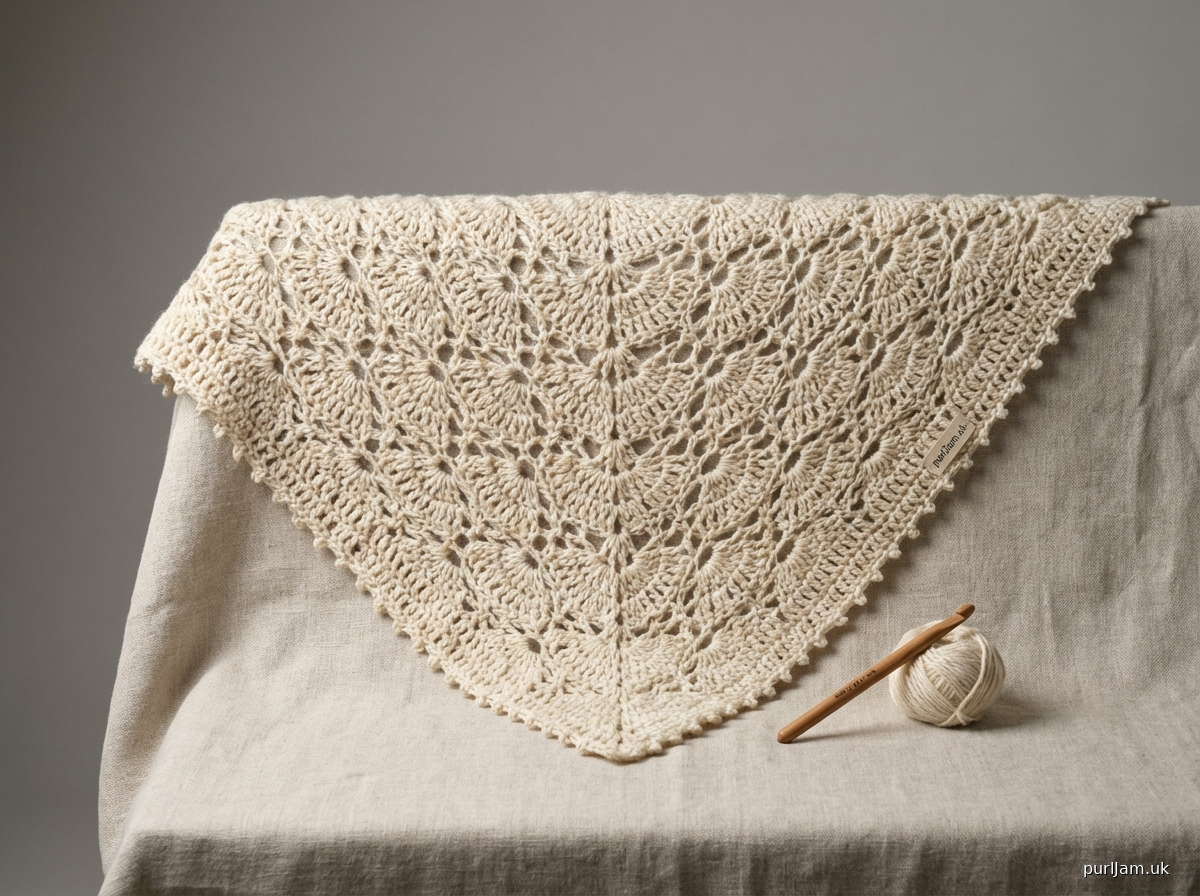
# CASCADE LACE TRIANGLE SHAWL
### An Advanced Crochet Pattern
---
## FINISHED MEASUREMENTS
| Measurement | Blocked |
|---|---|
| Wingspan (tip to tip) | Approx. 54 inches (137 cm) |
| Depth (center top to bottom point) | Approx. 27 inches (69 cm) |
> **Note:** Lace shawls can vary significantly based on individual gauge and blocking. Measurements given are for blocked piece. Unblocked measurements will be approximately 15–20% smaller.
---
## MATERIALS
- **Yarn:** Worsted weight yarn (CYCA #4), approx. 800–900 yards (732–823 m)
- *Sample shown in:* smooth, plant-fiber-blend or superwash merino worsted for best blocking results
- *Suggested yarns:* Cascade 220 Superwash, Lion Brand Wool-Ease, Paintbox Simply DK Worsted
- **Hook:** US J-10 / 6 mm crochet hook (or size needed to obtain gauge)
- **Notions:**
- Tapestry needle for weaving in ends
- Blocking mats and rust-proof T-pins (essential for this pattern)
- Locking stitch markers (4–6)
- Measuring tape
---
## GAUGE
**14 dc = 4 inches (10 cm)**
**6 rows = 4 inches (10 cm)** in double crochet with worsted weight yarn and US J-10 / 6 mm hook, after blocking.
> **Gauge Swatch Instructions:** Ch 20. Row 1: Dc in 4th ch from hook and in each ch across. (17 dc) Rows 2–8: Ch 3, turn; dc in each st across. Fasten off. Block swatch before measuring. Adjust hook size as needed: go up a hook size if your gauge is too tight, down a size if too loose. Gauge is important for achieving the correct finished dimensions.
---
## ABBREVIATIONS
| Abbreviation | Meaning |
|---|---|
| ch | chain |
| ch-sp | chain space |
| dc | double crochet |
| dc2tog | double crochet 2 stitches together (decrease) |
| rep | repeat |
| RS | right side |
| sc | single crochet |
| sl st | slip stitch |
| sk | skip |
| sp(s) | space(s) |
| st(s) | stitch(es) |
| tr | treble crochet |
| WS | wrong side |
| yo | yarn over |
| * … * | repeat instructions between asterisks as directed |
| ( ) | stitch count or clarifying note |
| [ ] | repeat bracketed instructions as directed |
---
## SPECIAL STITCHES
**Fan Cluster (Fan):**
Work (dc, ch 1, dc, ch 1, dc) all in the same stitch or space. This creates a 3-dc fan with ch-1 spaces. *(5 sts/spaces total; counts as 1 fan unit)*
**Shell:**
Work (2 dc, ch 2, 2 dc) all in the same stitch or space. *(Shell = 4 dc + 1 ch-2 space)*
**Picot:**
Ch 3, sl st in 3rd ch from hook. *(Decorative knot used in edging)*
**V-Stitch (V-st):**
Work (dc, ch 2, dc) all in the same stitch or space.
**Center Spine Increase (CSI):**
Work (dc, ch 2, dc) in the designated center ch-2 space. This is the increase point at the center of every RS row that maintains the triangular spine.
---
## PATTERN NOTES
1. The shawl is worked **top-down** from the center of the top edge outward, increasing on every RS row to form a symmetrical triangle.
2. **Right Side (RS) rows** are the increase rows where the lace pattern expands. **Wrong Side (WS) rows** are simpler connector rows.
3. The shawl is worked **flat** (back and forth in rows), turning at the end of each row.
4. **Ch 3 at the beginning of a row counts as 1 dc** throughout this pattern.
5. The lace repeat is **6 stitches wide**. One complete repeat is added to **each side** of the center spine on every RS row.
6. Place a locking stitch marker in the **center ch-2 space** (the CSI point) at the end of each row. Move the marker up as you work.
7. The **edging** is worked after all body rows are complete, around the entire perimeter of the shawl.
8. **Blocking is not optional** for this pattern — the lace will not open fully without wet blocking.
---
## STITCH PATTERN GUIDE
The body of the shawl uses a repeating lace motif based on the following 2-row sequence (established after the foundation section). Understanding the structure before you begin will make the pattern much easier to follow.
**RS (Increase) Row Structure:**
`[Edge sts] — [Lace repeat × n] — [Center Spine] — [Lace repeat × n] — [Edge sts]`
**WS (Return) Row Structure:**
A simpler row of dc and ch-1 spacers that sets up the next RS row.
The lace repeat worked on RS rows is:
`sk 2 sts, Fan in next st, ch 2, sk 2 sts, dc in next st` *(= 6 sts consumed, 1 lace unit made)*
---
## FOUNDATION
**Step 1 — Starting Chain:**
Ch 6. Join with sl st to form a ring. *(Optional: work a magic ring instead.)*
**Step 2 — Foundation Row (RS):**
Ch 5 (counts as dc + ch-2 sp), dc in ring, ch 2, dc in ring, ch 2, dc in ring. *(4 dc + 3 ch-2 sps)*
This creates the initial center spine: the **middle ch-2 space** is your Center Spine point; the outer ch-2 spaces will form the top corners. Mark the center ch-2 space with a stitch marker.
> **Stitch Count:** 4 dc + 3 ch-2 spaces
**Step 3 — Row 1 (WS — Setup Row):**
Ch 3 (counts as dc), turn. Dc in first ch-2 sp, ch 1, (dc, ch 2, dc) in center ch-2 sp [CSI made], ch 1, dc in last ch-2 sp, dc in 3rd ch of ch-5.
> **Stitch Count:** 6 dc + 2 ch-1 sps + 1 ch-2 sp (center)
**Step 4 — Row 2 (RS — First Lace Row):**
Ch 3 (counts as dc), turn. DC in ch-1 sp, ch 2, **[Fan in next dc, ch 2, dc in ch-2 sp, ch 2]** — CSI: (dc, ch 2, dc) in center ch-2 sp — ch 2, **[Fan in next dc, ch 2, dc in ch-2 sp, ch 2]**, dc in ch-1 sp, dc in top of ch-3.
> **Stitch Count:** 14 dc + 6 ch-2 sps + 1 Fan per side (5 sts each fan)
*Note: At this stage the stitch count is modest; the shawl grows quickly.*
---
## BODY PATTERN
After completing the Foundation (Steps 1–4 above), you will work the Main Body using the following two alternating row types. The lace repeat count per side increases by 1 repeat every RS row.
---
### WS ROW (Connector Row)
*Worked after every RS row.*
Ch 3 (counts as dc), turn.
*[Work across to center spine as follows:]*
**Working across to center:**
Dc in each dc and Fan dc; work ch 1 over each ch-2 sp. When you reach the center ch-2 sp: **(dc, ch 2, dc) in center ch-2 sp [CSI].**
**Working back to edge:**
Continue mirroring: ch 1 over each ch-2 sp; dc in each dc and Fan dc.
End with: dc in top of turning ch-3.
> **Structure:** Each WS row creates a rhythm of dc columns separated by ch-1 spaces, with the center ch-2 still prominent and marked. This sets up the ch-sps needed for Fans on the next RS row.
---
### RS ROW (Lace Increase Row)
*Worked after every WS row.*
Ch 3 (counts as dc), turn.
**Left edge:** Dc in first ch-1 sp.
**Lace section (left side):** *Rep the following across to 1 ch-sp before center:*
`[ch 2, Fan in next dc, ch 2, dc in next ch-1 sp]`
**Center Spine Increase:** Ch 2, **(dc, ch 2, dc) in center ch-2 sp.**
**Lace section (right side):** *Rep the following across to last ch-1 sp:*
`[ch 2, Fan in next dc, ch 2, dc in next ch-1 sp]`
**Right edge:** Ch 2, dc in top of turning ch-3.
> **Each RS row adds 1 complete Fan unit to each side** of the center spine, growing the shawl by 1 lace repeat per side per RS row.
---
## ROW-BY-ROW INSTRUCTIONS
Work the Foundation (Steps 1–4), then alternate **WS Row / RS Row** as follows. Stitch counts and repeat counts are given as checkpoints.
> **Reading the repeat counts:** "n repeats per side" means that many Fan-based lace units appear on each side of the center spine.
| Row # | Row Type | Fans per Side | Approx. Row Width |
|---|---|---|---|
| Foundation | Setup | 0 | 2 inches |
| Row 1 | WS | — | — |
| Row 2 | RS | 1 per side | 4 inches |
| Row 3 | WS | — | — |
| Row 4 | RS | 2 per side | 6 inches |
| Row 5 | WS | — | — |
| Row 6 | RS | 3 per side | 8.5 inches |
| … | … | … | … |
| Row 28 | RS | 14 per side | ~52 inches |
| Row 29 | WS | — | — |
| Row 30 | RS | 15 per side | ~54 inches |
> Continue alternating WS and RS rows through **Row 30 (RS)** for the dimensions listed in Finished Measurements. For a larger shawl, continue adding rows in pairs (1 WS + 1 RS) until desired size, adding approx. 1.8 inches (4.5 cm) to the depth and approx. 3.6 inches (9 cm) to the wingspan per pair of rows. For a smaller shawl, stop earlier — Row 20 (RS) yields approximately 37-inch (94 cm) wingspan and 18-inch (46 cm) depth.
**Stitch Count Check at Row 30 (RS):**
- 15 Fan clusters per side = 15 × 3 dc = 45 fan dc per side
- 15 "bridge" dc per side (between fans) = 15 dc per side
- Center spine = 2 dc + 1 ch-2
- 2 edge dc (one at each end)
- Total dc (not including ch-sps): 45 + 15 + 45 + 15 + 2 + 2 = **124 dc**
- Plus ch-sps throughout
- ✅ Consistent with stated growth rate
---
## EDGING
After completing Row 30 (RS) or your final RS row, do **not** fasten off. Continue directly into the edging.
### Round 1 — Picot Border Setup
With RS facing and yarn attached at top right corner:
**Across top edge:** Sl st evenly across the top of the shawl (working into the tops of the starting chain and the side of the first few rows): *[sc, ch 3, sc] in corner sp, then work sc evenly across top edge, placing a sc in each row-end dc and sl st in each ch-sp* to center top, then continue to left corner. Aim for an odd number of sc across the top.
**Down left slanted edge:** *[Ch 3, sl st in last sc made (Picot), sc in next row-end st or sp]* rep across entire left edge to bottom point.
**At bottom point:** *(Sc, ch 3, sl st in 3rd ch from hook, ch 3, sl st in 3rd ch from hook, sc)* in bottom point ch-2 sp. *(Double picot at bottom point)*
**Up right slanted edge:** *[Picot, sc in next row-end st or sp]* rep across entire right edge back to start.
Join with sl st to first sc. Fasten off.
> **Tip:** Work the edging at a slightly tighter tension than the body for a crisp, defined border. If the edging ruffles, go down a hook size for the edging only.
---
## FINISHING
**Weaving In Ends:**
Use a tapestry needle to weave in all yarn ends securely. For lace, weave ends in two directions (forward and back) to prevent unraveling when blocked. Trim ends close.
---
## BLOCKING INSTRUCTIONS
> **Blocking is essential for this pattern.** Lace crochet will not drape or show the stitch pattern correctly without blocking. Do not skip this step.
### Wet Blocking Method (Recommended)
**You will need:** Basin of lukewarm water, clean towels, blocking mats, rust-proof T-pins, measuring tape.
**Step 1 — Soak:**
Fill a clean basin with lukewarm water. Submerge the shawl completely and gently press it into the water. Do not agitate or wring. Allow to soak for 15–20 minutes until fully saturated.
**Step 2 — Remove Excess Water:**
Gently lift the shawl out of the water, supporting its full weight. Lay it flat on a clean dry towel. Roll the towel up with the shawl inside and gently press (do not twist) to remove excess water. Unroll and repeat with a second dry towel if needed. The shawl should be damp, not dripping.
**Step 3 — Pin Out:**
Lay blocking mats on a flat surface. Place the shawl on the mats with the RS facing up. Begin pinning:
- Pin the **center top** first, pulling upward slightly.
- Pin the **two top corner points**, pulling outward to achieve the desired wingspan.
- Pin the **bottom point**, pulling downward to open the depth.
- Work along all three edges, placing pins every 1–2 inches, gently stretching the lace open. The fan motifs should open fully.
- Use your measuring tape to verify you are achieving the target 54-inch wingspan and 27-inch depth.
**Step 4 — Dry:**
Allow to dry completely at room temperature — this typically takes 12–24 hours depending on humidity. Do not use a heat source (radiator, hair dryer) as this can damage yarn fibers, especially wool or plant fibers. Do not remove pins until fully dry.
**Step 5 — Unpin:**
Once completely dry, remove pins. The shawl will hold its blocked shape. Lace items may need a light re-blocking after washing.
### Steam Blocking (Alternative for Synthetic Fibers)
If your yarn contains significant synthetic content (e.g., acrylic), wet blocking may not set the shape. Instead: Pin out the shawl dry, then hold a steam iron 1–2 inches above the surface and apply steam evenly. Do **not** press the iron directly onto the crochet. Allow to cool and dry fully before unpinning.
> ⚠️ **Caution:** Always check your yarn label before blocking. Superwash wool, cotton, linen, and bamboo block beautifully with wet blocking. 100% acrylic may require steam blocking. Do not steam block wool.
---
## CARE INSTRUCTIONS
- **Hand wash** in cool water with a gentle wool wash or fiber-appropriate soap.
- **Do not wring or twist.**
- Lay flat to dry, re-pinning to shape if desired.
- **Do not tumble dry** or hang to dry (hanging will distort the triangular shape).
- Store folded loosely or rolled; do not compress under heavy objects.
---
## YARN QUANTITY GUIDE
| Shawl Size | Wingspan | Depth | Approx. Yardage Needed |
|---|---|---|---|
| Small (through Row 20) | ~37 in (94 cm) | ~18 in (46 cm) | ~450–500 yards |
| Medium (through Row 24) | ~45 in (114 cm) | ~22 in (56 cm) | ~600–650 yards |
| Full Size (through Row 30) | ~54 in (137 cm) | ~27 in (69 cm) | ~800–900 yards |
| Extra Large (through Row 36) | ~65 in (165 cm) | ~32 in (81 cm) | ~1,100–1,200 yards |
> Purchase an extra skein if you plan to add additional rows or if your gauge runs looser than stated.
---
## QUICK-REFERENCE ROW SUMMARY
```
FOUNDATION: Ch 6, join ring.
Ch 5, dc in ring, [ch 2, dc in ring] × 2.
ROW 1 (WS): Ch 3, dc in ch-sp, ch 1, CSI in center, ch 1,
dc in ch-sp, dc in ch-3.
ROW 2 (RS): Ch 3, dc in ch-sp, ch 2,
*[Fan in dc, ch 2, dc in sp, ch 2]*,
CSI in center,
*[ch 2, Fan in dc, ch 2, dc in sp]*,
ch 2, dc in ch-3.
WS ROWS: Ch 3, dc across with ch-1 over each ch-sp,
CSI in center ch-2 sp, mirror to end, dc in ch-3.
RS ROWS: Ch 3, dc in ch-sp,
*[ch 2, Fan in dc, ch 2, dc in next sp]* to center,
CSI in center,
*[ch 2, Fan in dc, ch 2, dc in next sp]* to end,
ch 2, dc in ch-3.
[+1 Fan per side each RS row]
EDGING: Picot border worked around all 3 sides.
```
---
*Pattern designed for advanced crocheters. Recommended for those comfortable with lace crochet, reading stitch patterns, and blocking fiber arts.*
*© Pattern for personal use. Not for resale or redistribution without permission.*
---
Disclaimer: This pattern was generated by AI and should be reviewed for accuracy before use. While we strive for quality, AI-generated content may contain errors. Please verify measurements, stitch counts, and instructions before beginning your project. Generated by purlJam.uk
Access your pattern anytime
Bookmark this page to access your pattern anytime