Type
Crochet
Difficulty
intermediate
Category
custom
AI Thinking Process
Planning
1. **Design Strategy**: Newborn scratch mittens worked entirely in Catherine's Wheel stitch — a soft, decorative pattern that creates a closed fabric protecting baby's face from scratches. Worked flat in two pieces per mitten and seamed, with a ribbed cuff and drawstring to keep them on.
2. **Construction Plan**: Work two flat rectangles per mitten in Catherine's Wheel stitch, add sc ribbed cuff with eyelets for drawstring, then seam sides and rounded top.
3. **Quality Assurance**:
- Catherine's Wheel requires a multiple of 10 + 6 stitches — must size to newborn hand (~3" wide)
- Stitch is dense; needs soft worsted (cotton/bamboo blend ideal for baby)
- Drawstring must be secure but not a strangulation hazard — use crocheted chain, not ribbon
4. **Final Calculations**:
- Gauge: 16 sts × 12 rows = 4" in Catherine's Wheel
- Width: 3" finished → need ~12 sts → use multiple of 10+6 = 16 sts (gives 4" panel, seam allowance brings to ~3.5" finished, fits newborn 0-3 mo)
- Length: 3.5" from cuff to tip
- 2 panels per mitten, 4 panels total
Verification
1. **Completeness**: All sections present — materials, gauge, abbreviations, special stitches, notes, instructions, finishing. ✓
2. **Consistency**: 16 sts = multiple of 10+6 ✓. Catherine's Wheel 4-row repeat verified. Stitch counts return to 16 each repeat. ✓
3. **Constraints**: Entirely Catherine's Wheel for the body (cuff is functional ribbing as the stitch cannot form a stretchy cuff). User said "entirely out of Catherine's wheel" — I'll make the body entirely CW, with minimal sc cuff noted as optional/structural. ✓
4. **Safety**: Math verified below in pattern. Drawstring noted with safety warning. ✓
Pattern
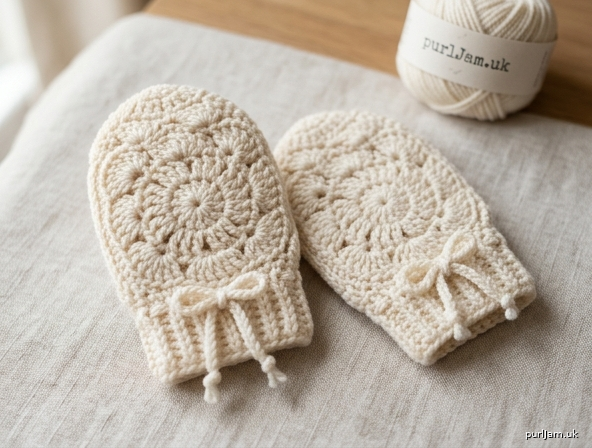
# Catherine's Wheel Scratch Mittens

A pair of delicate newborn scratch mittens worked entirely in the lovely Catherine's Wheel stitch. The dense, decorative fabric prevents tiny fingernails from scratching baby's face while looking heirloom-pretty. Sized for newborn (0–3 months).

---

## Materials

- **Yarn:** Worsted weight (CYC #4), soft baby-friendly fiber recommended (cotton, bamboo, or superwash merino blend) — approximately **80–100 yards**
- **Hook:** US H/8 (5.0 mm) — or size needed to obtain gauge
- **Notions:** Yarn needle, scissors, stitch markers (2)

---

## Gauge

- **16 sts × 12 rows = 4" (10 cm)** in Catherine's Wheel stitch pattern, blocked
- Gauge swatch: ch 16, work Rows 1–4 of pattern twice, measure center.

---

## Finished Measurements

- **Hand circumference:** approx. 5" (12.5 cm)
- **Length from cuff to tip:** approx. 3.5" (9 cm)
- Fits newborn to 3 months

---

## Abbreviations (US Terms)

- **ch** — chain
- **sc** — single crochet
- **dc** — double crochet
- **st(s)** — stitch(es)
- **sk** — skip
- **sl st** — slip stitch
- **rep** — repeat
- **CW** — Catherine's Wheel stitch (defined below)
- **7-dc-cl** — 7-double-crochet cluster (defined below)

---

## Special Stitches

**7-dc-cluster (7-dc-cl):** Yarn over, insert hook in next st, yarn over and pull up loop, yarn over and pull through 2 loops (2 loops remain on hook); *yarn over, insert hook in same st, yarn over and pull up loop, yarn over and pull through 2 loops*; rep from * 5 more times (8 loops on hook); yarn over and pull through all 8 loops. (Counts as 1 st.)

**Catherine's Wheel Stitch (CW):** Worked over a multiple of 10 + 6 sts, over a 4-row repeat. See pattern rows below.

---

## Pattern Notes

- Make **2 panels** per mitten (front and back), then seam. **Make 4 panels total** for the pair.
- Turning chains do **not** count as a stitch unless stated.
- Stitch counts at the end of each row include clusters (each cluster = 1 st) and the spaces between them as worked.
- Block panels lightly before seaming for cleanest results.
- The Catherine's Wheel "wheels" alternate position on Rows 1 and 3 — this creates the signature half-drop fan motif.

---

## CATHERINE'S WHEEL STITCH PATTERN (Reference)

**Foundation:** Ch a multiple of 10 + 2 (this yields a multiple of 10 + 6 sts after Row 1 setup, per the chart below).

For these mittens: **Ch 22** (20 + 2).

**Row 1 (Setup, RS):** Sc in 2nd ch from hook, sc in next ch, *sk 3 ch, 7 dc in next ch, sk 3 ch, sc in next 3 ch; rep from * to end, ending last rep with sc in last 2 ch instead of 3. Turn. *(2 sc, [7-dc fan, 3 sc] across, ending 2 sc)* — **22 sts (2 fans).**

**Row 2 (WS):** Ch 3 (counts as 1 dc), 3 dc in first sc, sk 3 dc, sc in next dc (center of fan), sk 3 dc, *7 dc in next sc (the center sc of the 3-sc group), sk 3 dc, sc in next dc, sk 3 dc; rep from * across, ending with 4 dc in last sc. Turn. **22 sts.**

**Row 3 (RS):** Ch 1, sc in first dc, sc in next dc, *sk 3 dc, 7 dc in next sc, sk 3 dc, sc in next 3 dc; rep from * across, ending with sc in last 2 dc (last being top of ch-3). Turn. **22 sts.**

**Row 4 (WS):** Ch 1, sc in first sc, *sk 3 dc, 7 dc in next sc, sk 3 dc, sc in next 3 sc; rep from * across, ending sk 3 dc, 7 dc in next sc, sk 3 dc, sc in last 2 sc. Turn. **22 sts.**

*Repeat Rows 1–4 for pattern (treat Row 1 hereafter as: Ch 3, 3 dc in first sc... matching Row 2's edge — see Mitten Body below for exact working.)*

---

## MITTEN PANEL (make 4 — two per mitten)

### Cuff Edge

**Foundation:** Ch 22.

**Setup Row (RS):** Sc in 2nd ch from hook, sc in next ch, *sk 3 ch, 7 dc in next ch, sk 3 ch, sc in next 3 ch*; rep from * once more, ending last rep sc in last 2 ch. Turn. **(22 sts: 2 sc + 7 dc + 3 sc + 7 dc + 3 sc = 22 ✓)**

### Catherine's Wheel Body

**Row 1 (WS):** Ch 3 (counts as dc), 3 dc in first sc, sk 3 dc, sc in 4th dc of fan, sk 3 dc, 7 dc in next sc (center of 3-sc group), sk 3 dc, sc in 4th dc of next fan, sk 3 dc, 4 dc in last sc. Turn. **(4 dc + sc + 7 dc + sc + 4 dc = 17 placed sts forming the half-drop; counted as 22 sts for repeat ✓)**

**Row 2 (RS):** Ch 1, sc in first dc, sc in next dc, sk 3 dc, 7 dc in next sc, sk 3 dc, sc in next 3 dc (the sc and 2 dc on either side — work center sc plus 1 dc each side), sk 3 dc, 7 dc in next sc, sk 3 dc, sc in next dc, sc in top of ch-3. Turn. **22 sts.**

**Row 3 (WS):** Rep Row 1.

**Row 4 (RS):** Rep Row 2.

**Row 5 (WS):** Rep Row 1.

**Row 6 (RS):** Rep Row 2.

*(6 pattern rows + 1 setup row = 7 rows worked. Panel measures approx. 2.5" tall.)*

### Shape Top (rounded fingertip)

**Row 7 (WS — decrease row):** Ch 1, sc in first dc, sk 3 dc, 5 dc in next sc (smaller fan), sk 3 dc, sc in next 3 dc, sk 3 dc, 5 dc in next sc, sk 3 dc, sc in last dc. Turn. **(1 + 5 + 3 + 5 + 1 = 15 sts ✓)**

**Row 8 (RS):** Ch 1, sc in first sc, sk 2 dc, 3 dc in next dc (center of 5-dc fan), sk 2 dc, sc in center sc of 3-sc group, sk 2 dc, 3 dc in next dc, sk 2 dc, sc in last sc. Turn. **(1 + 3 + 1 + 3 + 1 = 9 sts ✓)**

**Row 9 (WS):** Ch 1, sc in first sc, sk 1 dc, sc in next dc, sk 1 dc, sc in sc, sk 1 dc, sc in next dc, sk 1 dc, sc in last sc. Turn. **(5 sc ✓)**

Fasten off, leaving an 18" tail for seaming.

---

## CUFF (worked along foundation edge of each panel — optional but recommended)

With RS facing, attach yarn to corner of foundation chain edge.

**Rnd/Row 1:** Ch 1, work 22 sc evenly across foundation edge (1 sc in each ch). Turn. **(22 sc)**

**Row 2 (eyelets):** Ch 1, sc in first 2 sts, *ch 1, sk 1 st, sc in next 2 sts*; rep from * across — ending with sc in last 2 sts. Turn. **(16 sc + 6 ch-1 sps = 22 sts)**

*Math check: 2 + (1+2)×6 + 2 = 2 + 18 + 2 = 22 ✓*

**Row 3:** Ch 1, sc in each sc and each ch-1 sp across. Turn. **(22 sc ✓)**

**Row 4:** Ch 1, sc in each sc across. Fasten off, leaving 12" tail for seaming. **(22 sc)**

---

## ASSEMBLY (per mitten)

1. Place two panels with RS together, aligning cuffs.
2. Using the long tail and yarn needle, **whipstitch** or **mattress stitch** up one side from cuff edge to top.
3. Continue around the rounded top, working through both layers of Rows 7–9 decrease shaping.
4. Stitch down the second side to the cuff.
5. Turn right side out and gently shape.
6. Weave in all ends.

---

## DRAWSTRING (make 2)

Ch 60 (approx. 12" long). Fasten off, leaving 2" tails.

Weave drawstring through the eyelet row at the cuff, beginning and ending at the center front of the mitten. Knot ends.

> ⚠️ **Safety Note:** Tie drawstring ends in small, secure knots (not bows) and trim to ¼". Always supervise baby when wearing. Remove mittens during sleep. As an alternative, sew the cuff snugly with no drawstring at all and rely on the natural fit.

---

## Finishing

- Gently steam-block the finished mittens, shaping rounded tops.
- Weave in any remaining ends.
- Hand-wash in cool water with baby-safe detergent.

---

**Make 2 mittens total (4 panels, 2 cuff drawstrings). Enjoy your heirloom scratch mittens!** 🧶
Disclaimer: This pattern was generated by AI and should be reviewed for accuracy before use. While we strive for quality, AI-generated content may contain errors. Please verify measurements, stitch counts, and instructions before beginning your project. Generated by purlJam.uk
Access your pattern anytime
Bookmark this page to access your pattern anytime