Type
Knitting
Difficulty
beginner
Category
Pattern
Pattern
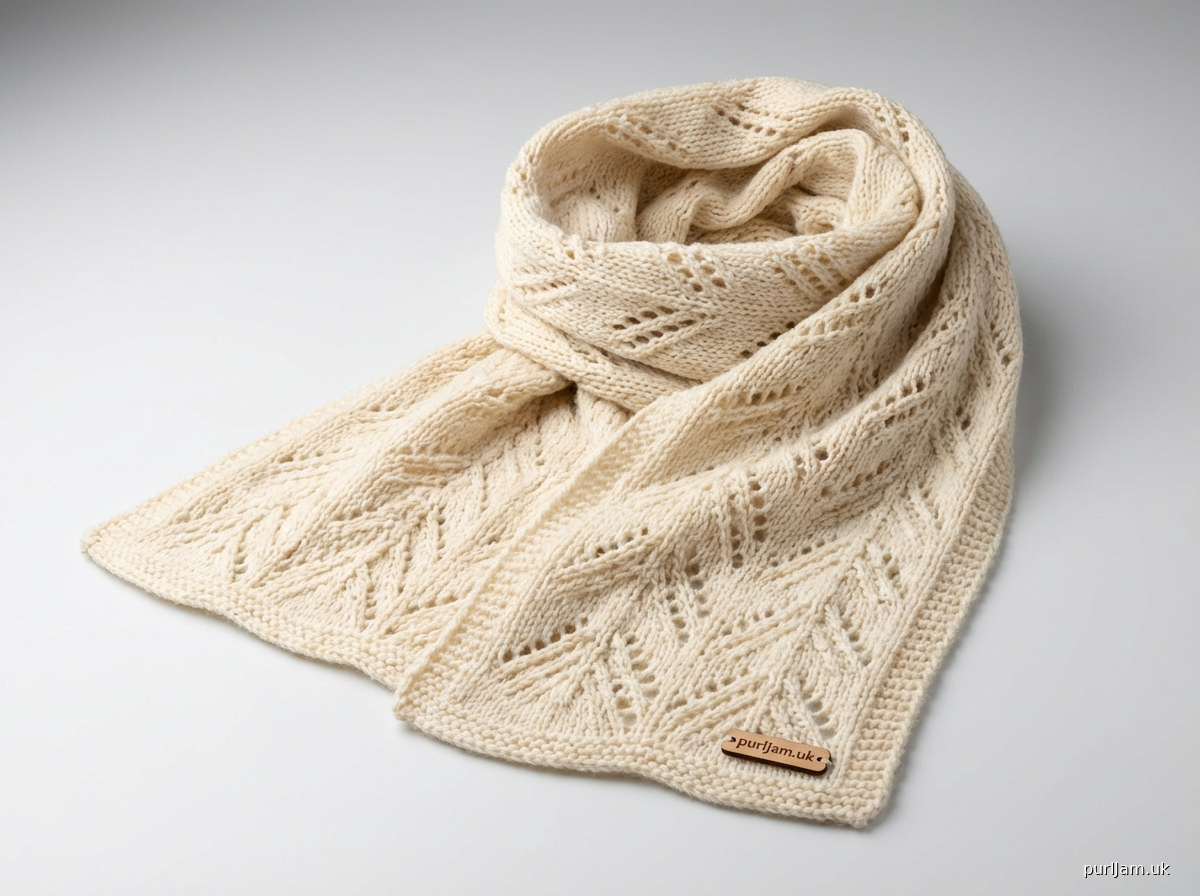
# CLASSIC LACE MUFFLER
**A Beginner Lace Project for Standard Gauge Machine**

---

## MACHINE_SETUP

**Machine Type**: Standard gauge knitting machine (Brother/Silver/Knitmaster or equivalent)

**Carriages Required**:
- Main bed knit carriage (KC)
- Lace carriage (LC)

**Punchcard/Electronic Pattern**:
- **Punchcard machines**: Load Punchcard #1 (6-stitch repeat, basic lace pattern with diagonal transfers)
- **Electronic machines**: Program Pattern #1 or equivalent 6-stitch all-over lace design
- Pattern repeat: 6 stitches × 8 rows

**Needle Configuration**:
- Main bed only (no ribber required)
- Working needles: 42 needles total
- Needle arrangement: Left 21 — Center 0 — Right 21 (21L to 21R)
- This creates 7 complete pattern repeats across width

**Cast-On Method**: Waste yarn and ravel cord method
1. Thread waste yarn (contrasting color, similar weight)
2. Set tension dial to 7
3. Bring 42 needles into B position (21L to 21R)
4. Knit 8-10 rows waste yarn with KC, ending COL (carriage on left)
5. Lay ravel cord (smooth cotton or nylon cord) across needles in hooks
6. Knit 1 row over ravel cord
7. Change to main yarn
8. Knit 6 rows plain stocking stitch at tension 7 before beginning lace pattern

**Carriage Settings**:
- **Main bed carriage (KC)**: Part buttons at normal position (I), tension dial at 7
- **Lace carriage (LC)**: Set to N (normal lace transfer), tension dial at 8 (one number higher than main carriage)

**Initial Setup Checklist**:
- [ ] Punchcard locked on row 1 (or electronic pattern programmed)
- [ ] 42 needles in B position (21L to 21R)
- [ ] Waste yarn knit, ravel cord inserted
- [ ] Main yarn threaded
- [ ] Cast-on comb and weights ready (approximately 3-4 claw weights)

---

## MATERIALS

**Yarn**:
- Approximately 350-400 yards (320-366 m) worsted weight yarn
- Suggested: Wool or wool-blend for best blocking and drape
- Sample shown in single color; optional contrast for stripe accents

**Notions**:
- Waste yarn (50 yards, contrasting color)
- Ravel cord (smooth cord for cast-on)
- Cast-on comb
- 3-4 claw weights or equivalent weight (approximately 100-150g total)
- Transfer tool (single or triple transfer tool)
- Latch tool for bind-off
- Tapestry needle for weaving ends
- Blocking wires or pins (optional but recommended)
- Steam iron or garment steamer

---

## GAUGE_AND_TENSION

**Tension Settings**:
- Main bed carriage: Tension dial 7
- Lace carriage: Tension dial 8

**Gauge** (after blocking):
- **Stitches**: 6 sts = 1" (2.5 cm) in lace pattern
- **Rows**: 7.5 rows = 1" (2.5 cm)
- Note: Lace fabric will grow significantly lengthwise when blocked

**Swatch Instructions**:
Always knit a test swatch before beginning project:
1. Cast on 36 needles (6 complete repeats)
2. Knit 6 rows plain stocking stitch
3. Work lace pattern for 48 rows (6 complete pattern repeats vertically)
4. Knit 6 rows plain stocking stitch
5. Bind off loosely
6. Steam block aggressively, pinning out lace holes
7. Measure gauge in center of swatch after cooling

**Dimensions**:
- **Width**: 7" (18 cm)
  - Math check: 42 sts ÷ 6 sts/inch = 7"
- **Length**: 56" (142 cm) before blocking; approximately 58-60" after blocking
  - Math check: 420 rows ÷ 7.5 rows/inch = 56"

---

## PATTERNING

**Lace Pattern Structure**:
The lace pattern is worked using alternating passes of the lace carriage and main bed carriage.

**Pattern Sequence** (repeats throughout):
1. **Selection row**: KC makes 1 pass from COL to COR (or COR to COL), needles are selected into D position according to punchcard/program
2. **Transfer row**: LC makes 1 pass in same direction, transferring stitches according to selection, creating lace holes
3. **Knit rows**: KC makes 1 pass, knitting all stitches and creating yarn-overs in empty needles
4. Repeat for pattern repeat length (8 rows for this pattern)

**Detailed Lace Carriage Instructions**:
- The lace carriage does NOT knit; it only transfers stitches
- Always ensure LC tension is set to 8 (looser than main carriage)
- The LC will move selected needles either left or right according to pattern
- Empty needles will remain in position for yarn-overs on next KC pass

**Pattern Repeat Specifics**:
- **Horizontal repeat**: 6 stitches
- **Vertical repeat**: 8 rows
- **Total repeats across width**: 7 repeats (42 needles ÷ 6 = 7)
- **Total repeats vertically**: Approximately 52-53 repeats (420 rows ÷ 8 = 52.5)

**Punchcard Settings**:
- Lock card on row 1 for first selection row
- Release card after first KC pass
- Card will advance automatically with each KC pass
- After 8 rows, pattern repeat will cycle continuously

**Electronic Machine Settings**:
- Program 6-stitch × 8-row pattern
- Set pattern to continuous repeat (not single motif)
- Pattern position: Center over working needles
- Memo setting: N (normal memo for lace)

**Edge Stitches** (for neat selvedges):
- First and last needle on each side will knit plain every row
- These needles should NOT be included in lace transfers
- If using electronic machine, ensure pattern is programmed for 40 active stitches with 1 plain edge stitch each side

---

## ROW_PLAN

**RC000-006**: Foundation rows (main yarn, plain stocking stitch)
- Set RC to 000
- Main yarn threaded, KC set to tension 7
- Hang cast-on comb with 3 claw weights evenly spaced
- Knit 6 rows plain stocking stitch, ending COL or COR
- Check: Fabric should be even, weights hanging properly

**RC006**: Begin lace pattern
- Lock punchcard on row 1 (or activate electronic pattern)
- **Row 007**: KC makes selection pass → needles move to D position
- After this pass, release punchcard to advance automatically
- **Row 007**: LC makes transfer pass in same direction
- **Row 008**: KC knits all stitches, creating yarn-overs
- Continue alternating selection/transfer/knit sequence

**RC010-020**: Initial pattern establishment
- Check pattern alignment after first complete 8-row repeat
- Rehang weights if needed, ensure even tension
- Verify lace holes are forming correctly
- If pattern looks distorted, check LC tension (may need to increase to 9)

**RC020-100**: Continue lace pattern
- Work lace pattern sequence continuously
- Every 20 rows, pause to check:
  - Weights still hanging evenly
  - No dropped stitches
  - Pattern advancing correctly
  - Fabric not pulling to one side
- Rehang weights every 40-50 rows, moving them up to fabric edge

**RC100-200**: Mid-section progress check
- At RC100, measure width (should be approximately 7")
- Measure length so far (should be approximately 13-14")
- Continue lace pattern sequence
- Maintain consistent rhythm: select → transfer → knit

**RC200-300**: Continue lace pattern
- Pattern should be well-established and visible
- Continue rehanging weights every 40-50 rows
- Watch for yarn supply; join new yarn at side edges if needed (leave 6" tails for weaving)

**RC300-400**: Approach final length
- At RC300, measure length (should be approximately 40")
- Continue pattern to RC414 (complete last pattern repeat)
- Math check: 414 rows ÷ 8 = 51.75 repeats (end after row 6 of repeat 52)

**RC414-420**: Final plain rows
- After completing last lace pattern repeat at RC414
- Set punchcard to locked position (or deactivate electronic pattern)
- Remove LC from bed
- Knit 6 rows plain stocking stitch with KC only at tension 7
- End COL or COR
- RC should read 420

**RC420**: Bind off
- Use latch tool bind-off method or waste yarn method
- **Latch tool bind-off**: Working from right to left, use latch tool to pull each stitch through the next stitch, binding off loosely
- Alternatively: Knit 8-10 rows waste yarn at tension 10, remove from machine, and finish later with needle bind-off for maximum stretch

---

## FINISHING

**Removing from Machine**:
1. If using latch tool bind-off, remove fabric from machine after securing last stitch
2. If using waste yarn method, carefully remove fabric from machine after waste yarn rows
3. Gently remove ravel cord from cast-on edge
4. The cast-on edge will open, creating live stitches

**Cast-On Edge Finishing** (if using waste yarn method):
- Thread tapestry needle with 24" length of main yarn
- Pick up live stitches from cast-on edge onto tapestry needle
- Work a sewn bind-off: pass needle through first 2 stitches purlwise, then back through first stitch knitwise and drop it off; repeat across
- This creates a stretchy edge matching the bind-off edge

**Weaving Ends**:
- Use tapestry needle to weave in all yarn tails
- Weave vertically along side edges for 2-3"
- Trim excess yarn close to fabric

**Blocking** (CRITICAL for lace):
Proper blocking opens up the lace pattern and is essential for this project.

1. **Steam blocking method**:
   - Lay muffler flat on blocking board or clean towel on flat surface
   - Gently stretch to dimensions (7" × 58-60" after blocking)
   - Pin edges with blocking pins or blocking wires through side edges
   - Hold steam iron 1-2" above fabric, apply generous steam
   - Do NOT press iron directly on fabric
   - Allow to cool and dry completely (2-4 hours) before unpinning

2. **Wet blocking method** (alternative):
   - Soak muffler in cool water with wool wash for 15 minutes
   - Gently squeeze out excess water (do not wring)
   - Roll in towel to remove more moisture
   - Lay flat on blocking surface
   - Pin to dimensions, stretching gently to open lace
   - Allow to air dry completely (12-24 hours)

3. **Hanging with weights** (optional, for extra length):
   - After steam blocking, hang muffler vertically
   - Attach blocking weights or clips to bottom edge
   - Let hang for 24 hours to elongate fabric
   - This can add 2-4" of additional length

**Final Pressing**:
- After completely dry, give one final gentle steam
- Check that all lace holes are open and visible
- Fabric should have a soft drape, not be stiff

**Optional Fringe**:
For decorative fringe at short ends:
1. Cut 28 strands of yarn, each 14" long (7 fringes × 2 ends × 2 strands per fringe)
2. Using crochet hook, fold 2 strands in half
3. Insert hook through edge stitch from wrong side to right side
4. Pull loop of folded strands through
5. Draw cut ends through loop and tighten
6. Space 7 fringes evenly across each short end
7. Trim fringe to even length (approximately 6")

**Care Instructions**:
- Hand wash in cool water with wool wash
- Lay flat to dry or hang with light weight
- Steam lightly to refresh lace pattern if needed
- Store folded or rolled to prevent stretching

---

## ABBREVIATIONS

**General Terms**:
- **RC**: Row counter
- **COL**: Carriage on left
- **COR**: Carriage on right
- **KC**: Knit carriage (main bed carriage)
- **LC**: Lace carriage
- **sts**: Stitches
- **L**: Left
- **R**: Right

**Machine-Specific Terms**:
- **B position**: Needles in working position (forward from A position)
- **D position**: Needles in fully forward position (selected for lace transfer or pattern)
- **Main bed**: Primary needle bed on flat machine
- **Tension dial**: Dial controlling tightness of knitting (higher number = looser)
- **Part buttons**: Settings on carriage controlling needle selection
- **Punchcard**: Paper or mylar card with punched holes indicating pattern
- **Ravel cord**: Smooth cord used in cast-on that can be easily removed
- **Waste yarn**: Scrap yarn used for temporary cast-on/bind-off

**Lace Carriage Terms**:
- **N setting**: Normal lace transfer setting
- **Selection row**: Row where KC selects needles into D position according to pattern
- **Transfer row**: Row
Disclaimer: This pattern was generated by AI and should be reviewed for accuracy before use. While we strive for quality, AI-generated content may contain errors. Please verify measurements, stitch counts, and instructions before beginning your project. Generated by purlJam.uk
Access your pattern anytime
Bookmark this page to access your pattern anytime