Type
Crochet
Difficulty
beginner
Category
hat
AI Thinking Process
Planning
Verification
Pattern
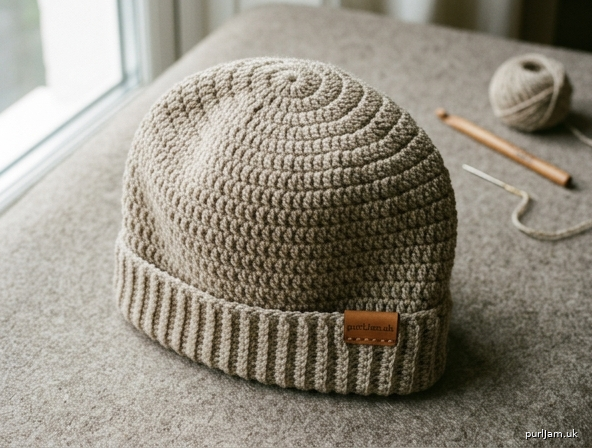
Cozy Worsted Top-Down Beanie
A warm, seamless beanie worked from the top down in half double crochet. This is a true beginner project — no complicated shaping, just a simple magic ring, steady increases, and easy rounds worked even. An optional folded ribbed band adds a snug, stretchy finish.
Skill Level
Beginner
Finished Measurements
- Circumference: 20 inches (51 cm), unstretched — fits an adult medium head of about 21–23 inches (53–58 cm) with comfortable negative ease.
- Height: approximately 8 inches (20 cm), or 9 inches (23 cm) with the folded ribbed band.
Gauge
- 12 hdc × 9 rows = 4 inches (10 cm) in half double crochet.
- Take a moment to check your gauge — it determines the final fit. Work a flat swatch at least 5 inches wide. If your swatch is too big, go down a hook size; if too small, go up a hook size.
Materials
- Yarn: Worsted weight (medium / #4), approximately 150–180 yards (137–165 m). One standard skein is plenty.
- Hook: US H-8 (5 mm), or size needed to obtain gauge.
- Notions: Stitch marker, yarn needle, scissors.
Abbreviations (US Terms)
- ch = chain
- sc = single crochet
- hdc = half double crochet
- BLO = back loop only
- st(s) = stitch(es)
- inc = increase (work 2 stitches in the same stitch)
- sl st = slip stitch
- rnd = round
Construction Notes
This hat is worked in continuous spiral rounds (do not join at the end of each round) unless stated. Place a stitch marker in the first stitch of the round and move it up as you go to track your progress. The crown is shaped with even increases until it reaches the correct diameter, then the body is worked even to full height.
Pattern
Crown (Increase Section)
Setup: Make a magic ring.
Round 1: Work 10 hdc into the magic ring. Pull the ring closed tightly. (10 sts)
Round 2: 2 hdc in each st around. (10 increases → 10 + 10 = 20 sts) ✓ (20 sts)
Round 3: *1 hdc in next st, 2 hdc in next st; repeat from * around. (10 increases → 20 + 10 = 30 sts) ✓ (30 sts)
Round 4: *1 hdc in each of next 2 sts, 2 hdc in next st; repeat from * around. (10 increases → 30 + 10 = 40 sts) ✓ (40 sts)
Round 5: *1 hdc in each of next 3 sts, 2 hdc in next st; repeat from * around. (10 increases → 40 + 10 = 50 sts) ✓ (50 sts)
Round 6: *1 hdc in each of next 4 sts, 2 hdc in next st; repeat from * around. (10 increases → 50 + 10 = 60 sts) ✓ (60 sts)
At the end of Round 6 you should have 60 sts. Lay the crown flat — it should measure about 6.4 inches (16 cm) across. This is the top of your hat.
Body (Worked Even)
Rounds 7–23: 1 hdc in each st around. (60 sts each round)
That is 17 rounds worked even. Combined with the 6 crown rounds, this gives a total of 23 rounds.
Height check: At 9 rounds per 4 inches, 23 rounds ≈ 10.2 inches worked… so for the target 8-inch body we work fewer even rounds. Work Rounds 7–19 (13 even rounds) for the standard 8-inch (20 cm) height.
- Crown = 6 rounds ≈ 2.7 inches
- Even body = 13 rounds ≈ 5.8 inches
- Total = 8.5 inches (21.6 cm) before the band ✓
To try it on as you go: after about 6 inches of total height, pause and slip the hat on. Add or remove even rounds to reach your preferred depth. Each extra round adds about 0.44 inch (1.1 cm).
When your hat reaches the desired height, proceed to the band.
Ribbed Band (Optional but Recommended)
The ribbed band adds stretch and a polished edge. It is worked directly onto the body.
Transition round: Sl st in the next st to smooth the round, then ch 1 (does not count as a st).
Band setup: Work 1 round of sc around, 1 sc in each st. (60 sts), join with a sl st to the first sc.
Ribbing: Every round: Ch 1, then sc BLO in each st around, join with a sl st to the first sc. (60 sts)
Working in the back loop only creates the raised ribbed texture and horizontal stretch.
Work 6 rounds of BLO sc ribbing for a band that can be folded up into a snug double-thick brim (adds about 1 inch / 2.5 cm to finished height when folded).
For a single, non-folded snug edge, work only 3 rounds of BLO sc ribbing.
Finishing
- After the final round, fasten off, leaving a 6-inch (15 cm) tail.
- Thread the tail onto a yarn needle and weave in all ends securely on the wrong side.
- At the very top, use the starting magic-ring tail to double-check the center is pulled tight and closed; weave in that tail as well.
- Gently steam or wet-block if desired to even out the stitches and relax the crown so it sits smoothly.
Fit & Customization Guide
| Head Circumference | Target Stitch Count | Crown Rounds |
|---|---|---|
| 20–21 in (51–53 cm) | 54 sts | Stop increases at Round 5 (50), add 4 more sts in R6 partial… simpler: use 54 by working R6 as 8 sc, 2 hdc in next pattern |
| 21–23 in (53–58 cm) — this pattern | 60 sts | 6 rounds (as written) |
| 23–24 in (58–61 cm) | 66 sts | Add Round 7: 1 hdc in each of next 5 sts, 2 hdc in next st = 66 sts, then work even |
For the standard adult medium size, follow the pattern exactly as written for 60 sts.
Quick Reference Round Chart
| Round | Instruction | Stitch Count |
|---|---|---|
| 1 | 10 hdc in magic ring | 10 |
| 2 | 2 hdc in each st | 20 |
| 3 | (1 hdc, inc) ×10 | 30 |
| 4 | (2 hdc, inc) ×10 | 40 |
| 5 | (3 hdc, inc) ×10 | 50 |
| 6 | (4 hdc, inc) ×10 | 60 |
| 7–19 | hdc even (13 rnds) | 60 |
| Band | sc, then 6 rnds BLO sc | 60 |
Enjoy your cozy new beanie!
Disclaimer: This pattern was generated by AI and should be reviewed for accuracy before use. While we strive for quality, AI-generated content may contain errors. Please verify measurements, stitch counts, and instructions before beginning your project. Generated by purlJam.uk
Access your pattern anytime
Bookmark this page to access your pattern anytime