Type
Knitting
Difficulty
intermediate
Category
custom
AI Thinking Process
Planning
Verification
Pattern
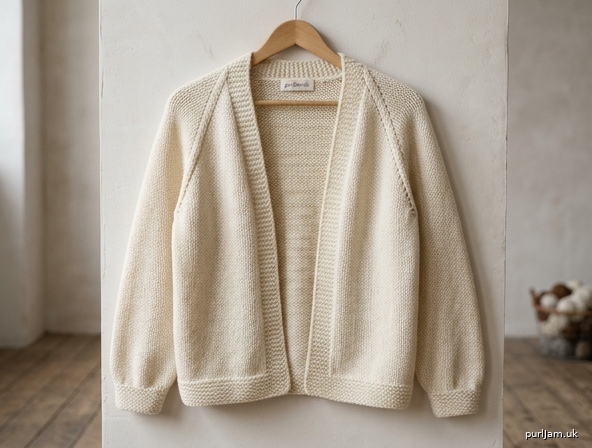
Cream Aran Open-Front Bolero
Seamless Top-Down Raglan — Beginner Friendly
A long, relaxed, open-front bolero in cream Aran yarn. It is worked seamlessly from the top down with simple raglan lines, integrated garter front bands, roomy full-length sleeves that taper to neat cuffs, and a hem long enough to cover the seat plus about 2" (5 cm). No seaming and no picking up stitches. You will measure the actual knitting as you go.
Materials
- Yarn: Aran weight (worsted/Aran), cream; approximately 1200 yards / 1100 m (about 600–700 g depending on brand). Single strand throughout.
- Needles: US 8 / 5 mm LYKKE circular needles
- 32" (80 cm) or longer for body
- 16" (40 cm) or use magic loop / long circular for sleeves
- Notions:
- 4 stitch markers (plus 2 optional contrasting markers for front bands)
- Waste yarn or stitch holders for sleeves
- Tapestry needle
- Tape measure
- Scissors
Gauge
18 stitches and 24 rows = 4" (10 cm) in stockinette stitch on US 8 / 5 mm, after gentle blocking.
You are not doing a separate swatch. After the first 2–3" (5–8 cm) of the yoke, measure your fabric:
- If you have more than 18½ sts per 4" (fabric too dense / small), go up a needle size.
- If you have fewer than 17½ sts per 4" (fabric too loose / big), go down a needle size. Recast if needed so your measurements can match the checkpoints below.
Working numbers used in this pattern: 4.5 sts per inch and 6 rows per inch.
Size
One custom size built to your measurements:
| Measurement | Target |
|---|---|
| Bust (worn over T-shirt) | 34¼" (87 cm) |
| Fit | Relaxed, about 10% positive ease; open front (not a fixed closed circumference) |
| Approximate finished back width at underarm | 18½–19½" (47–50 cm) |
| Shoulder to shoulder (back) | 16¼" (41 cm) |
| Length | Covers bum + about 2" (5 cm); typically about 28–30" (71–76 cm) from shoulder cast-on—confirm on your body |
| Sleeves | Full length, roomy upper arm, tapered to neater cuff |
Abbreviations (US)
- BO – bind off
- CO – cast on
- k – knit
- p – purl
- pm – place marker
- sm – slip marker
- st(s) – stitch(es)
- RS – right side
- WS – wrong side
- M1L – make 1 left (lift bar between sts from front to back, knit through back loop)
- M1R – make 1 right (lift bar between sts from back to front, knit through front loop)
- k2tog – knit 2 together (right-leaning decrease)
- ssk – slip, slip, knit (left-leaning decrease)
- St st – stockinette stitch (knit on RS, purl on WS when flat; knit every round in the round)
- Garter – knit every row when flat; knit 1 round, purl 1 round when in the round
Pattern Notes
- Construction: Cast on at the neck. Work the yoke flat (open front) with raglan increases. Separate the sleeves. Continue the body flat. Work each sleeve in the round from the held stitches downward. Nothing is sewn; no stitches are picked up.
- Integrated front bands: The first and last 4 stitches are garter-stitch bands worked on every row so the fronts stay flat and finished.
- Raglan “seams”: Four markers divide Left Front | Left Sleeve | Back | Right Sleeve | Right Front. You increase on either side of each marker on RS rows (8 increases per RS raglan row).
- Measure as you go: Body length and sleeve length are decided on your body, not only by row counts.
- Keep it simple: When in doubt, stop at a RS row, try the piece on, and compare to the checkpoints.
- Relaxed sleeves: Upper sleeves are roomy; decreases are spread out so the taper looks smooth into the cuff.
Pattern
Setup — Cast On and Place Markers
Using US 8 / 5 mm and long circular needle, loosely CO 62 sts.
Setup row (WS):
K4, p3, pm, p12, pm, p28, pm, p12, pm, p3, k4.
(62 sts: 7 left front | 12 left sleeve | 28 back | 12 right sleeve | 7 right front ✓)
These 4 markers are your raglan markers. The outer 4 knit stitches on each end are your front bands (always knit on both RS and WS).
Yoke — Raglan Increases (worked flat)
Row 1 (RS) — Raglan increase row:
K4 (band), knit to 1 st before marker, M1R, k1, sm, k1, M1L;
repeat from * to * at each of the 4 markers, knit to last 4 sts, k4 (band).
(8 sts increased → 70 sts ✓)
Row 2 (WS):
K4, purl to last 4 sts (slipping markers as you meet them), k4.
Row 3 (RS) — Raglan + front neck increase row (use on the rows listed below):
K4, M1L, knit to 1 st before marker, M1R, k1, sm, k1, M1L;
work the same raglan pair at each remaining marker, knit to last 4 sts, M1R, k4.
(10 sts increased: 8 raglan + 2 front neck ✓)
Row 4 (WS): Same as Row 2.
Work the yoke as follows:
- Work Raglan increase Row 1 on every RS row.
- Work plain WS rows as Row 2.
- Also work the extra front-neck increases (Row 3 style) on the following RS rows only: 3, 7, 11, 15, 19, 23, 27 (7 front-neck increase rows).
Continue until you have worked 28 raglan RS increase rows total (this includes the 7 rows that also had front-neck increases).
Expected stitch count after 28 raglan RS rows:
| Section | Math | Sts |
|---|---|---|
| Left front | 7 + 28 (raglan) + 7 (neck) | 42 |
| Left sleeve | 12 + 56 | 68 |
| Back | 28 + 56 | 84 |
| Right sleeve | 12 + 56 | 68 |
| Right front | 7 + 28 + 7 | 42 |
| Total | 62 + (28×8) + (7×2) | 300 sts ✓ |
Measurement checkpoints (more important than the count):
- Yoke depth (along a raglan line, from cast-on to needle): about 9½–10" (24–25 cm).
- Back stitches between the two center markers should measure about 18½–19½" (47–50 cm) wide.
- Full back shoulder feel should match your 16¼" (41 cm) shoulder-to-shoulder when tried on (raglan lines sitting at the natural shoulder/arm crease).
If you reach the width/depth before 28 increase rows: stop increasing when the back width and armhole depth look right on you; note your actual stitch counts and use those from here.
If you need a deeper/roomier yoke: work 2 extra raglan RS rows (with WS rows between) before separating.
End having just worked a WS row.
Separate Body and Sleeves
Separation row (RS):
K4, knit across left front to first marker, remove marker,
place all left-sleeve sts on waste yarn (remove next marker),
CO 6 sts with backward-loop (underarm), pm (side marker, optional),
knit across all back sts, remove markers as you go,
CO 6 sts (underarm),
place all right-sleeve sts on waste yarn,
knit across right front to last 4 sts, k4.
Body stitch count:
42 + 6 + 84 + 6 + 42 = 180 sts ✓
(If your yoke counts differed, body = left front + right front + back + 12 underarm sts.)
Underarm cast-ons give ease through the bust/chest so the fit stays relaxed, not skin-tight.
Body (worked flat, open front)
Continue flat in pattern:
- RS: K4, knit to last 4 sts, k4.
- WS: K4, purl to last 4 sts, k4.
Work until total length from shoulder cast-on is long enough to fully cover your bum + about 2" (5 cm).
For many adults this is roughly 28–30" (71–76 cm) from cast-on edge—try it on and add or subtract length here. The open fronts will hang straight; bands stay in garter the whole way.
Hem (garter, built-in):
Work 12 rows garter on all stitches as follows:
- Every row: Knit all sts (including slipping any side marker if used).
BO loosely knitwise on the next RS row. (Tip: use a needle one size larger to bind off if your edge tends to pull in.)
Sleeves (make 2 alike — in the round, no pickup)
Return 68 held sleeve sts to US 8 / 5 mm needle (short circular or magic loop).
With RS facing, join yarn at center of underarm. Pick up the underarm by knitting across the 6 underarm cast-on sts of the body (you are knitting into the existing loops/bases of those CO sts as you join—not picking up a new edge along a side seam). Place marker for beginning of round at center underarm.
Round 1: Knit all sts.
Sleeve count: 68 + 6 = 74 sts ✓
Knit every round (stockinette in the round) until sleeve measures 2" (5 cm) from underarm join.
Taper the sleeve
You want a roomy upper arm that gradually becomes a neater cuff (~8–9" / 20–23 cm around).
Decrease round: K1, k2tog, knit to last 3 sts, ssk, k1. (2 sts decreased)
Work decrease rounds about every 1" (2.5 cm) (about every 6 rounds at this gauge) until sleeve measures about 15–16" (38–41 cm) from underarm, or 2" (5 cm) short of your full wrist length when tried on.
Target cuff stitch count: about 38–40 sts
Math check: 74 → 40 requires 17 decrease rounds (34 sts decreased): 74 − 34 = 40 sts ✓.
At one decrease round per inch over ~15–16" after the first 2", you will land near this count. If you reach 40 sts early, stop decreasing and work straight. If still above 42 sts near cuff length, work decrease rounds every 4 rounds instead for the last few inches.
Try the sleeve on: it should feel relaxed through the arm and comfortably neat—not tight—at the wrist.
Cuff
With about 40 sts (or your final count):
Work 2" (5 cm) garter in the round:
- Round A: knit
- Round B: purl
Repeat A–B until cuff measures 2" (5 cm).
BO loosely in knit (use larger needle if needed).
Repeat for second sleeve.
Finishing
- Weave in all ends with tapestry needle on the WS.
- Gently block: soak in lukewarm water with a little wool wash, press out water in a towel (do not wring), and lay flat.
- Pat the back to about 16¼" (41 cm) across the shoulders.
- Smooth the body to your desired length and relaxed bust width.
- Smooth sleeves long and slightly tapered; do not stretch cuffs wide.
- Let dry completely.
- Optional: steam lightly along garter bands if they flare or curl.
No seams to sew. No stitches to pick up. Wear open over a T-shirt with relaxed drape.
Quick Reference — Designed Numbers
| Checkpoint | Number |
|---|---|
| CO | 62 sts |
| Raglan RS increase rows | 28 (plus 7 of those with front-neck M1s) |
| Sts at separation | 42 / 68 / 84 / 68 / 42 (total 300) |
| Underarm CO each side | 6 sts |
| Body sts | 180 |
| Sleeve join | 74 sts |
| Sleeve cuff | ~40 sts |
| Gauge | 18 sts × 24 rows = 4" (10 cm) |
Always prefer your tape measure and try-on over the row/stitch targets if the two disagree. The garment is custom to your 34¼" (87 cm) bust, 16¼" (41 cm) shoulders, relaxed ease, and bum-covering length.
Enjoy your cream Aran bolero — simple stitches, seamless construction, and a relaxed everyday fit.
Disclaimer: This pattern was generated by AI and should be reviewed for accuracy before use. While we strive for quality, AI-generated content may contain errors. Please verify measurements, stitch counts, charts, and instructions before beginning your project. Generated by purlJam.uk
Love this pattern?
Save this pattern to your free PurlJam libraryAccess your pattern anytime
Bookmark this page to access your pattern anytime