Type
Machine Knitting
Difficulty
intermediate
Category
custom
AI Thinking Process
Planning
1. **Design Strategy**: The core request is a visual depiction. For a beginner machine knitter, this translates best into a decorative panel or wall hanging using flat knitting and simple intarsia. The "dome tomb" will be represented by an arched top achieved through decreases, and the "man" will be depicted using intarsia in contrasting colors. To keep it beginner-friendly, advanced techniques like true 3D shaping or complex colorwork are avoided.
2. **Construction Plan**:
* The project will be a single flat panel, knit bottom-up.
* Initial rows will establish a stable base.
* The main body of the panel will be knit straight, incorporating the intarsia design for the man.
* The top section will feature gradual decreases on both sides to create the dome/arch shape.
* The project will conclude with a simple bind-off.
* No ribber is required, keeping the pattern accessible for standard gauge machines without attachments.
3. **Quality Assurance**:
* **Gauge and Yarn**: Worsted weight yarn is specified for a standard gauge machine. This often requires a looser tension setting (T8-T9) to prevent fabric stress and ensure ease of knitting. A note about yarn suitability will be included.
* **Intarsia Simplicity**: The man's figure will be highly stylized and blocky to simplify intarsia technique for beginners, minimizing the number of bobbins and color changes per row.
* **Shaping Clarity**: Decreases for the dome will be clearly defined with exact needle counts and row intervals.
* **RC Checkpoints**: Every significant step will have a Row Counter checkpoint to aid tracking.
* **Tool Call-outs**: Explicit mention of necessary tools (bobbins, transfer tools) will be included.
4. **Final Calculations**:
* **Gauge**: Estimated 22 stitches and 30 rows per 4 inches (10 cm) for worsted on standard gauge at T8. This translates to 5.5 stitches/inch (2.2 sts/cm) and 7.5 rows/inch (3 rows/cm).
* **Dimensions**: Targeting a finished piece approximately 14 inches (35.5 cm) wide by 22.4 inches (57 cm) tall.
* Width: 14 inches * 5.5 sts/inch = 77 stitches. Rounded to 76 stitches for symmetry and ease.
* Height: 22.4 inches * 7.5 rows/inch = 168 rows.
* **Intarsia Placement**: The man will be centered within the 76-stitch width.
* **Dome Shaping**: Calculations will ensure a smooth, symmetrical curve down to a manageable bind-off width.
Verification
[PRE-FLIGHT CHECKS]
1. **Completeness**: Yes, all required sections (Title, Description, Materials, Tension/Gauge, Sizes, Abbreviations, Pattern Notes, Step-by-step instructions, Finishing) are planned.
2. **Consistency**:
* Gauge (22 sts / 30 rows per 4 inches) used to derive dimensions and stitch/row counts.
* Width: 76 stitches / (22 sts / 4 inches) = 13.8 inches (35.1 cm). Consistent.
* Height: 168 rows / (30 rows / 4 inches) = 22.4 inches (56.9 cm). Consistent.
* Intarsia sections (stitch widths, row counts) are designed to fit within the overall panel.
* Shaping calculations (decreases over rows) result in a defined final width and height.
3. **Constraints**:
* "Dome tomb with a man in white with a brown beard and medium length hair standing with arms out" is addressed by the intarsia design and dome shaping.
* "Difficulty Level: beginner" is maintained by simple intarsia, flat knitting, and basic decreases.
* "Worst weight yarn" is specified for Standard Gauge with appropriate tension notes.
* "Custom Machine Knitting Project" template instructions are followed.
* All machine knitting specifics (RC, carriage, tension, needles, tools) will be included.
* Terminology and abbreviation profile (imperial first, RC, carriage, etc.) will be adhered to.
4. **Safety**: The mathematical calculations appear sound, and no instructions are excessively complex or contradictory for a beginner machine knitter.
Pattern
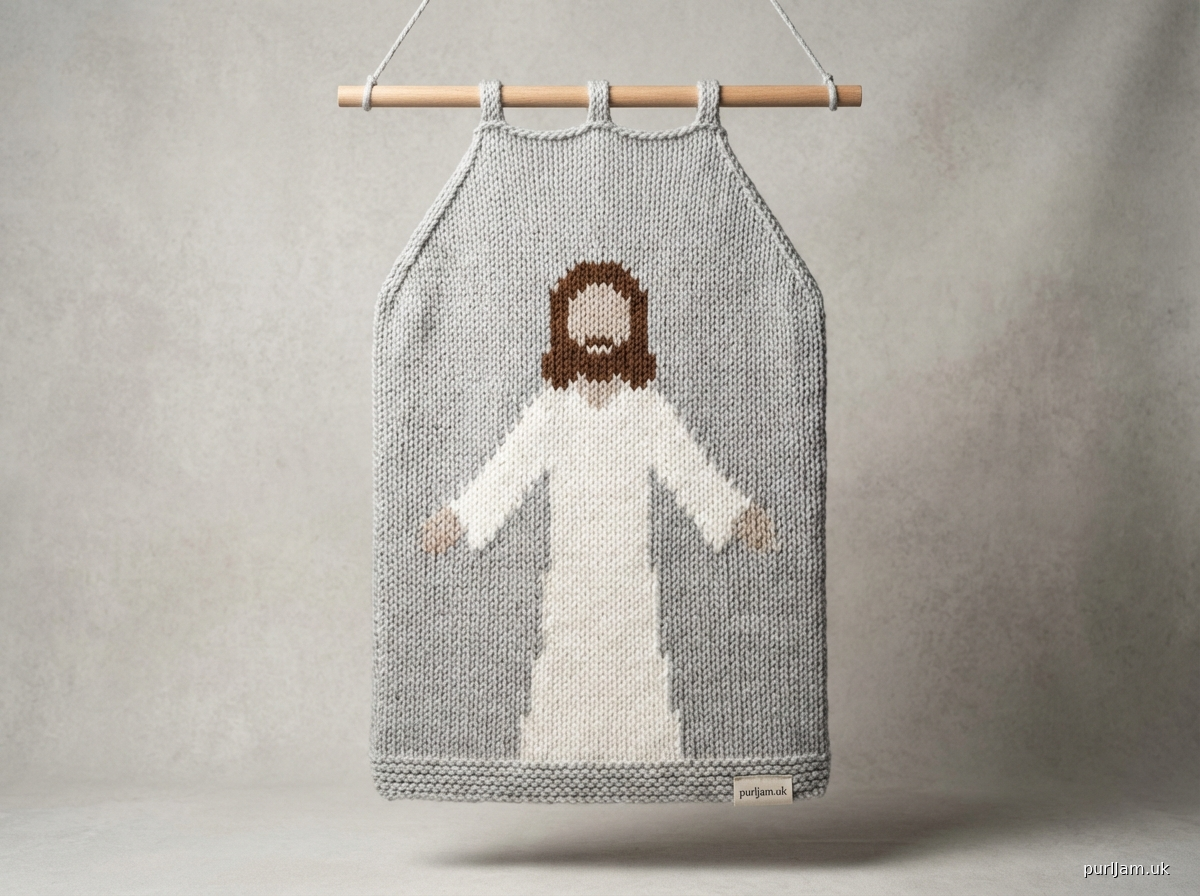
# Dome Tomb with Man Wall Hanging

This beginner-friendly machine knitting pattern creates a unique decorative panel, perfect as a wall hanging or appliqué. It features a stylized domed structure and an intarsia depiction of a man with a beard and outstretched arms, inspired by ancient imagery. The pattern uses simple flat knitting techniques and basic intarsia, making it an accessible project for those new to machine knitting.

**DIFFICULTY LEVEL:** Beginner

---

## Materials

*   **Machine:** Standard Gauge (4.5mm) knitting machine (e.g., Brother, Silver Reed, Studio, Empisal). *Note: While worsted weight yarn is specified, ensure your machine can comfortably handle it at a loose tension. A slightly thinner worsted or DK weight yarn may be easier for standard gauge machines. Alternatively, this pattern is also suitable for a Mid-Gauge machine at a slightly tighter tension.*
*   **Yarn:** Worsted Weight (Aran/10-ply)
    *   **MC (Main Color):** Light Grey (for the Tomb) - Approx. 250 yards (230 meters)
    *   **CC1 (Contrast Color 1):** White (for the Man) - Approx. 50 yards (45 meters)
    *   **CC2 (Contrast Color 2):** Brown (for Beard/Hair) - Approx. 10 yards (10 meters)
*   **Tools:**
    *   Waste yarn
    *   Ravel cord
    *   Yarn bobbins (at least 5-6, depending on intarsia method)
    *   Transfer tools (3-prong and 1-prong)
    *   Weighted hem bar or cast-on comb with weights
    *   Latch tool
    *   Tapestry needle for finishing
    *   Row counter (built-in to machine)

---

## Tension / Gauge

*   **Main Fabric Tension (MC, CC1, CC2):** T8 (Tension Dial 8)
*   **Resulting Gauge (after blocking):**
    *   22 stitches = 4 inches (10 cm)
    *   30 rows = 4 inches (10 cm)

**Mathematical Validation:**
*   1 inch = 5.5 stitches (22 stitches / 4 inches)
*   1 inch = 7.5 rows (30 rows / 4 inches)

---

## Sizes

One Size Only:
*   **Finished Width:** Approximately 13.8 inches (35.1 cm)
*   **Finished Height:** Approximately 22.4 inches (56.9 cm)

**Mathematical Validation:**
*   Width: 76 stitches / 5.5 stitches/inch = 13.8 inches.
*   Height: 168 rows / 7.5 rows/inch = 22.4 inches.

---

## Abbreviations & Machine-Specific Terms

*   **COL:** Carriage on Left
*   **COR:** Carriage on Right
*   **MC:** Main Color (Light Grey)
*   **CC1:** Contrast Color 1 (White)
*   **CC2:** Contrast Color 2 (Brown)
*   **K:** Knit
*   **ND:** Non-Working Position (Needles in D position, out of work)
*   **RC:** Row Counter
*   **St(s):** Stitch(es)
*   **T:** Tension Dial setting (e.g., T8)
*   **Waste Yarn:** Yarn used for temporary cast-ons, removed later.
*   **Ravel Cord:** A specialized cord or fine yarn used for a temporary cast-on, easily removed.
*   **Intarsia:** A colorwork technique where separate bobbins of yarn are used for each color block, twisting yarns at color changes to prevent holes.
*   **Transfer:** Moving stitches from one needle to another, or from a needle to a linker.
*   **Decrease (Dec):** Reducing the number of stitches.

---

## Pattern Notes

1.  **Yarn Management for Intarsia:** For the intarsia sections, you will need multiple bobbins of yarn. Wind small amounts of MC, CC1, and CC2 onto separate bobbins for each color block.
2.  **Twisting Yarns:** When changing colors during intarsia, always twist the old and new yarns together on the wrong side of the fabric to prevent holes.
3.  **Tension Consistency:** Maintain even tension throughout, especially with multiple bobbins. Use appropriate weights (hem bar, claw weights) to ensure stitches drop freely.
4.  **Needle Setup:** Ensure all needles are in A position (full working position) unless otherwise specified.
5.  **Carriage Settings:** For main knitting, the carriage should be set to "Knit" (often indicated by a circle or similar symbol). For transfers, ensure the carriage is parked.

---

## Step-by-Step Instructions

**MACHINE SETUP:**

1.  Set up your standard gauge machine. Ensure all 76 needles (from L38 to R38) are in working position.
2.  Attach waste yarn to your carriage.
3.  Knit several rows with waste yarn.
4.  Switch to ravel cord (a contrasting, slippery yarn). Knit 1 row.
5.  Set RC to 000.
6.  Thread **MC (Light Grey)** yarn into the carriage. Set tension dial to **T8**.

**MAIN PANEL - BASE AND BODY**

1.  **Cast On:**
    *   Set **RC to 000**.
    *   With carriage on the right (COR), push 76 needles (from L38 to R38) to working position (D).
    *   Using **MC**, cast on all 76 needles using your preferred method (e.g., e-wrap, latch-tool, or open cast-on).
    *   Knit 1 row from COR to COL.
    *   Hang weights along the cast-on edge.
    *   Knit 1 row from COL to COR.
    *   You should now be at **RC 002**.
2.  **Straight Knitting (MC):**
    *   Knit straight in **MC** for **30 rows**.
    *   **RC will be 032.** Carriage on Right (COR).
    *   *Mathematical Validation: 30 rows completed. Total rows = 32.*

**INTARSIA SECTION - THE MAN**

*(This section will require careful management of multiple bobbins. You'll be using MC, CC1, and CC2.)*

**Part 1: Man's Body (CC1 - White)**

1.  **RC 032:** Carriage on Right (COR).
    *   Introduce **CC1 (White)** yarn by placing bobbins for the man's body.
    *   **Knit 1 row to COL:**
        *   Needles L38 to L11 (28 needles): Knit with **MC** (from left bobbin).
        *   Needles L10 to R11 (22 needles): Knit with **CC1** (from central bobbin).
        *   Needles R12 to R38 (27 needles): Knit with **MC** (from right bobbin).
        *   *Remember to twist yarns at each color change.*
2.  **RC 033 - 061 (29 rows):**
    *   Continue knitting in this color pattern for **29 more rows**.
    *   Always ensure yarns are twisted at color changes.
    *   **RC will be 061.** Carriage on Left (COL).
    *   *Mathematical Validation: 1 (start row) + 29 (repeat rows) = 30 rows of body completed. Total rows = 32 (base) + 30 (body) = 62. Check RC matches.*

**Part 2: Man's Arms (CC1 - White)**

1.  **RC 062:** Carriage on Left (COL).
    *   The man's arms will extend 2 stitches outwards on each side.
    *   **Knit 1 row to COR:**
        *   Needles L38 to L13 (26 needles): Knit with **MC**.
        *   Needles L12 to R13 (26 needles): Knit with **CC1**.
        *   Needles R14 to R38 (25 needles): Knit with **MC**.
2.  **RC 063 - 071 (9 rows):**
    *   Continue knitting in this color pattern for **9 more rows**.
    *   **RC will be 071.** Carriage on Left (COL).
    *   *Mathematical Validation: 1 (start row) + 9 (repeat rows) = 10 rows of arms completed. Total rows = 62 + 10 = 72. Check RC matches.*

**Part 3: Man's Head & Neck (CC1 - White)**

1.  **RC 072:** Carriage on Left (COL).
    *   The man's head will be narrower, centered.
    *   **Knit 1 row to COR:**
        *   Needles L38 to L7 (32 needles): Knit with **MC**.
        *   Needles L6 to R6 (12 needles): Knit with **CC1**.
        *   Needles R7 to R38 (32 needles): Knit with **MC**.
2.  **RC 073 - 081 (9 rows):**
    *   Continue knitting in this color pattern for **9 more rows**.
    *   **RC will be 081.** Carriage on Left (COL).
    *   *Mathematical Validation: 1 (start row) + 9 (repeat rows) = 10 rows of head/neck completed. Total rows = 72 + 10 = 82. Check RC matches.*

**Part 4: Man's Hair & Beard (CC2 - Brown)**

1.  **RC 082:** Carriage on Left (COL).
    *   Introduce **CC2 (Brown)** for the beard and hair.
    *   **Knit 1 row to COR:**
        *   Needles L38 to L7 (32 needles): Knit with **MC**.
        *   Needle L6 (1 needle): Knit with **CC2** (left beard bobbin).
        *   Needles L5 to R5 (10 needles): Knit with **CC1** (face bobbin).
        *   Needle R6 (1 needle): Knit with **CC2** (right beard bobbin).
        *   Needles R7 to R38 (32 needles): Knit with **MC**.
2.  **RC 083 - 086 (4 rows):**
    *   Continue knitting in this color pattern (L6 and R6 in CC2, L5-R5 in CC1) for **4 more rows**.
    *   **RC will be 086.** Carriage on Left (COL).
    *   *Mathematical Validation: 1 (start row) + 4 (repeat rows) = 5 rows of beard framing completed. Total rows = 82 + 5 = 87. Check RC matches.*
3.  **RC 087:** Carriage on Left (COL).
    *   Transition to full brown hair.
    *   **Knit 1 row to COR:**
        *   Needles L38 to L7 (32 needles): Knit with **MC**.
        *   Needles L6 to R6 (12 needles): Knit with **CC2** (hair bobbin, can use one brown bobbin now).
        *   Needles R7 to R38 (32 needles): Knit with **MC**.
4.  **RC 088 - 091 (4 rows):**
    *   Continue knitting in this color pattern (L6-R6 in CC2) for **4 more rows**.
    *   **RC will be 091.** Carriage on Left (COL).
    *   *Mathematical Validation: 1 (start row) + 4 (repeat rows) = 5 rows of brown hair completed. Total rows = 87 + 5 = 92. Check RC matches.*
    *   **Total Man Section:** 30 (body) + 10 (arms) + 10 (head) + 5 (beard frame) + 5 (hair) = 60 rows.
    *   **Overall RC:** 32 (base) + 60 (man) = 92. (RC 091 is the last row of the man, so RC 092 starts next section.)

**UPPER PANEL - STRAIGHT SECTION (MC)**

1.  **RC 092:** Carriage on Left (COL).
    *   Cut all **CC1** and **CC2** yarns, leaving 6-8 inch tails to weave in.
    *   Continue knitting with **MC** only across all 76 needles.
    *   Knit straight in **MC** for **28 rows**.
    *   **RC will be 120.** Carriage on Right (COR).
    *   *Mathematical Validation: 28 rows completed. Total rows = 92 (until end of man) + 28 (upper panel) = 120. Check RC matches.*

**DOME SHAPING (MC)**

*(All shaping is done by decreasing 1 stitch at each side. Use a 3-prong transfer tool to decrease: lift 2 stitches onto 1 needle, then transfer the 3rd stitch onto that same needle, or simply transfer 2 stitches inwards, then rehang the outer stitch on the adjacent needle to decrease.)*

1.  **Phase 1: Gentle Curve**
    *   **RC 120:** Carriage on Right (COR).
    *   **Decrease 1 stitch at each side every 2 rows, 20 times.**
    *   **RC 121 (to COL):** Decrease 1 stitch at R38 (transfer R37 to R38, empty R37, knit R38).
        *   *Needles in work: L38 to R37 (75 needles).*
    *   **RC 122 (to COR):** Decrease 1 stitch at L38 (transfer L37 to L38, empty L37, knit L38).
        *   *Needles in work: L38 to R37 (74 needles).*
    *   Repeat this sequence (decrease 1 st at COR, then 1 st at COL) for **19 more times**.
    *   **After 20 decreases on each side:**
        *   You will have decreased a total of 40 stitches (20 on left, 20 on right).
        *   **RC will be 160.** Carriage on Right (COR).
        *   Remaining stitches: 76 - 40 = 36 stitches (L18 to R18).
        *   *Mathematical Validation: 20 decreases * 2 rows/decrease = 40 rows. Total rows = 120 + 40 = 160. Check RC matches.*

2.  **Phase 2: Steeper Curve**
    *   **RC 160:** Carriage on Right (COR).
    *   **Decrease 1 stitch at each side every row, 8 times.**
    *   **RC 161 (to COL):** Decrease 1 stitch at R18.
        *   *Needles in work: L18 to R17 (35 needles).*
    *   **RC 162 (to COR):** Decrease 1 stitch at L18.
        *   *Needles in work: L17 to R17 (34 needles).*
    *   Repeat this sequence (decrease 1 st at COR, then 1 st at COL) for **7 more times**.
    *   **After 8 decreases on each side:**
        *   You will have decreased a total of 16 stitches (8 on left, 8 on right).
        *   **RC will be 168.** Carriage on Right (COR).
        *   Remaining stitches: 36 - 16 = 20 stitches (L10 to R10).
        *   *Mathematical Validation: 8 decreases * 1 row/decrease = 8 rows. Total rows = 160 + 8 = 168. Check RC matches.*

**BIND OFF**

1.  **RC 168:** Carriage on Right (COR).
2.  Cut a generous tail of **MC** yarn (at least 3 times the width of the remaining stitches). Thread into a tapestry needle.
3.  Bind off the remaining 20 stitches using the **Latch Tool Bind Off** method.
    *   Push the 20 needles to working position.
    *   With carriage to the right, knit across to the left, taking the loops off the needles with the latch tool.
4.  Remove work from the machine.

---

## Finishing Instructions

1.  **Weave in Ends:** Using a tapestry needle, carefully weave in all yarn tails from the intarsia sections and the bind-off edge. Ensure all color changes are securely twisted and ends are hidden on the wrong side of the fabric.
2.  **Blocking:** Gently wash your knitted panel according to your yarn's instructions. Pin the panel out to the specified finished dimensions (approx. 13.8 inches wide x 22.4 inches high), shaping the domed top. Allow to dry completely. Blocking will even out your stitches and set the shape.
3.  **Steam (Optional):** If your yarn is suitable, a light steam might help to further relax the stitches and flatten the fabric. Avoid direct contact with the iron.
4.  **Display:** Your "Dome Tomb with Man" wall hanging is now complete! You can hang it as is or add a dowel rod to the top for display.

---
**END OF PATTERN**
Disclaimer: This pattern was generated by AI and should be reviewed for accuracy before use. While we strive for quality, AI-generated content may contain errors. Please verify measurements, stitch counts, and instructions before beginning your project. Generated by purlJam.uk
Access your pattern anytime
Bookmark this page to access your pattern anytime