Type
Knitting
Difficulty
beginner
Category
pullover
AI Thinking Process
Planning
Verification
Pattern
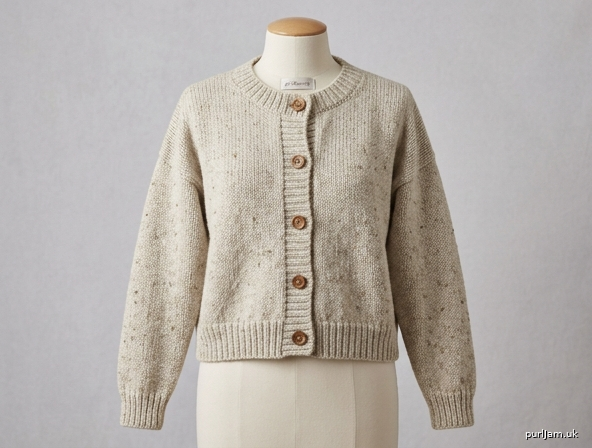
Easy Cropped Drop-Shoulder Cardigan
Crew neck • Boxy fit • DK weight Skill level: Beginner Size: EU 44–46 (one size)
A straight, boxy cropped cardigan with dropped shoulders and a simple crew neck. The back and fronts are rectangles — there is no armhole shaping. Shoulders are seamed, then sleeves are picked up along the straight armhole edge and knitted down to the cuff. Button bands and a neckband are picked up last.
This is a women’s-style cardigan: buttonholes sit on the right front as worn.
Finished measurements
To fit bust 43¼–45¾ in (110–116 cm) with about 5–7 in (12.5–18 cm) positive ease.
| in | cm | |
|---|---|---|
| Bust, buttoned | 50 | 127 |
| Back width | 25½ | 65 |
| Length, shoulder to hem | 18½ | 47 |
| Armhole depth | 9 | 23 |
| Side seam | 9½ | 24 |
| Shoulder width (each) | 8½ | 21.5 |
| Back neck width | 8½ | 21.5 |
| Front neck drop | 3 | 7.5 |
| Sleeve length (pickup to cuff edge) | 16½ | 42 |
| Upper sleeve width | 18¼ | 46.5 |
| Cuff width (unstretched) | 9½ | 24 |
| Hem / button-band rib | 2 / 1½ | 5 / 4 |
The shoulder seam sits down the upper arm — that is the drop-shoulder fit. The body is cropped and hits around the high hip.
Yarn
Elle Karoo Tweed DK (80% acrylic, 20% wool; about 145 m / 158 yds per 50 g ball), or any DK that matches gauge.
Yardage: 1370 yds / 1250 m — 11 balls of 50 g / 145 m. Buy a 12th ball if your gauge is dense or you lengthen the sleeves.
Any DK that knits to 22 sts = 4 in (10 cm) may be substituted.
Needles
- US 6 / 4 mm, 32 in (80 cm) circular for the body (worked flat)
- US 6 / 4 mm, 16 in (40 cm) circular or double-pointed needles or magic loop for the sleeves
- US 5 / 3.75 mm, 32 in (80 cm) circular for ribbing, button bands, and neckband
If you only have 4 mm, you may work the ribbing on 4 mm as well; the bands will be slightly looser.
Notions
- Stitch markers
- Tapestry needle
- 6 buttons, ¾ in (19 mm)
- Spare 4 mm needle (optional, for holding sleeve stitches)
Gauge
22 sts and 30 rows = 4 in (10 cm) in stockinette stitch on US 6 / 4 mm, after blocking.
Swatch at least 6 × 6 in (15 × 15 cm), wash and dry as you will treat the cardigan, then measure the center 4 in (10 cm).
If you have too many stitches in 4 in, go up a needle size. If you have too few, go down a needle size. Fit depends on this number.
Abbreviations (US)
BO — bind off CO — cast on k — knit k2tog — knit 2 together (right-leaning decrease) p — purl pm — place marker rem — remain(ing) rep — repeat RS — right side ssk — slip, slip, knit (left-leaning decrease): slip 1 knitwise, slip 1 knitwise, insert left needle into the fronts of both slipped stitches and knit them together st(s) — stitch(es) St st — stockinette stitch (knit RS, purl WS; in the round, knit every round) WS — wrong side yo — yarn over
Pattern notes
- The body is worked flat, in three pieces.
- There is no armhole indent and no sleeve cap. The armhole is simply the top 9 in (23 cm) of each side edge, left unseamed.
- Sleeves are picked up around that opening and worked in the round down to the cuff. Stockinette in the round is knit every round — no purling.
- Lengths are given in inches/cm, not row counts, so measure as you go.
- Women’s cardigan: buttonholes on the right front as worn.
- 2×2 rib on a multiple of 4 sts:
*k2, p2; rep from * to end. - When seaming, use mattress stitch and take half a stitch (or one stitch) from each edge.
Beginner decrease reminder
- k2tog slants right. Use it at the left-hand side of the RS (end of a RS row, or just before the end-of-round marker).
- ssk slants left. Use it at the right-hand side of the RS (beginning of a RS row, or just after the beginning-of-round marker).
Back
With US 5 / 3.75 mm, CO 140 sts. (140 sts ÷ 5.5 sts per inch = 25.45 in ✓)
Rib: Work in 2×2 rib (*k2, p2; rep from * to end) until the piece measures 2 in (5 cm) from the cast-on, ending after a WS row.
Change to US 6 / 4 mm.
Body: Work in stockinette stitch (knit RS, purl WS) until the piece measures 18½ in (47 cm) from the cast-on, ending after a WS row.
Bind off all 140 sts knitwise on the RS. Cut yarn, leaving a 20 in (50 cm) tail for seaming one shoulder.
Mark the shoulder and neck divisions on the bind-off edge (safety pins or scrap yarn):
- 47 sts right shoulder
- 46 sts back neck
- 47 sts left shoulder (47 + 46 + 47 = 140 ✓)
Also mark 9½ in (24 cm) up from the hem on each side edge — this is the top of the side seam / bottom of the armhole.
Right Front
(Wearer’s right. Center-front / neck edge is at the end of RS rows.)
With US 5 / 3.75 mm, CO 64 sts. (64 sts ÷ 5.5 sts per inch = 11.64 in ✓)
Rib: Work in 2×2 rib until the piece measures 2 in (5 cm) from the cast-on, ending after a WS row.
Change to US 6 / 4 mm.
Body: Work in stockinette until the piece measures 15½ in (39.5 cm) from the cast-on, ending after a RS row. (18½ in total − 3 in neck drop = 15½ in ✓)
Shape crew neck
Next row (WS): BO 6 sts, purl to end. 58 sts. (64 − 6 = 58 ✓)
Decrease row (RS): Knit to last 3 sts, k2tog, k1. 57 sts.
Next row (WS): Purl.
Rep the last 2 rows 10 more times (11 decrease rows total). 47 sts. (58 − 11 = 47 ✓; 11 RS decrease rows ≈ 22 rows ≈ 3 in ✓)
Work even in stockinette on 47 sts until the piece measures 18½ in (47 cm) from the cast-on, ending after a WS row. BO all 47 sts. Cut yarn, leaving a 20 in (50 cm) tail.
Mark 9½ in (24 cm) up from the hem on the side (non-neck) edge.
Left Front
(Wearer’s left. Center-front / neck edge is at the beginning of RS rows.)
With US 5 / 3.75 mm, CO 64 sts.
Rib: Work in 2×2 rib until the piece measures 2 in (5 cm) from the cast-on, ending after a WS row.
Change to US 6 / 4 mm.
Body: Work in stockinette until the piece measures 15½ in (39.5 cm) from the cast-on, ending after a WS row.
Shape crew neck
Next row (RS): BO 6 sts, knit to end. 58 sts. (64 − 6 = 58 ✓)
Next row (WS): Purl.
Decrease row (RS): K1, ssk, knit to end. 57 sts.
Next row (WS): Purl.
Rep the last 2 rows 10 more times (11 decrease rows total). 47 sts. (58 − 11 = 47 ✓)
Work even in stockinette on 47 sts until the piece measures 18½ in (47 cm) from the cast-on, ending after a WS row. BO all 47 sts. Cut yarn, leaving a 20 in (50 cm) tail.
Mark 9½ in (24 cm) up from the hem on the side (non-neck) edge.
Block the body pieces
Wet-block the back and both fronts to the measurements above. Let them dry fully. Blocking before seaming makes the shoulders, side seams, and stitch pickup much easier.
Join shoulders
With RS together (or RS facing you if you prefer mattress stitch from the right side), sew each front shoulder to the matching 47-st block of the back using mattress stitch or an overcast seam on the bind-off edges.
47 front sts to 47 back sts each side ✓
The center 46 sts of the back remain open for the neck.
Sleeves (make 2)
Worked in the round from the armhole down. No sleeve cap.
With US 6 / 4 mm and RS facing, beginning at the side-seam marker (bottom of the armhole):
Pick up and knit 100 sts evenly around the armhole — 50 sts along the back armhole edge and 50 sts along the front armhole edge, between the two 9½ in markers. Pick up about 3 sts for every 4 rows. (9 in + 9 in = 18 in; 100 sts ÷ 5.5 = 18.18 in ✓)
Place marker for beginning of round (underarm) and join, being careful not to twist.
Work even in stockinette (knit every round) for 1 in (2.5 cm).
Decrease round: K1, k2tog, knit to last 3 sts, ssk, k1. 2 sts decreased.
Knit 3 rounds even.
Rep the last 4 rounds (decrease round, then 3 even rounds) 23 more times — 24 decrease rounds in total. 52 sts. (100 − 24 × 2 = 52 ✓; 52 ÷ 4 = 13, ready for 2×2 rib ✓)
Work even on 52 sts until the sleeve measures 14½ in (37 cm) from the pickup.
Change to US 5 / 3.75 mm.
Cuff: Work in 2×2 rib (*k2, p2; rep from * to end of round) until the cuff measures 2 in (5 cm).
(14½ + 2 = 16½ in total sleeve ✓)
BO loosely in rib.
Work the second sleeve the same way.
Side seams
With mattress stitch, sew each side seam from the hem up to the underarm marker / sleeve join — 9½ in (24 cm). The remaining 9 in (23 cm) is the armhole and is already filled by the sleeve.
Weave in the underarm join so it lies flat.
Button bands
Bands are picked up along the straight center-front edges, from hem to the start of neck shaping (the 6-st bind-off). They do not travel around the neck.
Left front band (no buttonholes)
With US 5 / 3.75 mm, RS facing, and beginning at the neck (start of the 6-st bind-off), pick up and knit 86 sts evenly down to the hem — about 3 sts for every 4 rows. (86 = 4 × 21 + 2, so the band can start and end with k2 ✓)
Row 1 (WS): P2, *k2, p2; rep from * to end.
Row 2 (RS): K2, *p2, k2; rep from * to end.
Rep Rows 1–2 until the band measures 1½ in (4 cm), ending after a WS row. BO loosely in rib.
Right front band (buttonholes)
With US 5 / 3.75 mm, RS facing, and beginning at the hem, pick up and knit 86 sts evenly up to the start of neck shaping.
Work as for the left band until the band measures ¾ in (2 cm), ending after a WS row.
Buttonhole row (RS): Work 5 sts in established rib, [yo, k2tog, work 13 sts in rib] 4 times, yo, k2tog, work 12 sts in rib, yo, k2tog, work 5 sts in rib. (5 + 4 × 15 + 2 + 12 + 2 + 5 = 86 ✓; 6 buttonholes ✓)
On the next row, work each yo in pattern (knit or purl it as the rib requires so the 2×2 rhythm continues).
Continue in 2×2 rib until the band measures 1½ in (4 cm) from the pickup, ending after a WS row. BO loosely in rib.
Neckband
With US 5 / 3.75 mm and RS facing, beginning at the top of the right button band:
Pick up and knit 104 sts evenly around the neck:
- 8 sts across the top of the right button band
- 22 sts along the right front neck (6 bind-off sts + about 16 along the shaped edge)
- 44 sts across the back neck
- 22 sts along the left front neck
- 8 sts across the top of the left button band
(8 + 22 + 44 + 22 + 8 = 104 ✓; 104 ÷ 4 = 26 ✓)
Do not join; the neckband is worked flat.
Row 1 (WS): P2, *k2, p2; rep from * to end.
Row 2 (RS): K2, *p2, k2; rep from * to end.
Rep Rows 1–2 until the neckband measures 1 in (2.5 cm), ending after a WS row. BO loosely in rib.
The short side edges of the neckband sit at the inner corners of the button bands. Tack them down neatly on the WS if needed.
Finishing
- Weave in all remaining ends.
- Sew 6 buttons to the left band, opposite the buttonholes. Place the first about ¾ in (2 cm) from the hem and the last just below the neckband; the rest will line up with the holes.
- Steam- or wet-block the bands and neckband so they lie flat. Do not stretch the rib.
- Check that the side seams, underarms, and shoulder seams are smooth.
Schematic (key dimensions)
        8½"     8½"     8½"
      |------|--------|------|          shoulders / back neck
     /        back 25½"       \
    |                          |
    |         18½" long        |        cropped body
    |                          |
     \________________________/         hem 2" rib

    each front 11¾"  +  1½" band
    neck drop 3" on each front

    sleeve: 18¼" at armhole → 9½" cuff
            16½" long from pickup
    armhole depth 9"   side seam 9½"
Bust, buttoned: 25½ in back + 11¾ in + 11¾ in fronts + 1½ in + 1½ in bands − 1½ in overlap = 50 in ✓
How to wear / fit notes
- The shoulder seam will sit several inches down the upper arm. This is correct for drop shoulder, not a mistake.
- The body is a box: no waist shaping, generous ease, cropped hem.
- If you want a longer body, work extra stockinette before the neck shaping (fronts) and before the bind-off (back), and pick up more stitches for the button bands (keep a multiple of 4 + 2). Add yarn.
- If sleeves feel short or long, change the even section after the decreases; keep the 2 in cuff.
Beginner technique tips
Mattress stitch: Lay pieces RS up, side by side. Thread the tapestry needle under the running bar between the first and second stitches on one edge, then the matching bar on the other edge. Alternate sides and pull snug every few stitches.
Pick up and knit: With RS facing, insert the needle under the edge strand(s), wrap the working yarn as if to knit, and pull through. Space the new stitches evenly — a 3-sts-per-4-rows rhythm along a side edge is the usual rate.
Loose bind-off for rib: If the cuff or neckband bind-off feels tight, go up one needle size for the bind-off row only, or use a sewn bind-off.
End of pattern.
Disclaimer: This pattern was generated by AI and should be reviewed for accuracy before use. While we strive for quality, AI-generated content may contain errors. Please verify measurements, stitch counts, charts, and instructions before beginning your project. Generated by purlJam.uk
Love this pattern?
Save this pattern to your free PurlJam libraryAccess your pattern anytime
Bookmark this page to access your pattern anytime