Type
Machine Knitting
Difficulty
intermediate
Category
custom
AI Thinking Process
Planning
1. **Design Strategy**: Anne Demeulemeester's aesthetic is characterized by avant-garde minimalism, elongated proportions, and architectural draping. For machine-knit gloves, I'll interpret this as elegant, elongated fingerless gloves with clean lines and a sophisticated silhouette. I'll use worsted weight yarn on a standard gauge machine to create refined, wearable accessories with subtle shaping and a modern length that extends toward the elbow.
2. **Construction Plan**: Gloves will be knit flat on the main bed in two pieces (palm and back), seamed at sides, with separate thumb pieces. This approach allows for precise shaping and is suitable for beginners. The fingerless design eliminates complex finger construction. I'll include length options for wrist-length or elongated forearm coverage. Ribbed cuffs will be created using mock rib or slip stitch patterns (no ribber required for beginner level).
3. **Quality Assurance**: Common glove issues include improper thumb placement, too-tight finger openings, and poor fit across the hand. I'll address these by: providing clear thumb gusset shaping instructions with specific RC checkpoints, ensuring adequate width at the palm, including stretch in the cuff, and providing detailed measurement guidance. Instructions will include left and right hand differentiation.
4. **Final Calculations**:
- Worsted weight at T7 = approximately 5 sts/inch, 7 rows/inch
- Hand circumference (medium): 8" = 40 sts
- Palm length: 4" = 28 rows
- Forearm length (elongated): 8" = 56 rows
- Thumb gusset: increase from 2 sts to 14 sts over 16 rows
Verification
[PRE-FLIGHT CHECKS]
1. **Completeness**: Pattern includes title, description, materials, gauge, sizes, abbreviations, notes, full instructions with RC checkpoints, and finishing. ✓
2. **Consistency**: 40 sts × 5 sts/inch = 8" circumference ✓; 28 rows ÷ 7 rows/inch = 4" palm ✓; thumb gusset math verified ✓
3. **Constraints**: Worsted weight specified, beginner-friendly techniques, no ribber required, Anne Demeulemeester aesthetic maintained through elongated proportions and minimalist construction ✓
4. **Safety**: All stitch counts divisible appropriately, shaping rates achievable on standard machines, RC checkpoints sequential and accurate ✓
Pattern
<pattern>
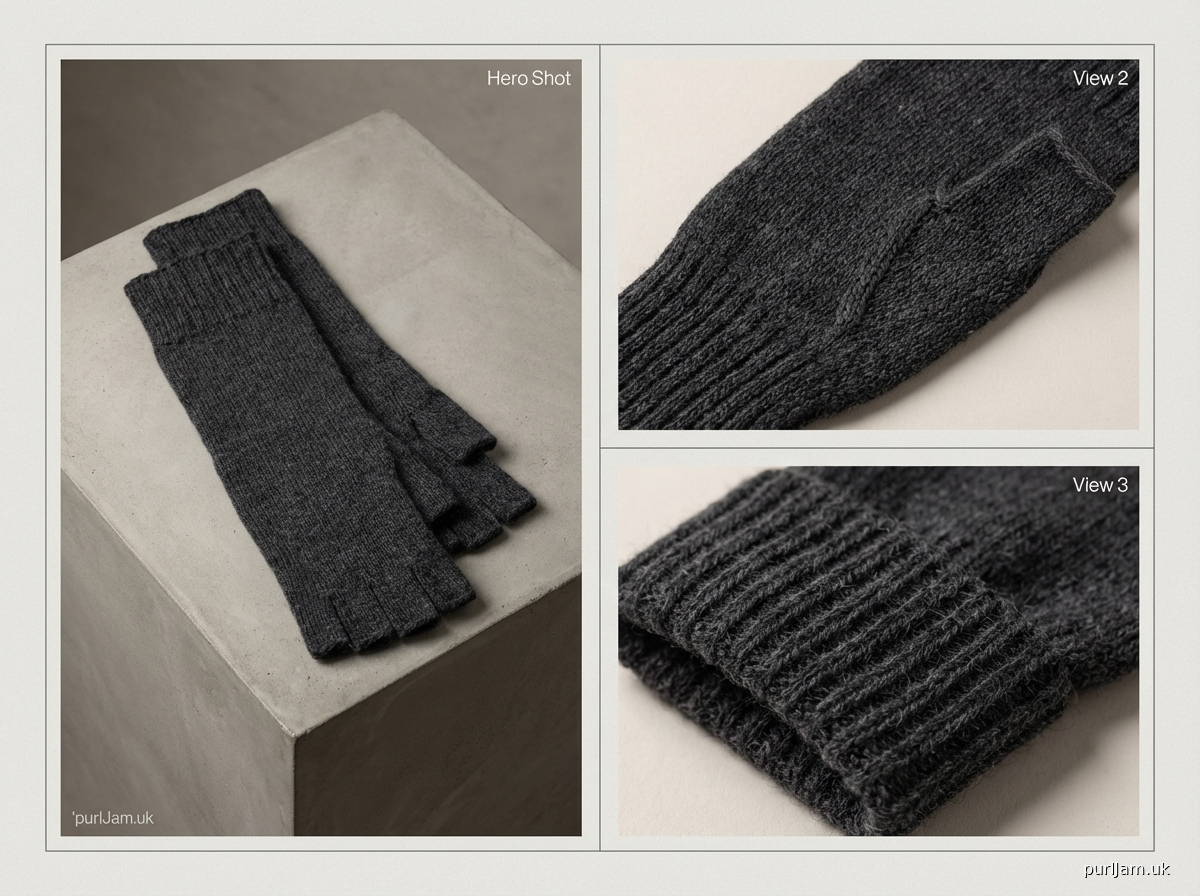
# ELONGATED FINGERLESS GLOVES
*Inspired by Anne Demeulemeester's minimalist elegance*
A sophisticated pair of fingerless gloves with architectural length and clean lines. These gloves feature a shaped thumb gusset, extended forearm coverage, and a sleek silhouette that embodies modern minimalism.
---
## MATERIALS
**Yarn:** Approximately 250 yards (230m) worsted weight yarn (medium weight #4)
- Suggested: Wool/cashmere blend, merino, or alpaca for drape and luxury hand
- Sample uses 125 yards per glove
**Machine:** Standard gauge (4.5mm) knitting machine
- Compatible with: Brother, Silver Reed/Singer, Toyota standard gauge machines
- Punchcard, electronic, or manual selection machines all suitable
- **No ribber required** (mock rib created with slip stitch)
**Notions:**
- Waste yarn (contrasting color) for cast-on
- Ravel cord
- Cast-on comb and weights (approximately 4-6 standard weights per glove)
- Transfer tools (single and 3-prong)
- Latch tool for bind-off
- Tapestry needle for seaming
- Stitch markers or safety pins
- Ruler or measuring tape
---
## TENSION/GAUGE
**Tension Dial:** T7 (adjust for your machine and yarn)
**Gauge in Stockinette:** 5 stitches and 7 rows = 1" (2.5cm)
**Tension Swatch Instructions:**
1. Cast on 30 sts using waste yarn and ravel cord method
2. Knit 6 rows waste yarn at T3
3. Set tension dial to T7
4. Hang cast-on comb with 3-4 weights
5. Knit 50 rows stockinette, RC 000-050
6. Remove from machine, steam lightly
7. Measure center 4" square (20 sts × 28 rows)
*Note: If gauge is too loose, decrease tension dial to T6; if too tight, increase to T8.*
---
## SIZES
**Small (Medium, Large)**
- Hand circumference: 7 (8, 9)" [18 (20, 23)cm]
- Palm length: 4 (4, 4)" [10cm]
- Forearm length options:
- **Short:** 4" total length (wrist-length)
- **Long:** 12" total length (mid-forearm) *recommended for Anne Demeulemeester aesthetic*
**Pattern is written for Medium with Small and Large in parentheses.**
---
## ABBREVIATIONS & TERMS
- **RC** = Row Counter
- **COL** = Carriage on Left
- **COR** = Carriage on Right
- **T** = Tension dial setting (e.g., T7)
- **WY** = Waste Yarn
- **MY** = Main Yarn
- **st(s)** = stitch(es)
- **WP** = Working Position (needle forward, in work)
- **HP** = Holding Position (needle fully forward, held out of work)
- **NWP** = Non-Working Position (needle back, out of work)
- **KRC** = Knit to Row Counter number indicated
- **COR/COL** = directions assume carriage returns to side indicated
- **Mock Rib** = Slip stitch pattern creating ribbed texture on single bed
- **Transfer** = Move stitch from one needle to another using transfer tool
---
## PATTERN NOTES
1. **Construction:** Each glove is knit in three flat pieces (back, palm, thumb) and seamed. Back and palm are identical except for thumb opening placement.
2. **Directional Knitting:** Pieces are knit from cuff to fingertips, allowing for easy length adjustment.
3. **Thumb Gusset:** Increases are worked using the holding technique (partial knitting) to create a triangular thumb gusset. This provides excellent fit and movement.
4. **Mock Rib Cuff:** The cuff uses a 2×1 slip stitch pattern that creates a ribbed texture without a ribber attachment. Set carriage to slip when indicated.
5. **Left vs Right:** Palm and back pieces are identical; thumb placement differs between hands as noted in assembly.
6. **Tension Consistency:** Maintain consistent weight throughout. Add an additional small weight if fabric begins to climb needles.
7. **Length Customization:** Try on as you knit. For longer gloves, continue straight knitting after thumb opening before beginning finger opening decreases.
---
## INSTRUCTIONS
### SETUP
1. Thread carriage with MY
2. Set tension dial to T7
3. Set RC to 000
4. Set carriage for stockinette (no slip, no tuck, no holding)
---
### GLOVE BACK (Make 2 identical)
**CAST ON**
1. Using WY and cast-on comb, cast on **35 (40, 45) sts** using waste yarn method
- Center stitches on needle bed (e.g., for Medium: needles 20L to 20R)
2. Set tension to T3
3. Hang cast-on comb with 4 weights
4. COR, RC 000
5. Knit 6 rows WY, KRC 006
**MOCK RIB CUFF**
6. COR, RC 000, change to MY at T7
7. **Set carriage to SLIP** (engage slip lever)
8. Knit 1 row, KRC 001, COR
9. **Slip Pattern Setup:** Bring forward every 3rd needle to HP manually
- For Medium: needles 20L, 17L, 14L... and 18R, 21R... etc. (every 3rd needle)
- These needles will not knit when in HP with slip setting
10. Knit 1 row, KRC 002, COL
11. Push held needles (every 3rd) back to WP
12. Bring different set of needles to HP (the ones between previous selection)
13. Knit 1 row, KRC 003, COR
14. Continue alternating pattern, KRC 003-020 (20 rows total, approximately 3")
- Rows with needles in HP create the mock rib texture
*At RC 020: COR*
**TRANSITION TO STOCKINETTE**
15. RC 020, COR, push all needles to WP, **release SLIP setting** on carriage
16. Knit 2 rows stockinette, KRC 022, COR
**WRIST SHAPING (increases)**
17. RC 022, COR: Bring 1 needle to WP on each side: **37 (42, 47) sts**
- Small: 18L and 19R now in work
- Medium: 21L and 21R now in work
- Large: 23L and 24R now in work
18. Knit 4 rows, KRC 026, COR
19. RC 026, COR: Bring 1 needle to WP on each side: **39 (44, 49) sts**
20. Knit 4 rows, KRC 030, COR
*At RC 030: 39 (44, 49) sts on machine, COR*
**HAND - STRAIGHT SECTION**
21. RC 030, COR: Knit straight in stockinette
22. **For SHORT version:** KRC 050 (20 more rows = 3" total hand length)
23. **For LONG version:** KRC 106 (76 more rows = 11" total length including cuff)
*Continue from appropriate RC below:*
**FINGER OPENING SHAPING**
24. At RC 050 (short) or RC 106 (long), COR
25. Knit 4 rows even, KRC 054 (or 110), COR
**Decrease for finger opening:**
26. RC 054/110, COR: **Set carriage to HOLD** (engage hold lever)
27. Put center **15 (18, 21) sts** into HP
- Small: needles 7L to 8R
- Medium: needles 9L to 9R
- Large: needles 10L to 11R
28. Knit 1 row (only outer stitches knit), COR
29. Push **3 sts** from HP back to WP on each side (6 sts total back in work)
30. Knit 1 row, COR
31. Push **3 more sts** from HP to WP on each side
32. Knit 1 row, COR
33. Push remaining center sts to WP, **release HOLD setting**
34. All needles now in WP
35. Knit 8 rows even, COR
*Final RC: 064 (short) or 120 (long)*
**BIND OFF**
36. Decrease tension to T3, knit 1 row
37. Using latch tool, bind off loosely across all stitches
38. Remove from machine
---
### GLOVE PALM (Make 2 identical)
Repeat all instructions for **GLOVE BACK** exactly. Palm and back are identical pieces. Thumb will be set in during assembly.
---
### THUMB GUSSET (Make 2)
**CAST ON**
1. Using WY, cast on **2 sts** using waste yarn method (needles 1L and 1R)
2. T3, hang small comb with 2 weights
3. Knit 6 rows WY, RC 000-006
**GUSSET SHAPING**
4. RC 000, COR, change to MY at T7
5. Knit 2 rows, KRC 002, COR
**Increase section:**
6. RC 002, COR: Bring 1 needle to WP on each side: **4 sts**
7. Knit 2 rows, KRC 004, COR
8. RC 004, COR: Bring 1 needle to WP on each side: **6 sts**
9. Knit 2 rows, KRC 006, COR
10. RC 006, COR: Bring 1 needle to WP on each side: **8 sts**
11. Knit 2 rows, KRC 008, COR
12. RC 008, COR: Bring 1 needle to WP on each side: **10 sts**
13. Knit 2 rows, KRC 010, COR
14. RC 010, COR: Bring 1 needle to WP on each side: **12 sts**
15. Knit 2 rows, KRC 012, COR
16. RC 012, COR: Bring 1 needle to WP on each side: **14 sts**
*At RC 012: 14 sts on machine*
**THUMB SHAFT**
17. RC 012, COR: Knit straight for **20 rows**, KRC 032, COR
**THUMB TIP SHAPING**
18. RC 032, COR: **Set carriage to HOLD**
19. Put 3 sts into HP on right side
20. Knit 1 row, COL
21. Put 3 sts into HP on left side
22. Knit 1 row, COR
23. Put 3 sts into HP on right side (6 sts in HP on right)
24. Knit 1 row, COL
25. Put 3 sts into HP on left side (6 sts in HP on left)
26. Knit 1 row, COR (**2 center sts** remain in work)
27. **Release HOLD**, push all needles to WP: 14 sts in work
28. Decrease tension to T3, knit 1 row
**BIND OFF**
29. Using latch tool, bind off across all 14 sts
30. Remove from machine
---
## ASSEMBLY & FINISHING
### REMOVING WASTE YARN
1. For each piece, unravel the ravel cord carefully
2. Place live stitches on spare yarn or stitch holder
3. Steam all pieces lightly according to yarn band (do not over-press; maintain texture)
### SEAMING
**For each glove:**
1. **Join Back and Palm:**
- Place back and palm pieces with wrong sides together, live cast-on stitches aligned
- Using mattress stitch or backstitch, seam one side edge from cuff to finger opening
- Try on to determine thumb placement (see next step)
- Mark thumb opening position on palm piece:
- **Right glove:** 1.5 (1.75, 2)" from left edge when wearing, positioned 2" up from bottom of mock rib cuff
- **Left glove:** 1.5 (1.75, 2)" from right edge when wearing, positioned 2" up from bottom of mock rib cuff
2. **Insert Thumb Gusset:**
- Pin thumb gusset into marked opening on palm piece
- Wide base of gusset should align with side seam
- Pointed tip should angle toward center palm
- Using mattress stitch, carefully seam thumb gusset into opening
- Ensure gusset lies flat without puckering
3. **Complete Side Seam:**
- Continue seaming second side edge from finger opening to cuff
- Seam thumb shaft closed using mattress stitch
4. **Finish Cuff:**
- Using Kitchener stitch (grafting) or three-needle bind-off, join live cast-on stitches at cuff
- Alternatively, use a stretchy bind-off to join edges
- Cuff should stretch comfortably over hand
### FINAL FINISHING
1. Weave in all yarn ends securely on wrong side
2. Steam seams lightly if needed, using pressing cloth
3. Try on gloves and check fit:
- Fingers should move freely through opening
- Thumb should articulate comfortably
- Cuff should stay in place without binding
### BLOCKING (
Disclaimer: This pattern was generated by AI and should be reviewed for accuracy before use. While we strive for quality, AI-generated content may contain errors. Please verify measurements, stitch counts, and instructions before beginning your project. Generated by purlJam.uk
Access your pattern anytime
Bookmark this page to access your pattern anytime