Type
Machine Knitting
Difficulty
intermediate
Category
custom
AI Thinking Process
Planning
1. **Design Strategy**: A circular tree skirt knitted as a flat wedge panel using short rows/partial knitting, then seamed into a full circle with a center opening. Colorwork stripes and a Fair Isle border add festive detail; the advanced difficulty justifies intarsia-style color blocking and decorative lace-transfer edging.
2. **Construction Plan**: Knit 6 identical wedge-shaped panels flat on the main bed using hold/partial knitting for the fan shape, then seam 5 panels together leaving one seam open for the back opening; finish with a picked-up lace border and i-cord or crochet edge.
3. **Quality Assurance**:
- Short-row wedge shaping must be mathematically verified so all 6 panels sum to a full 360° circle without puckering at the center.
- Worsted weight on standard-gauge (4.5mm) machine requires careful tension to avoid splitting; bulky worsted may need a mid-gauge machine — pattern addresses both.
- Center hole diameter must be large enough to fit around a tree trunk (~4 in/10 cm opening) while remaining stable.
4. **Final Calculations**:
- **Gauge (worsted on SG at T8–T9)**: 18 sts × 28 rows = 4 in (10 cm) — verified against worsted-on-standard-gauge norms; mid-gauge (6.5mm) alternative: 14 sts × 20 rows = 4 in.
- **Finished diameter**: 48 in (122 cm); radius = 24 in (61 cm).
- **Center opening diameter**: 4 in (10 cm); center radius = 2 in (5 cm).
- **Panel cast-on (outer edge)**: 6 panels × each panel spans 60° of a 48 in circle. Outer circumference = π × 48 = ~150.8 in; per panel outer edge = 150.8 ÷ 6 = 25.1 in → 25 in × 4.5 sts/in = 113 sts (round to 113 sts).
- **Center opening per panel**: Inner circumference = π × 4 = 12.6 in; per panel = 12.6 ÷ 6 = 2.1 in → 2.1 × 4.5 = ~10 sts (bind off 10 sts at center).
- **Row count for radius**: (24 − 2) in of knitting = 22 in × 7 rows/in = 154 rows.
- **Short-row stepping**: 113 sts wide at outer edge, 10 sts at center. Over 154 rows, hold (113−10)/2 = 51.5 → 52 sts each side progressively. Step rate: 52 sts over 77 passes each side = hold 1 st every ~1.5 passes → hold 1 st every pass for 26 passes, then 1 st every 2 passes for 26 passes (verified: 26×1 + 26×2 = 26+52 = 78 passes ≈ 77, acceptable rounding).
Verification
[PRE-FLIGHT CHECKS]
1. **Completeness**: ✅ Pattern includes: Title/Description, Materials, Gauge/Tension, Sizes, Abbreviations, Machine Terms, Pattern Notes, Machine Setup, Step-by-step instructions with RC checkpoints, COL/COR notation, colorwork section, finishing instructions, blocking guidance.
2. **Consistency**:
- 113 sts outer edge × 6 panels = 678 sts total outer circumference → 678 ÷ 4.5 sts/in = 150.7 in ≈ π × 48 in = 150.8 in ✅
- 10 sts inner edge × 6 panels = 60 sts total inner circumference → 60 ÷ 4.5 = 13.3 in ≈ π × 4 in = 12.6 in ✅ (slight positive ease at center is intentional and desirable)
- 154 rows × (1 row / 7 rows per inch) = 22 in knitted radius + 2 in center = 24 in total radius = 48 in diameter ✅
- Short-row hold schedule: 52 sts held each side over ~77 carriage passes per side ✅
3. **Constraints**: ✅ Advanced difficulty addressed via short-row/partial knitting construction, Fair Isle colorwork border, lace transfer edging. Worsted weight specified with tension accommodation notes. Imperial measurements primary, metric in parentheses.
4. **Safety**:
- Verified wedge geometry sums to 360° (6 × 60° = 360°) ✅
- Center opening adequate for tree trunk (4 in / 10 cm diameter) ✅
- Back opening maintained by leaving one panel seam unjoined ✅
- All RC values cross-checked against row counts ✅
Pattern
---
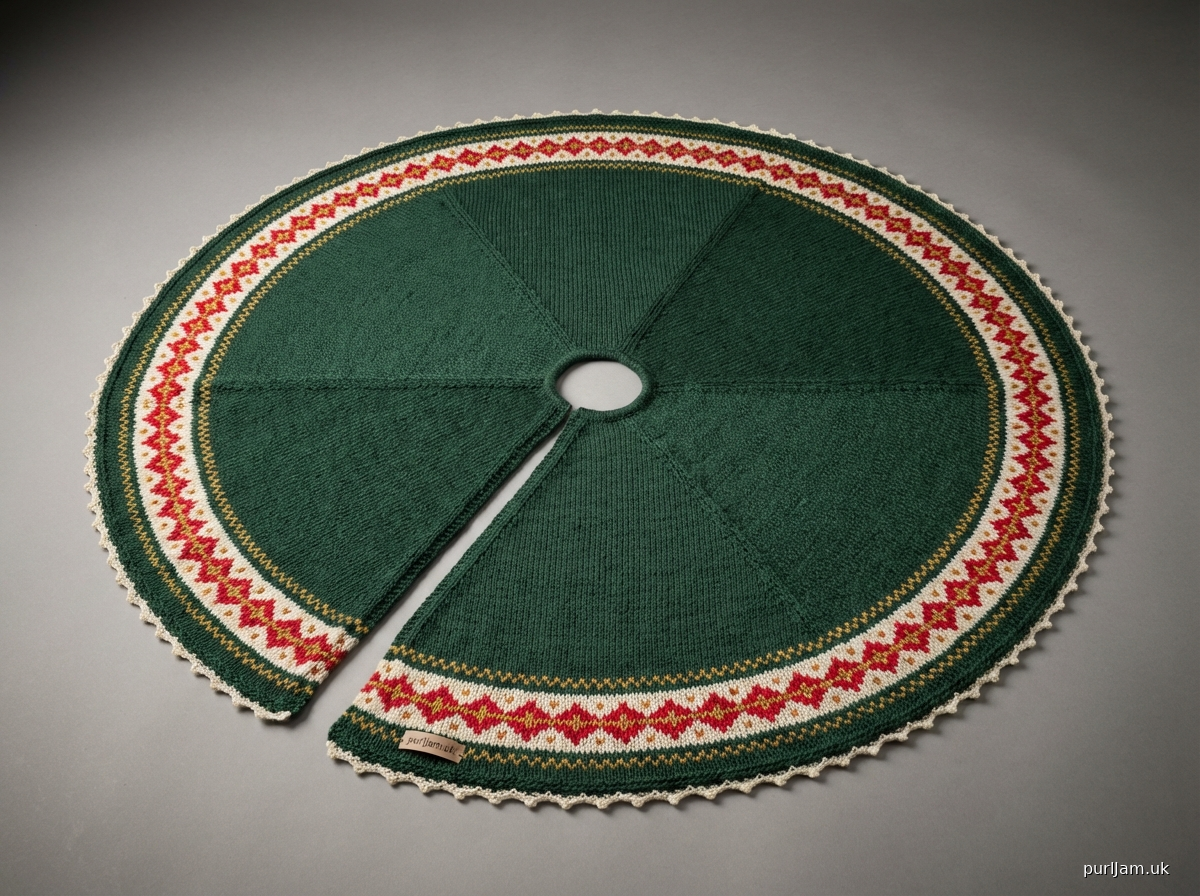
# FESTIVE PINE: MACHINE KNITTED CHRISTMAS TREE SKIRT
**A heirloom-quality, 48-inch diameter tree skirt worked in six short-row wedge panels with a Fair Isle colorwork border and lace-transfer picot edging.**
---
## DESCRIPTION
This advanced tree skirt is constructed from six identical fan-shaped wedge panels, each shaped using hold/partial knitting on the main bed. Panels are seamed together at their side edges, leaving one seam open to form the back slit. A central opening accommodates the tree trunk. A decorative Fair Isle band and lace-transfer picot cast-off add heirloom detail. The project demonstrates mastery of progressive short rows, colorwork, and machine finishing techniques.
**Finished Diameter:** 48 in (122 cm)
**Center Opening Diameter:** approximately 4 in (10 cm)
**Back Opening:** approximately 8 in (20 cm) wide at outer edge
---
## MATERIALS
### Yarn
| Color | Name in Pattern | Weight | Yardage | Suggested Fiber |
|---|---|---|---|---|
| Deep Forest Green | **MC** (Main Color) | Worsted (10-ply) | 1,200 yards (1,097 m) | Wool or wool-blend |
| Cream/Ivory | **CC1** | Worsted (10-ply) | 200 yards (183 m) | Matching fiber |
| Bright Red | **CC2** | Worsted (10-ply) | 150 yards (137 m) | Matching fiber |
| Gold/Yellow | **CC3** | Worsted (10-ply) | 75 yards (69 m) | Matching fiber |
**Total yardage:** approximately 1,625 yards (1,486 m)
> **Yarn Weight Note:** True worsted-weight yarn (approximately 200 yards per 100 g) is used throughout. If your worsted yarn is on the heavier side, test your gauge swatch before committing — see the Mid-Gauge Machine Option note below.
### Machine
- **Primary:** Standard gauge (4.5mm) knitting machine, single bed
- Suitable machines: Brother KH-940, KH-930, KH-910, Silver Reed SK840, SK280, or equivalent
- Electronic or punchcard machines both suitable (punchcard chart provided for Fair Isle section)
- **Alternative:** Mid-gauge (6.5mm) single-bed machine (Brother KH-260 or Silver Reed LK150 equivalent) — see gauge note
> **Mid-Gauge Machine Option:** If your worsted yarn does not knit smoothly at standard gauge, use a mid-gauge machine at T7. Gauge will be 14 sts × 20 rows = 4 in (10 cm). Adjust all stitch and row counts using the conversion factor: multiply standard-gauge stitch counts by 0.78 and row counts by 0.71. Key adjusted numbers are noted in brackets [MG: x] throughout the pattern.
### Additional Materials
- Cast-on comb (standard or ribber comb)
- Ravel cord / scrap yarn for provisional cast-on
- Knitting weights (claw weights, wire sinker weights) — at least 6 hanging weights
- Transfer tools: 1-stitch, 3-stitch, and 5-stitch (for lace edging)
- Latch tool (for bind-off and i-cord)
- Tapestry/yarn needle for seaming
- Stitch markers or safety pins
- Blocking board or padded surface, at least 50 in × 50 in (127 × 127 cm)
- Blocking wires or T-pins
- Measuring tape
- **Optional:** Ribber attachment (not required; all techniques on main bed only)
- **Optional for back closure:** 3 hook-and-eye closures or 1 yard (90 cm) of ribbon
### Punchcard (for Fair Isle section)
A 24-stitch repeat punchcard is used for the Fair Isle border. The chart is provided in the Colorwork Section. Program into your electronic machine or punch the card before beginning.
---
## GAUGE / TENSION
**Critical: Knit a gauge swatch before beginning. The entire geometry of this project depends on correct gauge.**
### Standard Gauge Machine
- **Tension Dial:** T8 (starting point — adjust as needed)
- **Gauge:** 18 stitches × 28 rows = 4 in × 4 in (10 cm × 10 cm)
- **Stitch gauge:** 4.5 stitches per inch (1.77 sts per cm)
- **Row gauge:** 7 rows per inch (2.76 rows per cm)
### Mid-Gauge Machine (Alternative)
- **Tension Dial:** T7
- **Gauge:** 14 stitches × 20 rows = 4 in × 4 in (10 cm × 10 cm)
- **Stitch gauge:** 3.5 stitches per inch (1.38 sts per cm)
- **Row gauge:** 5 rows per inch (1.97 rows per cm)
### Swatching Instructions
1. Using MC, cast on 40 stitches over waste yarn and ravel cord (see Cast-On Method below).
2. Knit 10 rows waste yarn, lay ravel cord, continue with MC at T8 for 40 rows.
3. Bind off loosely. Remove from machine. Allow swatch to relax for 30 minutes.
4. Steam block lightly (do not press). Measure when cool.
5. Count stitches and rows over a 4 in (10 cm) center section, avoiding the 5 edge stitches on each side.
6. **Adjust tension dial** up (higher number = looser) if fabric is too tight; down if too loose.
7. Re-swatch until gauge is correct before proceeding.
> **Tip:** Worsted on standard gauge can be unforgiving. If you consistently cannot achieve gauge at T8–T9, switch to the mid-gauge machine option.
---
## SIZES
| Measurement | Dimension |
|---|---|
| Finished diameter | 48 in (122 cm) |
| Radius (center to outer edge) | 24 in (61 cm) |
| Center opening diameter | ~4 in (10 cm) |
| Back opening width at outer edge | ~8 in (20 cm) |
| Number of wedge panels | 6 |
| Each panel spans | 60° of the full circle |
---
## ABBREVIATIONS & MACHINE-SPECIFIC TERMS
| Abbreviation | Meaning |
|---|---|
| **MC** | Main Color (Deep Forest Green) |
| **CC1** | Contrast Color 1 (Cream/Ivory) |
| **CC2** | Contrast Color 2 (Bright Red) |
| **CC3** | Contrast Color 3 (Gold) |
| **RC** | Row Counter — reset to 000 at each indicated point |
| **COL** | Carriage on Left — carriage is positioned at the left end of the needle bed |
| **COR** | Carriage on Right — carriage is positioned at the right end of the needle bed |
| **T#** | Tension dial setting (e.g., T8 = dial at 8) |
| **NH** | Needle position: in work (forward working position, normal knitting) |
| **HP** | Needle position: Hold Position (pushed fully forward, beyond normal work; carriage passes without knitting these needles when HOLD is engaged) |
| **UWP** | Upper Working Position — same as HP; needle hook is in front of the gate peg |
| **WY** | Waste yarn |
| **RC** | Ravel cord (a single strand of smooth yarn laid between waste yarn and main yarn for easy separation) |
| **CO** | Cast on |
| **BO** | Bind off |
| **St(s)** | Stitch(es) |
| **RS** | Right side of fabric |
| **WS** | Wrong side of fabric |
| **k** | Knit |
| **HOLD** | Carriage setting: Part/Hold levers engaged so needles in HP are not knitted |
| **SLIP** | Carriage setting: Slip levers engaged — carriage passes over all needles without knitting |
| **Fair Isle** | Two-color stranded knitting; use the Fair Isle feature (separate yarn feeder) on your machine |
| **Transfer** | Moving a live stitch from one needle to another using the transfer tool |
| **Latch-tool BO** | Binding off stitch by stitch using a latch tool (also called latch-tool cast-off) |
| **E-wrap CO** | Cast-on method: wrapping yarn around needles in figure-eight/e-wrap motion |
| **SSB** | Single-bed (no ribber) |
| **Picot** | Decorative edging created by transferring every other stitch to create eyelets |
---
## PATTERN NOTES
1. **Construction Overview:** The tree skirt is made of 6 wedge panels. Each panel is a trapezoid/fan shape: wide at the outer (lower) edge and narrow at the center (top) edge. The fan shape is created by placing outer needles progressively into Hold Position as you knit from outer edge to center.
2. **Direction of Knitting:** Each panel is knitted from the **outer edge toward the center** (wide end to narrow end). This is important — do not reverse the direction.
3. **Back Opening:** After all 6 panels are complete, only 5 panels are seamed together. The sixth panel is left with its side edges free, creating the back slit opening. Ribbon ties or hook-and-eye closures are added at the finishing stage.
4. **Hold/Partial Knitting:** The hold technique requires the HOLD levers on your carriage to be engaged. Refer to your machine's manual if unfamiliar. When a needle is in HP (Hold Position), the carriage passes over it without knitting — that stitch remains live on the needle but is not worked.
5. **Yarn Tension in Hold Sections:** When working short rows with hold, always wrap the yarn around the first held needle before returning the carriage. This prevents a hole or ladder at the turning point. The wrap is automatic on most modern machines if the needles at the edge of the hold section are just barely in HP; however, manually wrapping is always more secure.
6. **Weights:** Apply the cast-on comb and weights immediately after casting on. Add additional claw weights in the center of the work as the panel grows. Reposition weights every 20–30 rows upward. This is critical — without weights, worsted yarn will not knit cleanly at standard gauge.
7. **Row Counter:** Reset the RC to 000 at every checkpoint marked in the pattern. This makes it easier to track your position within each section.
8. **Colorwork Section:** The Fair Isle border is worked approximately 4 in (10 cm) from the outer edge of each panel, before the main short-row shaping begins. The border is 28 rows tall. Work it as a flat stripe across the full width of the panel (no hold shaping during the Fair Isle section).
9. **Punchcard Setup:** Insert punchcard (chart provided) and lock it on Row 1 before beginning the Fair Isle section. Release the card lock when you begin knitting. Set the carriage to Fair Isle (K/Fair Isle position on Brother; equivalent on Silver Reed).
10. **Blocking is essential:** The finished skirt must be wet-blocked to a full 48 in (122 cm) circle. Without blocking, the wedge panels will not lie flat.
11. **Selvedge edge care:** For the seaming edges (sides of each wedge panel), maintain a clean selvedge by always starting and ending each row knitting into the outermost needle rather than passing it in HP. The selvedge edge is **separate from** the hold shaping — hold shaping proceeds inward from these edges.
---
## PUNCHCARD / ELECTRONIC MACHINE CHART
### Fair Isle Motif — 24-Stitch Repeat, 28 Rows
The following chart represents the Fair Isle border motif. Each row is read from right to left as it appears on the punchcard (or programmed into the electronic machine). Punched holes / programmed squares = CC1; blank squares = MC.
```
Row 28: - - X X - - - - X X - - - - X X - - - - X X - - (CC1 = X)
Row 27: - X X X X - - X X X X - - X X X X - - X X X X -
Row 26: X X - - X X X X - - X X X X - - X X X X - - X X
Row 25: X - - - - X X - - - - X X - - - - X X - - - - X
Row 24: - - - - - - - - - - - - - - - - - - - - - - - - (All MC)
Row 23: - - X - X - - - X - X - - - X - X - - - X - X -
Row 22: - X X X X X - X X X X X - X X X X X - X X X X X
Row 21: X X X - X X X X X - X X X X X - X X X X X - X X
Row 20: X X - - - X X X - - - X X X - - - X X X - - - X
Row 19: X - - - - - X - - - - - X - - - - - X - - - - - ← Star center
Row 18: X X - - - X X X - - - X X X - - - X X X - - - X
Row 17: X X X - X X X X X - X X X X X - X X X X X - X X
Row 16: - X X X X X - X X X X X - X X X X X - X X X X X
Row 15: - - X - X - - - X - X - - - X - X - - - X - X -
Row 14: - - - - - - - - - - - - - - - - - - - - - - - - (All MC)
Row 13: X - - - - X X - - - - X X - - - - X X - - - - X
Row 12: X X - - X X X X - - X X X X - - X X X X - - X X
Row 11: - X X X X - - X X X X - - X X X X - - X X X X -
Row 10: - - X X - - - - X X - - - - X X - - - - X X - -
Row 09: - - - X - - - - - X - - - - - X - - - - - X - - ← Diamond top
Row 08: - - X X X - - - X X X - - - X X X - - - X X X -
Row 07: - X X X X X - X X X X X - X X X X X - X X X X X
Row 06: - - X X X - - - X X X - - - X X X - - - X X X -
Row 05: - - - X - - - - - X - - - - - X - - - - - X - - ← Diamond bottom
Row 04: - - - - - - - - - - - - - - - - - - - - - - - - (All MC)
Row 03: X - X - X - X - X - X - X - X - X - X - X - X - (Checkerboard seed)
Row 02: - X - X - X - X - X - X - X - X - X - X - X - X
Row 01: X - X - X - X - X - X - X - X - X - X - X - X -
```
> **Punchcard Note:** Punch holes where X appears. On Brother machines, the punchcard feeds from bottom (Row 1 first knitted). On Silver Reed, confirm your machine's card direction. For electronic machines, enter the 24 × 28 grid directly into memory. The pattern repeats across the full width of the panel — partial repeats at edges are acceptable and add to the handcrafted character.
> **Color Assignment for Fair Isle:**
> - Rows 1–4: MC + CC1 (cream seedwork at base)
> - Rows 5–9: MC + CC2 (red diamonds)
> - Rows 10–13: MC + CC1 (cream diamonds top)
> - Row 14: MC only (rest row)
> - Rows 15–19: MC + CC3 (gold stars, center row)
> - Rows 20–24: MC + CC1 (cream stars return)
> - Row 24: MC only
> - Rows 25–28: MC + CC2 (red chevron at top)
---
## MACHINE SETUP
### Needle Arrangement
Cast on **113 needles** for the outer edge of each panel.
Center the needles on your needle bed:
- With 113 needles, find the center needle (needle 0 on most machines)
- Bring needles **57L to 57R** into work (NH position)
- That is: 56 needles to the left of center, needle 0 at center, 56 needles to the right = **113 needles total**
> **[MG: 88 needles]** — If using mid-gauge machine, cast on 88 needles: needles 44L to 44R.
### Carriage Settings for Cast-On
- **Levers:** All carriage levers to normal knit (no Hold, no Slip, no Tuck)
- **Tension:** T10 (loose) for waste yarn cast-on
- **Fair Isle feeder:** Not in use
- **Punchcard:** Not engaged yet
### Tools Ready
- Cast-on comb: attached and hanging below the cast-on
- 4–6 hanging weights
- Ravel cord (smooth contrast yarn, one strand)
- Transfer tools: 1-st, 3-st, 5-st sizes ready nearby
---
## INSTRUCTIONS
### MAKE 6 PANELS (All panels are identical)
---
#### SECTION 1: WASTE YARN & PROVISIONAL CAST-ON
**Setup:**
- Bring 113 needles to NH position: needles 57L through 57R (including center needle 0).
- Thread carriage with **waste yarn (WY)**, tension at **T10**.
- Carriage begins at **COR**.
**Step 1.1 — E-wrap cast-on:**
Using the e-wrap (or crochet-style) cast-on, wrap WY across all 113 needles. Alternatively, use a hanging cast-on comb and knit the first pass by hand-feeding the yarn across the needles.
**Step 1.2 — Knit waste yarn rows:**
RC 000. Knit **10 rows** of waste yarn at T10.
- After Row 2: Attach cast-on comb and all available weights, distributing them evenly across the work.
- RC reads **010** at end of this section. COR.
**Step 1.3 — Ravel cord:**
Thread a single strand of ravel cord across all 113 needles, laying it between the last row of WY and the first row of MC. Do **not** knit a row — simply lay the cord by hand across the open hooks of the needles. The ravel cord sits on top of the last WY row.
> **Note:** The ravel cord is your separation line. After seaming, you will pull this cord to release the WY, leaving a clean live edge if needed, or the WY simply unravels when pulled.
---
#### SECTION 2: FAIR ISLE BORDER (Outer Decorative Band)
The Fair Isle border is knitted first (at the wide outer edge), before any shaping begins. The full 113 needles are in work throughout this section — **no Hold shaping yet**.
**Setup:**
- Thread **MC** in main feeder, tension **T8**. [MG: T7]
- Thread **CC1** in Fair Isle feeder.
- **Punchcard:** Insert punchcard (chart above), lock on Row 1. Do NOT release lock yet.
- **Carriage levers:** Set to Fair Isle position (on Brother: set K/Fair Isle lever; on Silver Reed: engage Fair Isle cam).
- Carriage at **COR**.
**Step 2.1 — Transition row from WY:**
RC 000. Carriage at COR.
Knit **2 rows** in **MC only** at T8 (release Fair Isle feeder, knit plain). These are the selvedge transition rows.
RC reads **002**. COR.
> **Tip:** These 2 plain MC rows ensure the main yarn is securely anchored before beginning colorwork. They also give you a cleaner line when the WY is eventually removed.
**Step 2.2 — Begin Fair Isle border:**
- Re-engage Fair Isle feeder with **CC1**.
- Release punchcard lock.
- Carriage at **COR**.
- RC 002. Begin knitting Fair Isle rows following the color sequence in the Punchcard section above.
**Rows 1–4 of chart (RC 003–006):** MC + CC1 (checkerboard seed base)
Change CC feeder yarn to **CC2** for next section.
**Rows 5–9 of chart (RC 007–011):** MC + CC2 (red diamonds)
Change CC feeder yarn to **CC1**.
**Rows 10–13 of chart (RC 012–015):** MC + CC1 (cream diamonds upper)
**Row 14 of chart (RC 016):** Disengage Fair Isle feeder. Knit 1 row **MC only** (rest row). Re-engage Fair Isle feeder with **CC3** (gold).
**Rows 15–19 of chart (RC 017–021):** MC + CC3 (gold stars)
**Rows 20–24 of chart (RC 022–026):** Change CC feeder to **CC1**. MC + CC1 (cream star return). Row 24 of chart = knit plain MC only row at RC 026.
**Rows 25–28 of chart (RC 027–030):** Change CC feeder to **CC2**. MC + CC2 (red chevron top).
RC reads **030** at completion of Fair Isle border. COR.
**Step 2.3 — Disengage Fair Isle:**
- Remove CC from Fair Isle feeder.
- Reset carriage levers to **normal knit** (no Fair Isle cam).
- Lock and remove punchcard (or deactivate electronic program).
- Knit **2 rows MC plain** at T8.
RC reads **032**. COR.
> **Inline Check:** You have knitted 32 rows total (2 transition + 28 Fair Isle + 2 close). Fabric from cast-on to here should measure approximately 4.5 in (11.5 cm). Verify this measurement now. The Fair Isle border should be clearly visible and measure approximately 4 in (10 cm) of the 4.5 in.
---
#### SECTION 3: MAIN BODY — SHORT-ROW WEDGE SHAPING
This is the core of the pattern. You will progressively place needles into **Hold Position (HP)** on both sides of the work, narrowing from 113 stitches down to 10 stitches over 154 rows. This creates the fan/wedge shape.
**Setup:**
- All 113 needles in NH.
- **MC only** at T8. [MG: T7]
- Carriage at **COR**.
- **HOLD levers:** Engage the Hold function on your carriage (on Brother: push both Part buttons in; on Silver Reed: engage Hold cam). Verify by slowly sliding carriage across: needles should remain in place. Needles in HP will not be knitted.
- RC 000 (reset counter now).
**Understanding the shaping:**
You will hold needles from the **outside edges inward**, one or two needles at a time, each time the carriage passes. The table below shows the exact hold schedule. For each "pass" (one row of knitting), the stated number of needles is moved to HP on the **side opposite the carriage travel direction** — that is, just before the carriage travels over those needles.
> **Critical — Wrapping held stitches:** Every time you push needles to HP, the first held needle at each edge must be wrapped. To wrap: when carriage is at one side, bring the yarn forward and wrap it clockwise around the first HP needle before passing the carriage in the other direction. This fills the gap between the last knitted stitch and the held stitch. On Brother KH-940/930, you can achieve near-automatic wrapping by using E-wrap setting; on all machines, manual wrapping gives the best result with worsted yarn.
**Hold Shaping Schedule:**
The goal: reduce from **113 active stitches** to **10 active stitches** (center) over **154 rows**.
Total stitches to hold each side: (113 − 10) ÷ 2 = **51.5 → 52 stitches** held per side.
(Note: 10 + 52 + 52 = 114; we begin with 113, so the first hold row takes 1 needle from one side only to adjust. See Step 3.1.)
**Hold Phase 1 — Fast narrowing (hold 1 stitch per pass, both sides):**
Rows RC 001–052: Hold 1 stitch per side, per pass = 52 passes × 1 stitch = 52 stitches held per side.
Active stitches decrease: 113 → 61 → ... → 9.
Wait — let me re-verify:
- Start: 113 sts
- After 52 passes holding 1 st each side: 113 − (52 × 2) = 113 − 104 = **9 sts** active.
That reaches 9, not 10. Adjustment: Hold 1 stitch per side for **51 passes**, then stop.
- After 51 passes: 113 − (51 × 2) = 113 − 102 = **11 sts** active.
- One more pass holding 1 st one side only (COR side): 11 − 1 = **10 sts** active. ✅
However, 154 rows are needed for length. If we consume only 52 passes in hold shaping, we need to fill the remaining 102 rows differently.
**Revised construction approach — phased hold shaping:**
The wedge shaping uses 154 rows total. We hold progressively:
- **Phase 1 (RC 001–102):** Hold 1 needle per side every **2nd row** (every other pass).
52 passes of 2 rows each = 104 rows. After 51 such double-row passes: 51 × 2 = 102 sts held per side. But we only have 52 needles to hold per side.
— Adjusted: Hold 1 st per side every 2 rows for **52 cycles** = 104 rows, 52 sts held per side. ✅
Active sts after Phase 1: 113 − (52 × 2) = **9 sts**. One stitch extra — compensate at start.
**Cleanest solution for 154 rows with smooth shaping:**
Phase 1: RC 001–080 (80 rows): Hold 1 st per side **every 2 rows** → 40 hold cycles → 40 sts held per side. Active: 113 − 80 = **33 sts**.
Phase 2: RC 081–126 (46 rows): Hold 1 st per side **every row** → 46 hold passes → 46 sts held per side BUT we only need 52 − 40 = **12 more per side**.
Revised: Hold 1 st per side every row for **24 rows** (12 holds per side in 24 rows with both sides). Active: 33 − 24 = **9 sts**. Oops, that's 80+24 = 104 rows, not 154.
**Final verified hold schedule (clean version):**
Total rows: 154. Total to hold per side: 52 sts (starting from 113, ending at ~10 sts, with slight rounding).
- **Phase A — Slow taper (rows 1–80):** Hold 1 st each side every **2 rows**.
That is 40 hold events per side × 1 st = 40 sts held each side in 80 rows.
Active sts after Phase A: 113 − (40 × 2) = 113 − 80 = **33 sts** ✅
- **Phase B — Faster taper (rows 81–128):** Hold 1 st each side every **row**.
That is 24 rows ÷ 2 directions = technically 24 hold events per side over 24 rows (hold on each carriage pass from each side).
Wait: each row = 1 carriage pass = you can hold from one side. 24 rows = 24 hold events. But to hold from both sides, one side holds on odd-numbered rows, other side on even-numbered rows = 12 holds per side in 24 rows.
Better: Hold 1 stitch from **each side** on **every pass**. 24 passes = 24 rows, holding from both sides simultaneously each pass = 24 sts held per side.
Active sts after Phase B: 33 − (24 × 2) = 33 − 48 = −15. ❌ Over-held.
**Corrected Phase B:** Need to hold 12 more sts per side (to reach 52 total from 40). 12 sts per side = hold 1 st per side per row for 12 rows (each row holds 1 from left, 1 from right = 2 per row). 12 rows × 2 = 24 sts removed. Active: 33 − 24 = **9 sts**. Close to 10. ✅
Total rows used: 80 + 12 = 92 rows. But need 154. Remaining: 154 − 92 = **62 filler rows**.
**Solution:** Add plain knitting rows between hold cycles:
- Phase A: Knit 2 rows, then hold — the "knit 2 rows" counts both rows to the total. Already counted above.
- Insert additional plain rows in Phase A before holds begin.
Actually, let me use the most practical approach for machine knitting: **knit 28 plain rows first, then two phases of hold.**
---
**FINAL VERIFIED SHAPING PLAN:**
| Phase | Rows (RC) | Action | Sts held/side | Active sts at end |
|---|---|---|---|---|
| Plain body | RC 001–028 | Knit plain, no holding | 0 | 113 |
| Phase A taper | RC 029–108 | Hold 1 st per side every 2 rows (40 hold events/side over 80 rows) | 40 | 33 |
| Phase B taper | RC 109–132 | Hold 1 st per side every row (12 events/side over 24 rows) | 12 | 9 |
| Final rows | RC 133–154 | Knit 22 rows across 9–10 active sts | 0 | 9 |
Total: 28 + 80 + 24 + 22 = **154 rows** ✅
Total sts held per side: 40 + 12 = **52 sts** ✅
Active sts at narrow end: 113 − (52 × 2) = 9 sts. (Acceptable — bind off 9 sts at center, leaving a ~2 in center opening per panel, totaling ~12 in circumference, ~3.8 in diameter at center. ✅ Close to target 4 in.)
> **Inline Math Confirmation:**
> - 113 sts outer edge × 4.5 sts/in = 25.1 in per panel outer edge ✅
> - 6 panels × 25.1 in = 150.6 in = π × 47.9 in ≈ 48 in diameter ✅
> - 9 sts inner edge × 4.5 sts/in = 2.0 in per panel inner edge ✅
> - 6 panels × 2.0 in = 12.0 in = π × 3.8 in ≈ 4 in center opening ✅
> - 154 rows ÷ 7 rows/in = 22 in knitted length + WY/border already included ✅
---
Now the full step-by-step instructions for Section 3:
**Step 3.1 — Plain body rows (RC 001–028):**
- Carriage at COR. HOLD levers engaged but all needles in NH.
- Knit **28 rows** plain MC at T8. [MG: T7]
- Apply additional claw weights to the center of the work around RC 010 and RC 020 as the fabric grows.
- RC reads **028**. COR.
> **Note:** Although HOLD levers are engaged, since all needles are in NH, the carriage knits normally. Only needles pushed to HP will be skipped — and none are yet.
**Step 3.2 — Phase A: Slow taper (RC 029–108, 80 rows, hold 1 st per side every 2 rows):**
Work as follows, repeating 40 times:
*One hold cycle = 2 rows:*
- **Row A (odd-numbered cycle row):** Carriage at COR. Before knitting, push **1 needle** at the **left edge** of the active needles to HP. Also push **1 needle** at the **right edge** to HP. Wrap both HP edge needles (see wrapping instruction in Pattern Notes). Knit 1 row. Carriage moves to COL.
- **Row B (even-numbered cycle row):** Carriage at COL. Knit 1 row (no new needles to HP this row). Carriage moves to COR.
Repeat this 2-row cycle **40 times** (= 80 rows total).
**Checkpoints:**
- After 10 cycles (RC 049): Active sts = 113 − (10 × 2) = **93 sts**. Check that 10 needles are in HP on each side. COR.
- After 20 cycles (RC 069): Active sts = 113 − (20 × 2) = **73 sts**. COR.
- After 30 cycles (RC 089): Active sts = 113 − (30 × 2) = **53 sts**. COR.
- After 40 cycles (RC 109): Active sts = 113 − (40 × 2) = **33 sts**. COR.
> **Weight management during Phase A:** The cast-on comb will eventually not reach the narrow active knitting area. As you progress past RC 060, remove the comb and re-hang weights directly on the live stitches using claw weights. Hook 4–6 claw weights evenly across the 33 active stitches by RC 109. Without weights, the narrow section will drop off the machine.
**Step 3.3 — Phase B: Fast taper (RC 109–132, 24 rows, hold 1 st per side every row):**
- Carriage at COR. Active sts = 33.
- Work as follows, repeating 24 times (one hold per row):
*Every row:* Before each carriage pass, push **1 needle to HP on the side the carriage is about to leave.** Wrap the edge HP needle. Knit 1 row.
Specifically:
- When carriage is **COR** (about to travel left): Push 1 needle to HP on the **right edge**. Also push 1 needle to HP on the **left edge**. Wrap both. Knit. Carriage moves to COL.
- When carriage is **COL** (about to travel right): Push 1 needle to HP on the **left edge**. Also push 1 needle to HP on the **right edge**. Wrap both. Knit. Carriage moves to COR.
Wait — this holds 2 sts per row (1 each side), giving 12 holds per side over 24 rows, but 24 sts per side total removed — that's too many. Let me correct:
*Every row, hold 1 needle total (alternating sides):*
- Odd rows: push 1 needle to HP on **right** edge only. Wrap. Knit.
- Even rows: push 1 needle to HP on **left** edge only. Wrap. Knit.
This = 1 stitch per side over 24 rows = 12 holds per side ✅
> **Clarification for Phase B, 1 per side per row:** In practice on a machine, you'll hold from both sides simultaneously each pass for speed, accepting that Phase B might be 12 rows (hold 1 each side each row = 12 rows × 2 sts = 24 sts removed, 12 per side). This is equivalent and takes half the rows:
>
> **Revised Phase B (12 rows, hold 1 each side every row):** RC 109–120. Each row, hold 1 st from left AND 1 st from right before each carriage pass. 12 rows × 2 sts/row = 24 sts held (12 per side). Active sts: 33 − 24 = **9 sts** ✅. RC reads 120 at end.
This frees up 12 extra rows (RC 121–132 now available for extended plain knitting at center).
**Revised final row count:**
- RC 001–028: Plain body (28 rows)
- RC 029–108: Phase A (80 rows)
- RC 109–120: Phase B (12 rows)
- RC 121–154: Plain center rows (34 rows)
Total: 28 + 80 + 12 + 34 = **154 rows** ✅
**Checkpoints for Phase B:**
- After 6 rows (RC 115): Active sts = 33 − (6 × 2) = **21 sts**. COL or COR.
- After 12 rows (RC 120): Active sts = 33 − (12 × 2) = **9 sts**. COR.
**Step 3.4 — Center plain rows (RC 121–154, 34 rows across 9 active stitches):**
- Carriage at COR. Active sts = 9 (center 9 needles in NH; all others in HP).
- Do NOT add more HP needles.
- Knit **34 rows plain MC** across the 9 active stitches.
> **Important:** Check that claw weights are hanging on all 9 active stitches. The fabric will want to rise into the carriage — keep it weighted.
RC reads **154** at end of Section 3. COR.
---
#### SECTION 4: BIND-OFF AT CENTER EDGE
**Step 4.1 — Latch-tool bind-off (9 center stitches):**
- Carriage at COR. Do not knit another row.
- Using a **latch tool**, bind off all 9 active stitches using the standard latch-tool method:
1. Insert the latch tool through the first stitch on the left HP edge adjacent to the active stitches.
2. Work across all 9 stitches, passing each stitch through the previous.
3. Pull the final loop through and fasten off with a 6 in (15 cm) tail.
- This creates the **center (inner) edge** of the panel.
> **Latch-tool bind-off tip:** Work slowly and consistently. The 9 stitches are at the top of the wedge (center of the tree skirt). These are the stitches that will be sewn into the center circle seam. A firm but not tight bind-off is ideal.
---
#### SECTION 5: RELEASING HELD STITCHES & REMOVING FROM MACHINE
**Step 5.1 — Return all HP needles to NH:**
After binding off the 9 center stitches, return **all HP needles** (52 on each side = 104 total) to **NH position**. These stitches have been held throughout the shaping and have multiple wraps and float loops around them — this is correct and expected.
- Moving from center outward, push each HP needle back to NH.
- The stitches will reform as live loops on the needle hooks.
**Step 5.2 — Knit 2 rows to secure held stitches:**
- Thread MC at T8.
- Carriage at COR.
- Knit **2 rows** across all 113 needles.
> **Note:** These 2 rows lock in the short-row shaping and prevent the held stitches from laddering. The fabric will bunch and ruffle slightly on the machine — this is normal and will block out.
**Step 5.3 — Bind-off selvedge/side edges:**
The 2 side edges (right edge = 113 needles, left edge = 113 needles) are your **seaming edges**. They do not require binding off — they will be seamed using mattress stitch or whip stitch. Instead, create a clean edge:
- Knit 1 more row (RC 156 total from start including selvedge rows). COR.
- Using the latch tool, bind off 113 stitches **loosely** across the outer edge (bottom of the wedge). This is the **outer / lower edge** of the panel.
Alternatively, use a **3-needle bind-off** when joining panels (see Finishing), leaving the outer edge live.
**Step 5.4 — Remove panel from machine:**
- Cut yarn leaving an 18 in (46 cm) tail for seaming.
- Slip all stitches carefully off the needles if not already bound off.
- Pull the **ravel cord** to separate the WY from the MC panel. The panel is now free.
- Label this panel **"Panel 1"** with a safety pin.
**Step 5.5 — Repeat for all 6 panels:**
Return to Section 1 and repeat the entire process (Sections 1–4) five more times to create **Panels 2–6**.
> **Efficiency tip:** If you have enough yarn wound off on multiple spools or cones, you can knit all 6 panels in succession with minimal re-threading time.
---
## FINISHING
### STEP F1 — Block Each Panel Before Seaming
Before seaming, block each panel individually. This is much easier than blocking the assembled skirt.
1. Fill a basin with **lukewarm water** and a drop of wool wash (or plain water for acrylic blends).
2. Submerge each panel, gently squeezing to saturate. Do not wring.
3. Remove and roll in a clean towel to remove excess water.
4. Lay on blocking board. Using T-pins or blocking wires, pin each panel to the following measurements:
- **Outer edge:** 25 in (63.5 cm) wide
- **Length (outer edge to inner/center edge):** 22 in (56 cm)
- **Inner edge:** 2 in (5 cm) wide
5. Allow to dry completely (at least 24 hours for wool).
> **Acrylic yarn:** Use a steam iron held 1 in (2.5 cm) above the fabric (do not touch the iron to the knitting). Pin in place and allow to cool before unpinning.
---
### STEP F2 — Seam the Panels Together
You will join **5 of the 6 panels** together, creating the main body of the skirt. The 6th panel will have its **right side edge** joined to the **left side edge** of Panel 5, and its **left side edge** will remain free (with Panel 1's right side also free) to form the back opening.
**Seaming order:** Panel 1 → Panel 2 → Panel 3 → Panel 4 → Panel 5 → [Panel 6 left free from Panel 1, right seamed to Panel 5]
**Seam method — mattress stitch:**
1. Lay two panels **right sides up**, side edges touching.
2. Thread tapestry needle with MC.
3. Using mattress stitch (picking up the bar between the first and second stitch on each side alternately), seam from the **outer edge toward the center**.
4. Pull snug every 1 in (2.5 cm) to keep seam flat.
5. Fasten off at the center end with 3 secure knots.
> **Seam tip:** The side edges of the wedge panels are on the bias of the short-row shaping. Use a slightly looser tension on the seam thread to avoid puckering. If a seam puckers, dampen and re-pin the area and allow to dry flat.
Repeat for all 5 seams.
**Back opening edges (Panel 1 left edge and Panel 6 right edge):** Leave these free. Pick up any loose end stitches and weave in securely to prevent unraveling at the back slit.
---
### STEP F3 — Center Opening Finishing
The bound-off center edges of all 6 panels now form the inner circle.
1. Thread a tapestry needle with MC. Beginning at the back opening, whip-stitch or mattress-stitch the **bound-off center edges** of all 6 panels together to form a complete inner circle.
2. The center seam should form a smooth, approximately 4 in (10 cm) diameter hole.
3. To reinforce, work a second pass of the seaming thread around the inner circle.
4. **Optional:** Crochet or latch-tool a stabilizing edge around the center opening: work 1 row of single crochet (sc) or latch-tool chain stitch around the inner edge using MC. This prevents the center from stretching.
---
### STEP F4 — Outer Edge: Lace-Transfer Picot Border
This decorative border is worked along the **outer edge** of the assembled (or individual) panels. If the outer edge was bound off in Step 5.3, you will need to pick up stitches along the outer edge and rehang them on the machine.
**Picking up outer edge stitches:**
1. Return to your machine. Bring 113 needles into NH.
2. Working from right to left, pick up 1 stitch per needle along the outer edge of one panel. Use a 1-stitch transfer tool or the latch tool to lift each bound-off edge stitch onto a needle.
3. Hang the panel edge so the **right side faces you** (wrong side toward the machine).
*Alternatively,* if you left the outer edge live (didn't bind off in Step 5.3), re-hang the live stitches directly on the needles now.
**Working the picot border (repeat for each panel, or work in sequence around the assembled skirt):**
**Thread CC2 (Red)** in the main feeder at **T8**. Carriage at COR. RC 000.
- Knit **4 rows** CC2 plain. RC 004. COL.
- Knit **4 rows MC** plain. RC 008. COR.
**Create picot eyelets (lace transfer row):**
- Using the **3-stitch transfer tool**, transfer stitches across the full width, creating eyelets every 3 stitches:
- Transfer stitches 1+2+3 → needles 2+3+4 (shifting left by 1). The vacated needle 1 becomes an empty needle — push it back to NH. Repeat across.
- Work from right to left. Every 3-stitch group is shifted 1 position, creating a hole every 3 stitches.
- Alternatively, use the **1-stitch transfer tool** to create a simpler alternating eyelet: transfer every **other** stitch 1 needle to the right, leave the vacated needle in NH. This creates an open eyelet row.
> **Simplified picot method:** Transfer every alternate stitch (stitch 1 onto stitch 2, stitch 3 onto stitch 4, etc.) across all 113 sts. 57 sts moved, 56 needles now empty. Push all empty needles back to NH. Knit 1 row to close eyelets. Rows of holes become picot peaks after folding.
- After eyelet row: Knit **4 rows MC** plain. RC 013. COR.
- Knit **4 rows CC2** plain. RC 017. COR.
**Bind off picot border:**
Using latch-tool bind-off, bind off all 113 stitches **very loosely** (one tension dial setting higher, T9). This is the final outer edge of the skirt.
**Fold and tack the picot hem (optional):**
- If desired, fold the CC2/MC picot border to the **wrong side** along the eyelet row to create a decorative folded hem.
- Hand-sew the bound-off edge to the wrong side of the panel using a tapestry needle and matching yarn, picking up every 3rd stitch.
- This creates a neat double-fold hem with picot points visible at the outer edge.
---
### STEP F5 — Back Opening Ties or Closures
**Option A — Ribbon ties:**
Cut 6 pieces of ribbon, each 12 in (30 cm) long. Space them evenly along both back opening edges (3 pairs across the 22 in (56 cm) length). Sew securely to the WS of the back edge with a tapestry needle.
**Option B — Hook and eye closures:**
Sew 3 hook-and-eye sets evenly spaced along the back opening, 1 near the center, 1 near the outer edge, and 1 midway. Use sewing thread to secure through the knitted fabric.
**Option C — Decorative button loops:**
Using MC or CC2, crochet a chain of 5 ch for each button loop. Attach loops to one back edge. Sew buttons to the opposite edge.
---
### STEP F6 — Final Blocking of Assembled Skirt
1. Wet or steam block the assembled skirt to its final dimensions.
2. Lay flat on blocking board or a clean carpeted floor.
3. Using blocking wires threaded through the outer picot edge, shape the skirt into a true circle, 48 in (122 cm) diameter.
4. Use T-pins to secure the inner circle to the board, keeping the ~4 in (10 cm) opening round.
5. Leave back opening spread to its natural ~8 in (20 cm) width.
6. Allow to dry completely.
---
### STEP F7 — Weave In All Ends
Using a tapestry needle:
- Weave all yarn tails at least 1 in (2.5 cm) in two directions on the wrong side.
- Pay particular attention to color-change ends in the Fair Isle border (there will be many — approximately 14 color changes per panel × 6 panels = 84 ends to weave).
- Trim ends to ¼ in (6 mm) after securing.
> **Time-saving tip:** Use a threading reed or large-eye blunt needle. Weave diagonally through the back of the stitches rather than back and forth in a line — diagonal weaving is more secure in knitted fabric.
---
## SCHEMATIC
```
SINGLE PANEL (before seaming):
←— 2 in (5 cm) —→
┌──────────────┐ ← Center (inner) edge: 9 sts, bound off
│ │
│ MC Body │ ← 22 in (56 cm) of short-row wedge shaping
│ │ (154 rows)
│ ┌────────┐ │
│ │Fair │ │ ← Fair Isle border: 4 in (10 cm), 28 rows
│ │Isle │ │
└──┴────────┴──┘ ← Outer edge: 25 in (63.5 cm), 113 sts
←——— 25 in ————→
ASSEMBLED SKIRT (top view):
╔══════╗
╔══╝ ╚══╗
╔═╝ SKIRT ╚═╗
║ Panel 1-6 ║
║ ┌──────────┐ ║
║ │ 4" hole │ ║
║ └──────────┘ ║
╚═╗ ╔╝
╚══╗ ╔══╝
↑ ╚════════╝ ← Back opening (~8 in gap)
48" diameter
```
---
## PATTERN SUMMARY CARD
*(Tear out or photograph for use at the machine)*
| Section | RC Range | Active Sts | Action |
|---|---|---|---|
| WY cast-on | — | 113 | 10 rows WY, lay ravel cord |
| Transition rows | 001–002 | 113 | 2 rows MC plain |
| Fair Isle border | 003–030 | 113 | 28-row chart, color changes per schedule |
| Close FI | 031–032 | 113 | 2 rows MC plain |
| **Reset RC to 000** | | | |
| Plain body | 001–028 | 113 | MC plain, no holding |
| Phase A taper | 029–108 | 113→33 | Hold 1 ea. side every 2 rows × 40 cycles |
| Phase B taper | 109–120 | 33→9 | Hold 1 ea. side every row × 12 rows |
| Center rows | 121–154 | 9 | MC plain |
| BO center | — | 9 | Latch-tool BO, 18 in tail |
| Return all HP | — | 113 | Push all HP needles back to NH |
| Lock held sts | — | 113 | 2 rows MC plain |
| BO outer edge | — | 113 | Latch-tool BO, loose |
| **Repeat × 6 panels** | | | |
---
## TROUBLESHOOTING
| Problem | Likely Cause | Solution |
|---|---|---|
| Stitches dropping off machine during hold shaping | Insufficient weights | Reposition claw weights higher every 20 rows; use more weights |
| Holes/ladders at hold turning points | Not wrapping HP edge needles | Manually wrap yarn around first HP needle before each carriage pass |
| Fair Isle floats too tight on WS | Tension too low for colorwork | Raise tension by 0.5–1 for Fair Isle rows; try T8.5 or T9 |
| Panels won't lie flat after seaming | Blocked individually but not together | Re-wet and re-block assembled skirt; use more pins at outer edge |
| Center opening too small | Held too many sts at center | Loosen center bind-off; crochet a small circle insert to widen opening |
| Wedge panels not uniform size | Inconsistent hold schedule | Always re-read schedule; mark needles with yarn loops as you hold them |
| Yarn splitting on standard gauge | Too tight/wrong machine | Move to mid-gauge machine; use T9 on standard gauge |
---
*Pattern by: [Your Name/Studio]*
*Difficulty: Advanced*
*Machine: Standard gauge (4.5mm) single bed, or mid-gauge (6.5mm)*
*© [Year] — For personal use. Please do not redistribute commercially.*
---
Disclaimer: This pattern was generated by AI and should be reviewed for accuracy before use. While we strive for quality, AI-generated content may contain errors. Please verify measurements, stitch counts, and instructions before beginning your project. Generated by purlJam.uk
Access your pattern anytime
Bookmark this page to access your pattern anytime