Type
Crochet
Difficulty
intermediate
Category
custom
AI Thinking Process
Planning
Verification
Pattern
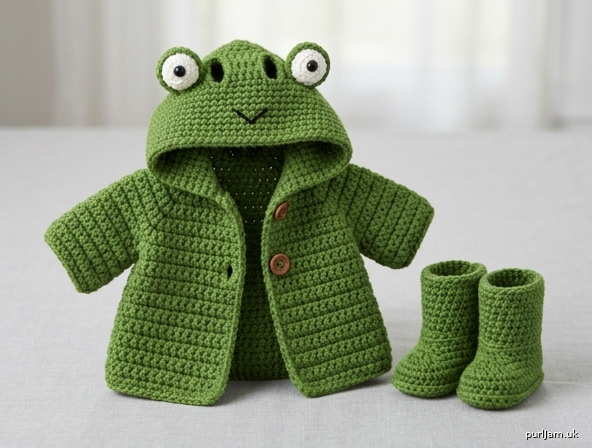
Frog Hood Raincoat and Boots
Amigurumi outfit (beginner)
An open A-line raincoat with short poke-through sleeves, a frog hood (ear slots plus two stuffed eyes), and matching flat-soled boots. Sized to the creature below, using the same bulky yarn and 5.0 mm hook so the stitch counts fit without guesswork.
Fits a creature with: neck 24 sts around; head 36 sts at the widest; body flaring 24 sts at the neck to 48 sts at the hem; boot-shaped legs with flat 24-st soles; long floppy ears on top of the head.
Materials
- Bulky weight (5) yarn, green (raincoat, hood, boots): 150 yd / 137 m
- Bulky weight (5) yarn, white (eye whites): 20 yd / 18 m
- Worsted or bulky yarn, black (pupils and optional smile): 10 yd / 9 m
- Hook: 5.0 mm (US H-8), or size needed to match gauge
- Notions: 2 buttons, ⅝" (16 mm); stitch markers; tapestry needle; small amount of polyester stuffing (eyes only); scissors
Yardage note: One small outfit. Extra green is allowed for a longer hem or a looser hood.
Gauge
16 sc and 18 rows = 4" (10 cm) in single crochet, worked flat.
Work a 20-st × 20-row swatch, measure the inner 16 sts and 18 rows, and change hook if needed. Gauge must match the creature’s fabric or the coat will not sit on the 24-st neck and 48-st hem.
Size
One size, to fit the creature described above.
Finished raincoat (at gauge):
- Neck edge: 28 sc = 7" (18 cm), wrapping a 6" (15 cm) neck with overlap
- Hem: 56 sc = 14" (35.5 cm), wrapping a 12" (30.5 cm) lower body with ease
- Length, neck to hem: 20 rows = 4½" (11.5 cm)
- Hood height: 18 rows = 4" (10 cm)
- Short sleeves: 14 sts around × 4 rnds ≈ ¾" (2 cm) long
- Boot soles: 24 sts around, about 2¼" (5.5 cm) long; shaft about 2¼" (5.5 cm) tall
Abbreviations (US)
- ch — chain
- sc — single crochet
- inc — 2 sc in the same stitch (increase 1)
- dec — sc2tog (invisible decrease preferred; regular sc2tog is fine)
- sl st — slip stitch
- st(s) — stitch(es)
- sp — space
- MR — magic ring
- BLO — back loop only
- RS / WS — right side / wrong side
- FO — fasten off
- rnd(s) — round(s)
Pattern Notes
- US crochet terms throughout. Work in both loops unless a round says BLO.
- Jacket and hood are worked flat, in rows. Ch 1 at the start of every row does not count as a stitch. Turn. Work the first sc in the first stitch.
- Boots, eyes, and pupils are worked in continuous spiral rounds. Mark the first stitch of every rnd and move the marker up.
- Sleeves are worked in joined rounds: sl st to the first sc, ch 1, and do not turn.
- Stitch counts are given in parentheses at the end of every row and rnd. Count them.
- Try the jacket on the creature after the armhole row and again at the hem. The fabric should wrap and button, not squeeze.
- Buttons are a choking hazard for children under 3 years. Embroider the close or sew buttons on with extreme security if the toy will be gifted to a young child.
Raincoat Body
Worked flat, top down, green yarn.
Foundation: Ch 29. Row 1 (RS): Sc in 2nd ch from hook and in each ch across, turn. (28)
Rows 2–3: Ch 1, sc in each st across, turn. (28)
Row 4 (WS, armholes): Ch 1, sc in next 5 sts, ch 6, skip 6 sts, sc in next 6 sts, ch 6, skip 6 sts, sc in last 5 sts, turn. (16 sc + 12 ch = 28)
Tip: The two ch-6 gaps are the armholes. Arms poke through; sleeves are added later.
Row 5 (RS): Ch 1, sc in each sc and in each ch across, turn. (28)
Row 6 (increase): Ch 1, (sc in next 6 sts, inc) 4 times, turn. (4 increases → 28 + 4 = 32 ✓)
Row 7: Ch 1, sc in each st across, turn. (32)
Row 8 (increase): Ch 1, (sc in next 7 sts, inc) 4 times, turn. (4 increases → 32 + 4 = 36 ✓)
Row 9: Ch 1, sc in each st across, turn. (36)
Row 10 (increase): Ch 1, (sc in next 8 sts, inc) 4 times, turn. (4 increases → 36 + 4 = 40 ✓)
Row 11: Ch 1, sc in each st across, turn. (40)
Row 12 (increase): Ch 1, (sc in next 9 sts, inc) 4 times, turn. (4 increases → 40 + 4 = 44 ✓)
Row 13: Ch 1, sc in each st across, turn. (44)
Row 14 (increase): Ch 1, (sc in next 10 sts, inc) 4 times, turn. (4 increases → 44 + 4 = 48 ✓)
Row 15: Ch 1, sc in each st across, turn. (48)
Row 16 (increase): Ch 1, (sc in next 11 sts, inc) 4 times, turn. (4 increases → 48 + 4 = 52 ✓)
Row 17: Ch 1, sc in each st across, turn. (52)
Row 18 (increase): Ch 1, (sc in next 12 sts, inc) 4 times, turn. (4 increases → 52 + 4 = 56 ✓)
Rows 19–20: Ch 1, sc in each st across, turn. (56)
FO. Weave in this tail. The 56-st hem is the flared raincoat bottom.
Hood
With RS of the jacket facing, join green in the first remaining loop of the foundation chain at the right-hand neck edge (as the garment faces you). You will pick up 1 sc in each of the 28 foundation chains.
Row 1: Ch 1, sc in each of the 28 foundation chains, turn. (28)
Row 2 (increase): Ch 1, (sc in next 6 sts, inc) 4 times, turn. (4 increases → 28 + 4 = 32 ✓)
Rows 3–13: Ch 1, sc in each st across, turn. (32)
Ear slots sit near the crown so long floppy ears can pass through. If the ears are very thick, see the tip after Row 17.
Row 14 (ear slots): Ch 1, sc in next 5 sts, ch 6, skip 6 sts, sc in next 10 sts, ch 6, skip 6 sts, sc in last 5 sts, turn. (20 sc + 12 ch = 32)
Row 15 (ear slots): Ch 1, sc in next 5 sts, ch 6, skip 6 ch, sc in next 10 sts, ch 6, skip 6 ch, sc in last 5 sts, turn. (32)
Row 16 (ear slots): Ch 1, sc in next 5 sts, ch 6, skip 6 ch, sc in next 10 sts, ch 6, skip 6 ch, sc in last 5 sts, turn. (32)
Row 17 (close slots): Ch 1, sc in next 5 sts, 6 sc across the ch-6 sp (1 sc in each ch, or 6 sc in the space), sc in next 10 sts, 6 sc across the next ch-6 sp, sc in last 5 sts, turn. (32)
Row 18: Ch 1, sc in each st across. (32)
FO, leaving a 12" (30 cm) tail. Fold the last row in half (16 sts to 16 sts) with WS together and whip stitch the top of the hood closed. Weave in the tail. The two 3-row chain gaps are the ear slots.
Thick-ear tip: For bulkier ears, work Rows 14–16 as: sc 4, ch 8, skip 8, sc 8, ch 8, skip 8, sc 4 (32). Close on Row 17 with 8 sc in each ch-sp.
Short Sleeves (make 2)
Each armhole is a 6-st skipped gap plus a 6-ch bridge. Work around the entire opening.
With RS facing, join green at one corner of the armhole.
Rnd 1: Ch 1. Work 6 sc across the skipped sts of Row 4, 1 sc in the row-edge at the corner, 6 sc across the ch-6, 1 sc in the other row-edge. Sl st in the first sc to join. (6 + 1 + 6 + 1 = 14 ✓)
Rnds 2–4: Ch 1, sc in each st around, sl st in first sc to join. (14)
FO after Rnd 4. Weave in ends. Repeat for the second armhole. Arms pop through these short sleeves.
Edging, Buttonholes, and Buttons
The edging neatens both fronts, the hood face, and the hem, and it carries the two buttonholes.
With RS facing, join green at the left front hem corner (left as the creature will wear it, so the edge that will hold the buttonholes).
Work 1 sc in each st and 1 sc in each row-end, as follows:
- Up the left front (20 row-ends), with 2 buttonholes: sc in next 8 row-ends, ch 2, skip 1 row-end, sc in next 6 row-ends, ch 2, skip 1 row-end, sc in last 4 row-ends. (8 + 6 + 4 = 18 sc + 2 skipped row-ends = 20 row-ends used ✓)
- Around the hood face: sc in each of the 18 hood row-ends on this side, then 18 sc down the other hood row-ends. (36)
- Down the right front: sc in each of the 20 row-ends. (20)
- Across the hem: sc in each of the 56 hem sts. (56)
Sl st in the first sc. FO. Weave in ends.
Sew the two buttons to the right front edging, opposite the ch-2 buttonholes.
Frog Eyes (make 2)
White yarn, continuous rounds. Stuff as you go; stuff firmly so the eyes stay round.
Rnd 1: 6 sc in MR. (6)
Rnd 2: Inc in each st around. (6 increases → 6 + 6 = 12 ✓)
Rnd 3: (Sc in next st, inc) 6 times. (6 increases → 12 + 6 = 18 ✓)
Rnd 4: Sc in each st around. (18)
Rnd 5: (Sc in next st, dec) 6 times. (6 decreases → 18 − 6 = 12 ✓)
Stuff firmly now.
Rnd 6: Dec 6 times. (6 decreases → 12 − 6 = 6 ✓)
FO, leaving a 10" (25 cm) tail. Thread the tail through the remaining 6 sts, pull closed, and hide the end inside. Do not flatten — the eyes should be spheres.
Pupils (make 2)
Black yarn.
Rnd 1: 6 sc in MR, sl st in first sc. (6)
FO, leaving a tail, and sew one pupil to the front of each white eye. (Beginner option: skip the crochet pupil and embroider a tight black circle, about ⅜" / 1 cm, on each eye.)
Boots (make 2)
Green yarn, continuous rounds. Do not stuff the soles. The BLO round is what keeps each boot sitting flat.
Oval sole
Rnd 1: Ch 7. Sc in 2nd ch from hook, sc in next 4 ch, 3 sc in last ch; rotate and work along the other side of the chain: sc in next 4 ch, 2 sc in the last ch (the same chain as the first sc). (14)
Rnd 2: Inc in the first st, sc in next 4 sts, inc in each of next 3 sts, sc in next 4 sts, inc in each of last 2 sts. (6 increases → 14 + 6 = 20 ✓)
Rnd 3: Inc in the first st, sc in next 6 sts, inc in the next st, sc in next 2 sts, inc in the next st, sc in next 6 sts, inc in the next st, sc in last 2 sts. (4 increases → 20 + 4 = 24 ✓)
Rnd 4 (sole ridge): Sc BLO in each st around. (24)
This BLO ridge is the wall of the sole. Set the boot on a table — it should already sit flat.
Shaft
Rnds 5–14: Sc in each st around (both loops). (24)
FO after Rnd 14, leaving a short tail, and weave in. Do not stuff. Repeat for the second boot.
The 24-st perimeter matches the creature’s flat soles so the dressed toy sits balanced.
Finishing
- Weave in every remaining tail on the WS.
- Place the eyes: Set both stuffed eyes on top of the hood, just in front of the ear slots and about ¾" (2 cm) apart, angled a little outward. Pin, try the hood on the creature (ears through the slots), then sew each eye on firmly with the white yarn tail, going through the hood fabric several times.
- Optional frog smile: With black yarn, embroider a wide, shallow U or a small V on the hood, centered below the eyes.
- Dress the creature: Put the raincoat on like a jacket, pass the arms through the short sleeves, pass the floppy ears through the hood slots, and button the two buttons. Slide one boot onto each 24-st sole. The unstuffed BLO soles should rest even on a table.
- Light steam-block the raincoat body only if the hem curls. Do not steam the stuffed eyes.
The outfit is finished.
Disclaimer: This pattern was generated by AI and should be reviewed for accuracy before use. While we strive for quality, AI-generated content may contain errors. Please verify measurements, stitch counts, charts, and instructions before beginning your project. Generated by purlJam.uk
Love this pattern?
Save this pattern to your free PurlJam libraryAccess your pattern anytime
Bookmark this page to access your pattern anytime