Type
Knitting
Difficulty
intermediate
Category
custom
AI Thinking Process
Planning
Verification
Pattern
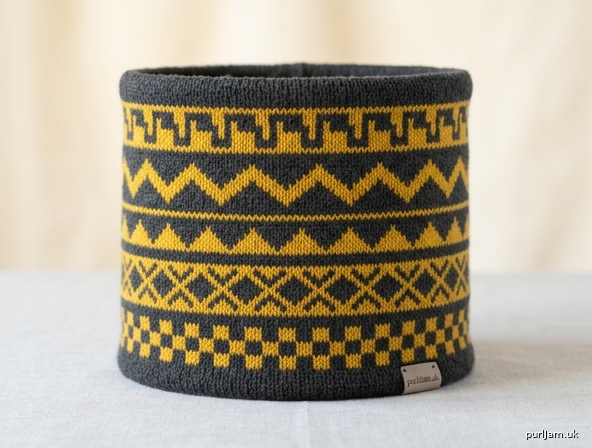
Geometric Shapes Beginner Colourwork Cowl
A simple, seamless cowl worked in the round that introduces stranded colourwork through five original geometric charts. Perfect for practicing even tension and reading charts while creating a cozy accessory. Choose two high-contrast worsted-weight colours and stack the motifs as written or rearrange them to suit your taste.
Materials
- Yarn: Worsted weight (category 4), approximately 180 yd (165 m) Colour A (main/background) and 160 yd (146 m) Colour B (contrast).
Example: Cascade 220 or equivalent wool or wool-blend. - Needles: US 7 (4.5 mm) 16" (40 cm) circular needle, or size needed to obtain gauge.
- Notions: Stitch marker, tapestry needle, scissors.
Gauge
20 sts and 24 rnds = 4" (10 cm) in stranded stockinette stitch in the round, blocked.
Swatch mandatory — colourwork gauge is often tighter than single-colour stockinette. Adjust needle size if needed.
Size
One size: 24" (61 cm) circumference × 10" (25.5 cm) tall after blocking.
(To adjust circumference, cast on any multiple of 24 sts and keep the same chart sequence.)
Abbreviations
- CO: cast on
- k: knit
- rnd(s): round(s)
- st(s): stitch(es)
- St st: stockinette stitch (knit every round)
- A: Colour A
- B: Colour B
- pm: place marker
- sm: slip marker
Pattern Notes
- Worked entirely in the round; read every chart row from right to left.
- Charts are shown with A = empty square (background), B = filled/X square (motif).
- Carry the unused colour loosely across the back. Catch floats every 4–5 stitches to avoid snags.
- For true beginners: keep both yarns in the left hand (or one in each hand) and maintain gentle, even tension—fabric should still stretch.
- Weave in ends as you go when changing colours between bands if desired.
- All charts are original geometric designs and free of copyright restrictions for personal or commercial use.
Instructions
Cast-On and Setup
With A and US 7 (4.5 mm) circular needle, CO 120 sts using a stretchy method (long-tail or German twisted).
Pm and join to work in the round, being careful not to twist. (120 sts)
Knit 4 rnds in A for lower border.
Colourwork Body
Work the five chart bands in order as follows. Each chart is repeated around the entire round. Between charts, work 2 rnds plain in A (these create clean dividers and add height).
Band 1 – Checkerboard (Chart 1)
Work Chart 1 (8-st repeat) 15 times around.
Repeat Chart 1 Rows 1–8 once (8 rnds).
(120 sts maintained)
Divider: With A only, k 2 rnds.
Band 2 – Diamond Lattice (Chart 2)
Work Chart 2 (12-st repeat) 10 times around.
Repeat Chart 2 Rows 1–12 once (12 rnds).
(120 sts)
Divider: With A only, k 2 rnds.
Band 3 – Standing Triangles (Chart 3)
Work Chart 3 (8-st repeat) 15 times around.
Repeat Chart 3 Rows 1–8 once (8 rnds).
(120 sts)
Divider: With A only, k 2 rnds.
Band 4 – Zigzag (Chart 4)
Work Chart 4 (12-st repeat) 10 times around.
Repeat Chart 4 Rows 1–8 once (8 rnds).
(120 sts)
Divider: With A only, k 2 rnds.
Band 5 – Stepped Squares (Chart 5)
Work Chart 5 (8-st repeat) 15 times around.
Repeat Chart 5 Rows 1–8 once (8 rnds).
(120 sts)
Top Border and Bind-Off
With A only, knit 4 rnds.
Bind off loosely knitwise (use a larger needle or sewn bind-off if needed for stretch).
Stitch-count check: 120 sts cast on, no shaping, 120 sts bound off ✓
Height check: 4 border + 8+2 + 12+2 + 8+2 + 8+2 + 8 + 4 border = 60 rnds
60 rnds ÷ 24 rnds per 4" = 10" (25.5 cm) ✓
Finishing
Weave in all remaining ends on the wrong side.
Soak in lukewarm water with wool wash, gently squeeze out water, and lay flat to dry, patting into a smooth tube. Do not stretch aggressively—colourwork fabric blooms nicely with light blocking.
Optional: single-crochet or blanket-stitch the cast-on and bind-off edges for a polished look.
Charts
(All charts use A = · (dot/empty) and B = X. Work right to left on every round. Repeats are marked.)
Chart 1 – Checkerboard (8-st × 8-rnd repeat)
Rnd 8: · X · X · X · X
Rnd 7: X · X · X · X ·
Rnd 6: · X · X · X · X
Rnd 5: X · X · X · X ·
Rnd 4: · X · X · X · X
Rnd 3: X · X · X · X ·
Rnd 2: · X · X · X · X
Rnd 1: X · X · X · X ·
(Repeat these 8 sts around)
Chart 2 – Diamond Lattice (12-st × 12-rnd repeat)
Rnd 12: · · · · · X · · · · · ·
Rnd 11: · · · · X X X · · · · ·
Rnd 10: · · · X · X · X · · · ·
Rnd  9: · · X · · X · · X · · ·
Rnd  8: · X · · · X · · · X · ·
Rnd  7: X · · · · X · · · · X ·
Rnd  6: · X · · · X · · · X · ·
Rnd  5: · · X · · X · · X · · ·
Rnd  4: · · · X · X · X · · · ·
Rnd  3: · · · · X X X · · · · ·
Rnd  2: · · · · · X · · · · · ·
Rnd  1: · · · · · · · · · · · ·
(Repeat these 12 sts around; Rnd 1 is solid A for clean start)
Chart 3 – Standing Triangles (8-st × 8-rnd repeat)
Rnd 8: X X X X X X X X
Rnd 7: · X X X X X X ·
Rnd 6: · · X X X X · ·
Rnd 5: · · · X X · · ·
Rnd 4: · · · · · · · ·
Rnd 3: · · · X X · · ·
Rnd 2: · · X X X X · ·
Rnd 1: · X X X X X X ·
(Repeat these 8 sts around)
Chart 4 – Zigzag (12-st × 8-rnd repeat)
Rnd 8: X · · · · · · · · · · X
Rnd 7: · X · · · · · · · · X ·
Rnd 6: · · X · · · · · · X · ·
Rnd 5: · · · X · · · · X · · ·
Rnd 4: · · · · X · · X · · · ·
Rnd 3: · · · · · X X · · · · ·
Rnd 2: · · · · X · · X · · · ·
Rnd 1: · · · X · · · · X · · ·
(Repeat these 12 sts around)
Chart 5 – Stepped Squares (8-st × 8-rnd repeat)
Rnd 8: X X · · X X · ·
Rnd 7: X X · · X X · ·
Rnd 6: · · X X · · X X
Rnd 5: · · X X · · X X
Rnd 4: X X · · X X · ·
Rnd 3: X X · · X X · ·
Rnd 2: · · X X · · X X
Rnd 1: · · X X · · X X
(Repeat these 8 sts around)
Beginner Tips for Success
- Make a small swatch of Chart 1 first to practice catching floats and reading the chart.
- If floats feel tight, spread the stitches on the right needle before knitting the next stitch.
- Colour dominance: holding B (motif) below A generally makes the pattern pop more—experiment on your swatch.
- These five charts can also be used individually for hats, mittens, or pillow panels; simply cast on a suitable multiple of 8 or 12 sts.
Enjoy your geometric colourwork adventure!
Disclaimer: This pattern was generated by AI and should be reviewed for accuracy before use. While we strive for quality, AI-generated content may contain errors. Please verify measurements, stitch counts, and instructions before beginning your project. Generated by purlJam.uk
Love this pattern?
Save this pattern to your free PurlJam libraryAccess your pattern anytime
Bookmark this page to access your pattern anytime