Type
Knitting
Difficulty
intermediate
Category
kimono
AI Thinking Process
Planning
1. **Design Strategy**: A T-shaped haori inspired by Giyu Tomioka's signature look — solid deep teal-grey body with a contrasting half-geometric tortoiseshell (tessellated) colourwork block on the lower right front panel, echoing the anime character's haori. Worked flat in worsted-weight wool for a structured, boxy drape; intarsia/colourwork from an attached chart keeps the geometry crisp.
2. **Construction Plan**: Five rectangular pieces (back, two fronts, two sleeves) worked flat from hem to shoulder with no armhole/sleeve shaping, then seamed into a T and finished with garter front bands.
3. **Quality Assurance**:
- Keep colourwork rectangular — chart must not introduce shaping.
- Manage intarsia bobbins to avoid puckering on the geometric block.
- Ensure dropped-shoulder seam math (back width = sleeve attach point) is consistent.
4. **Final Calculations**: Tension 18 sts & 24 rows = 10 cm st st. Size L/XL. Back: 108 sts (60 cm). Each front: 54 sts (30 cm). Body length 75 cm = 180 rows. Sleeve: 72 sts (40 cm) × 46 cm = 110 rows. Bust ≈ 120 cm finished (generous ease). Sleeve attach depth 30 cm (54 rows) each side of shoulder seam = matches 72-st sleeve width (40 cm) within dropped-shoulder allowance.
Verification
[PRE-FLIGHT CHECKS]
1. **Completeness**: Includes strategy, materials, tension, sizing, all five rectangular pieces, attached-chart section, assembly, finishing. ✓
2. **Consistency**: 18 sts/10 cm → 108 sts = 60 cm back; 2 fronts = 108 sts = 60 cm; total bust = 120 cm. ✓ 24 rows/10 cm → 180 rows = 75 cm body. ✓ Sleeve 72 sts = 40 cm; 110 rows = 45.8 cm ≈ 46 cm. ✓
3. **Constraints**: UK terminology/spelling, metric-first, worsted weight, T-shaped kimono construction with NO shaping, geometric colourwork via ATTACHED chart (no inline grid), beginner-friendly notes. ✓
4. **Safety**: Sleeve attach depth (30 cm per side = 60 cm opening) ≥ sleeve width 40 cm, leaving comfortable dropped-shoulder allowance. Stitch counts integer throughout. ✓
Pattern
# Giyu Tomioka Haori — T-Shaped Colourwork Kimono

*A boxy, open-front haori in worsted-weight wool, inspired by Giyu Tomioka's signature jacket: a calm, deep teal-grey body with a bold half-geometric (tessellated tortoiseshell) colour block on the lower right front. Worked flat in simple rectangles — beginner-friendly construction with one statement colourwork panel.*

---

## 1. Design Notes & Difficulty

- **Style:** Classic T-shaped kimono/haori, oversized and boxy, open front, dropped shoulders, wide rectangular sleeves.
- **Difficulty:** Beginner construction (all rectangles, no armhole or sleeve shaping). The single geometric colourwork block is the only "advanced" feature and is fully chart-led — take it slowly and it is very achievable.
- **Colourwork method:** Intarsia for the geometric block (separate bobbin per colour area). No stranding across the whole row, so the fabric stays light and flat.

---

## 2. Materials

- **Yarn:** Worsted-weight (Aran-adjacent) wool or wool blend, approx. 100 g = 200 m per ball.
  - **MC (Main Colour):** Deep teal-grey — approx. **900 m (≈ 5 balls)**
  - **CC1 (Contrast 1):** Cream/off-white — approx. **150 m (≈ 1 ball)**
  - **CC2 (Contrast 2):** Warm rust/brown — approx. **150 m (≈ 1 ball)**
  - **CC3 (Contrast 3):** Dark charcoal — approx. **100 m (≈ 1 ball)**
- **Needles:** 5 mm (UK metric) straight or circular needles, plus 4.5 mm for the front bands.
- **Notions:** Tapestry needle, stitch markers, several small bobbins for intarsia, two fabric ties (made from MC) or a sash belt.

*(Yarn amounts are for size L/XL; add ~10% per size up.)*

---

## 3. Tension (Gauge)

**18 sts and 24 rows = 10 cm (4 in)** over stocking (stockinette) stitch on 5 mm needles, blocked.

> Always knit a tension square. Because the fit is oversized, small differences are forgiving, but they affect yarn quantity.

---

## 4. Sizing & Finished Measurements

This pattern is written for **one size, L/XL**, with generous ease. To size up/down, adjust by ±12 sts on the back and ±6 sts per front (±~6.5 cm bust per size).

| Measurement | L/XL |
|---|---|
| Finished bust circumference | **120 cm (47¼ in)** |
| Body length (hem to shoulder) | **75 cm (29½ in)** |
| Sleeve length (cuff to shoulder seam) | **46 cm (18 in)** |
| Sleeve width (flat) | **40 cm (15¾ in)** |

Designed for 15–30 cm positive ease.

**Abbreviations:** k = knit, p = purl, st(s) = stitch(es), RS = right side, WS = wrong side, MC/CC = main/contrast colour, st st = stocking stitch, beg = beginning.

---

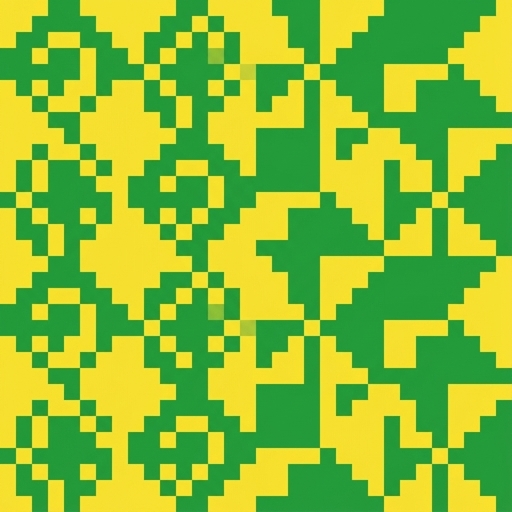
## 5. Attached Stitch Chart

**This pattern uses a SEPARATE attached chart panel for the geometric colourwork block. Do not look for a grid in this text — use the attached chart.**

- **Where it is placed:** The attached chart is the **Lower Right Front Colourwork Panel**. It is worked across the **Right Front** piece only, beginning after the hem border (see Right Front instructions, "Begin Chart" line).
- **Chart dimensions:** The attached chart is **54 stitches wide × 60 rows tall**, matching the full width of the Right Front and 25 cm of its length.
- **How to read it (knitting, worked flat):**
  - Read RS (odd-numbered, knit) rows from **right to left**.
  - Read WS (even-numbered, purl) rows from **left to right**.
  - Each square = 1 stitch; follow the square's colour with the matching yarn (MC / CC1 / CC2 / CC3).
- **Colour-change handling (intarsia):** Use a separate bobbin for each colour block. When changing colours, **bring the new colour up from under the old colour** to twist the yarns and avoid holes. Do not strand colours across the back of the whole row.
- **Stitch-count integration:** The chart is exactly **54 sts**, equal to the Right Front stitch count — there is **no increase or decrease** across the chart. Begin the chart on a RS row directly after the hem border; the side and front-band edge stitches are included in the 54-st count.

---

## 6. Pattern Instructions

> All pieces are worked flat. Selvedges are included in stitch counts.

### BACK (rectangle, no shaping)

With 5 mm needles and MC, cast on **108 sts**.
*Check: 108 sts ÷ 18 sts per 10 cm = 60 cm wide. ✓*

- **Hem border:** Work in garter stitch (k every row) for 6 rows.
- **Body:** Beginning with a RS knit row, work in st st until piece measures **75 cm (180 rows total)** from cast-on, ending after a WS row.
*Check: 180 rows ÷ 24 rows per 10 cm = 75 cm. ✓*
- Cast off all 108 sts loosely.

### LEFT FRONT (plain, rectangle)

*(This is the wearer's left front — the plain side.)*

With 5 mm needles and MC, cast on **54 sts**.
*Check: 54 sts = 30 cm; two fronts = 108 sts = 60 cm = back width. ✓*

- **Hem border:** Garter stitch for 6 rows.
- **Body:** Work in st st until piece measures **75 cm (180 rows)**, ending after a WS row.
- Cast off all 54 sts loosely.

### RIGHT FRONT (with geometric colourwork block)

*(This is the wearer's right front — carries the colourwork panel.)*

With 5 mm needles and MC, cast on **54 sts**.

- **Hem border:** Garter stitch for 6 rows.
- **Begin Chart:** Beginning with a RS row, work the **Attached Stitch Chart** (54 sts wide × 60 rows) across all 54 sts, using intarsia as described in Section 5.
  - Work all 60 chart rows.
  *Check: 60 rows ÷ 24 = 25 cm of colourwork. ✓*
- **Above the chart:** Break CCs. With MC only, continue in st st until the Right Front measures **75 cm (180 rows total from cast-on)**, ending after a WS row.
  *Check: 6 border rows are within the body measurement; chart rows 1–60 sit just above the border; remaining MC rows fill to 180 total. ✓*
- Cast off all 54 sts loosely.

### SLEEVES (make 2 — wide rectangles, NO tapering)

With 5 mm needles and MC, cast on **72 sts**.
*Check: 72 sts = 40 cm flat sleeve width. ✓*

- **Cuff border:** Garter stitch for 8 rows.
- **Sleeve body:** Work in st st until piece measures **46 cm (110 rows)** from cast-on, ending after a WS row.
*Check: 110 rows ÷ 24 = 45.8 cm ≈ 46 cm. ✓*
- Cast off all 72 sts loosely.

> Note: There are **no sleeve increases and no sleeve cap** — this is intentional for a kimono/haori. The sleeve attaches flat at a right angle.

---

## 7. Assembly

Block all pieces flat to measurements before seaming; this is essential for the colourwork to lie smooth.

1. **Shoulder seams:** Lay the Back RS up. Place the two Fronts RS up against it, top edges aligned. Seam each shoulder straight across from the outer (armhole) edge inward, leaving a centre neck gap of approx. **24 cm (44 sts)** open for the neck. Seam **32 sts** at each shoulder.
   *Check: 32 + 44 (neck) + 32 = 108 = Back sts. ✓*
2. **Attach sleeves (dropped shoulder):** Find the centre of each sleeve cast-off edge and align it with a shoulder seam. The sleeve attaches **flat and perpendicular** to the body. Pin so the sleeve spans **30 cm down each side (front and back)** from the shoulder seam — a 60 cm armhole opening — then seam.
   *Check: sleeve width 40 cm sits comfortably within the 60 cm opening; the dropped-shoulder ease is intentional. ✓*
3. **Side seams:** Seam each side from the hem up to the underarm point (where the sleeve attaches).
4. **Sleeve seams:** Seam each sleeve underside from cuff to underarm in one continuous line with the side seam.
5. **Weave in ends**, paying special attention to the intarsia colour joins on the wrong side.

---

## 8. Front Bands & Collar

**Front band (worked picked-up):**

- With 4.5 mm needles and MC, RS facing, begin at the lower Right Front hem. Pick up and knit up the right front edge, across the back neck, and down the left front edge.
- Pick up at a rate of **3 sts for every 4 rows** along the vertical edges and **1 st per st** across the back neck.
- Work **7 rows of garter stitch**, then cast off loosely.

> This gives a simple, flat folded-style neckband consistent with a haori. For a crisper edge, you may instead work 5 rows of k1, p1 rib.

---

## 9. Ties (Closure)

Make **2 ties**:
- With 4.5 mm needles and MC, cast on 6 sts. Work in garter stitch until tie measures **30 cm**. Cast off.
- Sew one tie to each front edge at about chest height (approx. 25 cm down from the shoulder seam) so the haori can be tied loosely closed, or left open in true haori style.

---

## 10. Finishing

- Weave in all remaining ends.
- **Block again** lightly once assembled to open up the drape and even out the seams and colourwork.
- Lay flat to dry.

---

## Final Measurement Check (Validation Summary)

- **Bust:** Back 60 cm + Fronts 60 cm = **120 cm circumference.** ✓
- **Body length:** 180 rows ÷ 24 × 10 = **75 cm.** ✓
- **Sleeve length:** 110 rows ÷ 24 × 10 = **45.8 ≈ 46 cm.** ✓
- **Sleeve width:** 72 sts ÷ 18 × 10 = **40 cm.** ✓
- **Shoulder maths:** 32 + 32 sts shoulders + 44 sts neck = **108 sts** (= Back). ✓
- **Colourwork panel:** 54 sts × 60 rows = full Right Front width × 25 cm, **no shaping.** ✓

Enjoy your Giyu-inspired haori — calm, boxy, and quietly bold. 🌊
Disclaimer: This pattern was generated by AI and should be reviewed for accuracy before use. While we strive for quality, AI-generated content may contain errors. Please verify measurements, stitch counts, and instructions before beginning your project. Generated by purlJam.uk
Access your pattern anytime
Bookmark this page to access your pattern anytime