Type
Knitting
Difficulty
advanced
Category
blanket
AI Thinking Process
Planning
1. **Design Strategy**:
- User wants a Gothic lunar moth blanket with moons, filigree, and ornate details in black cotton
- Beginner level requires simple stitches arranged artistically rather than complex stitch techniques
- Solution: Use granny square layout where each square features a moon motif in relief texture
- Incorporate raised stitches (FPdc/BPdc) for texture and dimension to create the ornate, Gothic feel
- Use shell stitches and picots in border for filigree effect
- Queen size target: approximately 90×90 inches (larger than template default)
2. **Construction Plan**:
- Create individual moon motif squares (12×12 inches each)
- Each square will have a raised crescent moon design using front post stitches
- Make 49 squares (7×7 grid) for 84×84 inch blanket, plus border to reach ~90×90
- Join-as-you-go method to minimize finishing work (beginner-friendly)
- Add ornate shell and picot border for filigree effect
3. **Quality Assurance**:
- 100% cotton is less forgiving than acrylic - must emphasize gauge swatching
- Cotton has no stretch - joins must be secure but not too tight
- Black yarn is hard to see - include detailed stitch markers guidance
- Beginner level means clear round-by-round instructions with stitch counts
- Large project requires motivation - break into manageable square goals
4. **Final Calculations**:
- Queen size: 90×90 inches
- Each square: 12×12 inches (7 squares × 12" = 84", plus 3" border each side = 90")
- Gauge with worsted cotton: 14 dc = 4", so 3.5 dc per inch
- 12" square = 42 dc across, will use 10 rounds to achieve
- 49 squares needed
- Yarn estimate: Cotton blankets use more than acrylic - approximately 5,500-6,000 yards for queen size
- 100% cotton worsted: typically 215-220 yards per 100g skein = 26-28 skeins
Verification
[PRE-FLIGHT CHECKS]
1. **Completeness**:
- ✓ Materials list with cotton-specific yardage
- ✓ Gauge section with pattern stitch measurement
- ✓ Moon motif square pattern with stitch counts
- ✓ Joining instructions
- ✓ Border pattern
- ✓ Finishing with blocking (essential for cotton)
- ✓ Diagram for moon motif square
2. **Consistency**:
- ✓ 12" square × 7 = 84" + 6" border = 90" ✓
- ✓ Gauge 3.5 dc/inch × 12" = 42 dc (will design square to this dimension)
- ✓ 49 squares calculated correctly (7×7)
- ✓ Yarn yardage: Queen cotton blanket ~5,500-6,000 yards
3. **Constraints**:
- ✓ Beginner level - using basic stitches (dc, FPdc, shells)
- ✓ Gothic theme - black yarn, ornate border
- ✓ Lunar moth/moon - crescent moon motif in each square
- ✓ Filigree/ornate - textured stitches and decorative border
- ✓ 100% cotton - addressed in materials and blocking
4. **Safety**:
- ✓ Each round stitch count will be verified
- ✓ Foundation chain math checked
- ✓ Square count for queen size verified
- ✓ Yarn amount appropriate for cotton (heavier than acrylic)
Pattern
<pattern>
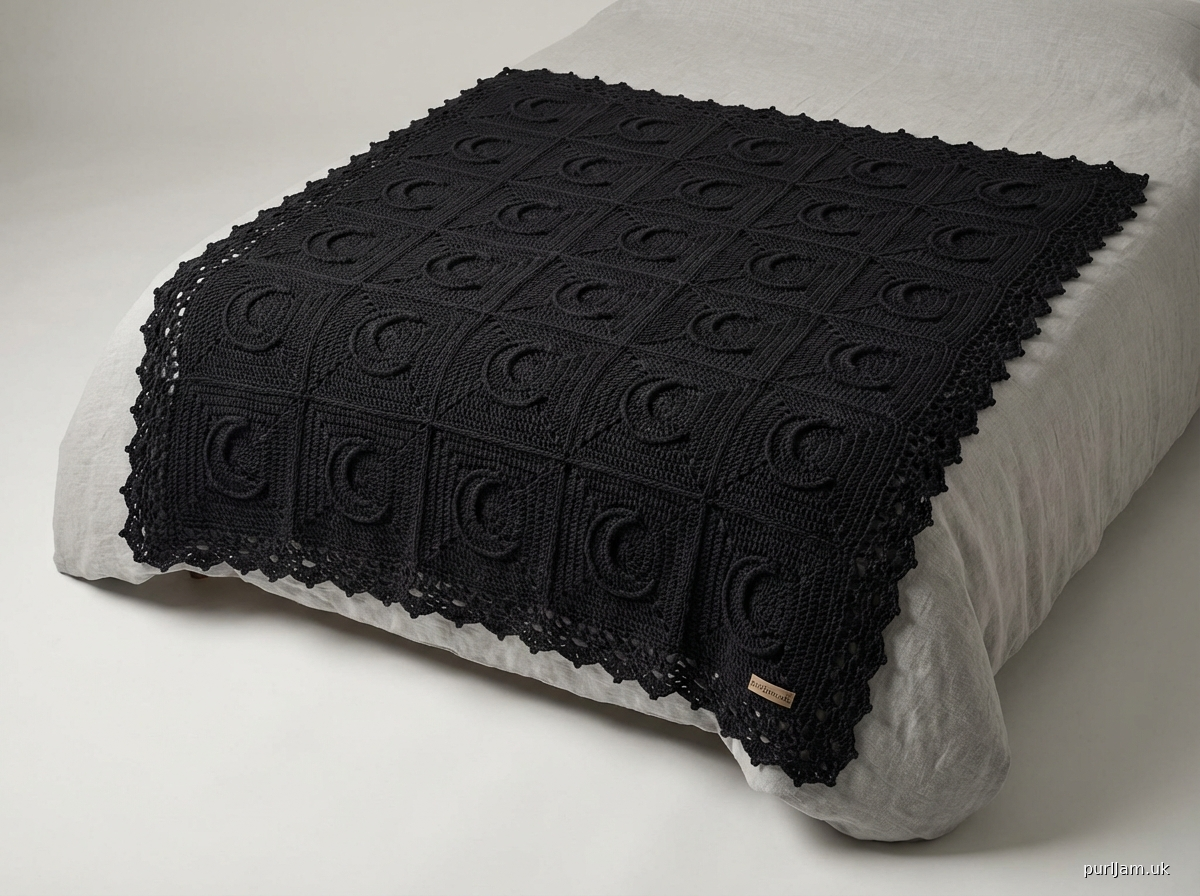
# Gothic Lunar Moth Blanket
## Design Notes
This enchanting blanket features 49 individual granny squares, each showcasing a raised crescent moon motif against a textured background. The Gothic aesthetic is achieved through dimensional front post stitches that create an ornate, filigree effect in deep black cotton. Perfect for creating a dramatic, celestial statement piece.
## Finished Measurements
- **Size**: 90 × 90 inches (queen)
- **Individual Square**: 12 × 12 inches
- **Number of Squares**: 49 (7 squares × 7 squares)
## Materials
- **Yarn**: 5,500-6,000 yards worsted weight 100% cotton yarn in black
- Approximately 26-28 skeins (based on 215 yards per 100g skein)
- Recommended: Lily Sugar'n Cream, We Are Knitters The Cotton, or similar 100% cotton worsted weight
- **Hook**: US H/8 (5.0 mm) or size needed to obtain gauge
- **Notions**:
- Stitch markers (at least 10 - essential for tracking in black yarn)
- Yarn needle for weaving ends
- Blocking pins and foam mats
- Good lighting for working with black yarn
## Gauge
**CRITICAL**: Cotton does not stretch like acrylic. Accurate gauge is essential.
In pattern stitch (double crochet), after blocking:
- **14 dc × 7 rows = 4 × 4 inches**
- **Each completed square = 12 × 12 inches**
Make a test square before beginning. If your square measures smaller than 12 inches, go up a hook size. If larger, go down a hook size.
## Special Stitches
- **FPdc (Front Post Double Crochet)**: Yo, insert hook from front to back to front around post of indicated stitch, yo and pull up loop, [yo and pull through 2 loops] twice.
- **BPdc (Back Post Double Crochet)**: Yo, insert hook from back to front to back around post of indicated stitch, yo and pull up loop, [yo and pull through 2 loops] twice.
- **Shell**: (2 dc, ch 2, 2 dc) in indicated stitch or space.
- **Picot**: Ch 3, sl st in 3rd ch from hook.
## Stitch Diagram Legend
```
○ = chain (ch)
• = slip stitch (sl st)
+ = single crochet (sc)
T = double crochet (dc)
⟨T = front post double crochet (FPdc)
T⟩ = back post double crochet (BPdc)
```
## Moon Motif Square Pattern
*Make 49 squares*
**Foundation**: Ch 6, sl st to first ch to form ring. (Mark beginning of each round with stitch marker - move marker up as you work)
**Round 1**: Ch 3 (counts as dc), 15 dc in ring, sl st to top of beginning ch-3. (16 dc)
**Round 2**: Ch 3 (counts as dc), dc in same st, 2 dc in each st around, sl st to top of beginning ch-3. (32 dc)
**Round 3**: Ch 3 (counts as dc), dc in same st, dc in next st, *2 dc in next st, dc in next st; repeat from * around, sl st to top of beginning ch-3. (48 dc)
**Round 4** (Beginning of Moon Motif): Ch 3 (counts as dc), dc in next 11 sts, FPdc in next 8 sts (this creates the raised crescent moon), dc in next 28 sts, sl st to top of beginning ch-3. (48 sts: 40 dc + 8 FPdc)
*Note: The 8 FPdc stitches form one side of the crescent moon curve.*
**Round 5**: Ch 3 (counts as dc), dc in next 10 sts, FPdc in next 10 sts (continuing moon curve), dc in next 27 sts, sl st to top of beginning ch-3. (48 sts: 38 dc + 10 FPdc)
**Round 6**: Ch 3 (counts as dc), dc in next 9 sts, FPdc in next 11 sts, dc in next 27 sts, sl st to top of beginning ch-3. (48 sts: 37 dc + 11 FPdc)
**Round 7**: Ch 3 (counts as dc), dc in next 9 sts, FPdc in next 10 sts, dc in next 28 sts, sl st to top of beginning ch-3. (48 sts: 38 dc + 10 FPdc)
*The moon curve is now defined.*
**Round 8** (Texture Round): Ch 3 (counts as dc), BPdc in next st, *dc in next st, BPdc in next st; repeat from * around, sl st to top of beginning ch-3. (48 sts alternating dc and BPdc)
*This creates a ribbed texture around the square.*
**Round 9** (Corner Round): Ch 3 (counts as dc), dc in next 9 sts, *(dc, ch 3, dc) in next st (corner made), dc in next 10 sts; repeat from * 2 more times, (dc, ch 3, dc) in next st, sl st to top of beginning ch-3. (56 dc + 4 corner ch-3 spaces)
*Math check: 11 dc per side × 4 sides = 44 dc, plus 12 corner dc = 56 dc total. ✓*
**Round 10** (Final Round): Ch 3 (counts as dc), dc in each st around working (dc, ch 3, dc) in each corner ch-3 space, sl st to top of beginning ch-3. Fasten off, leaving 12-inch tail for joining. (68 dc + 4 corner ch-3 spaces)
*Math check: 17 dc per side × 4 = 68 dc. ✓*
**Finished square should measure 12 × 12 inches.** Block if needed before joining.
## Diagram: Moon Motif Square
```
┌─────────────────────────┐
│ Corner ch-3 │
│ │
│ ○ ○ ○ ○ ○ ○ ○ │
│ T T T T T T T T T T T │
│ T T T ⟨T ⟨T ⟨T T T T T │ ← Moon curve (FPdc)
│ T T T ⟨T ⟨T ⟨T T T T T │
│ T T T T T T T T T T T │
│ ○ ○ ○ ○ ○ ○ ○ │
│ │
│ Corner ch-3 │
└─────────────────────────┘
Center ring (Rounds 1-3): Build circular base
Rounds 4-7: Create crescent moon with FPdc
Round 8: Add texture with alternating BPdc
Rounds 9-10: Square off with corners
```
## Assembly
**Join-As-You-Go Method** (recommended for beginners):
1. **First Square**: Complete as written through Round 10.
2. **Second Square**: Complete through Round 9. On Round 10, join to first square as follows:
- Work to first corner ch-3 space
- Instead of (dc, ch 3, dc), work: dc, ch 1, sl st into corner ch-3 space of adjacent square, ch 1, dc in same space of working square
- Continue across side being joined: instead of dc, work dc to corresponding st, then work a joining sl st to corresponding st on adjacent square, then dc in same st of working square
- Complete remaining sides normally
3. **Layout**: Arrange squares 7 across × 7 down
- Join squares in rows
- Join rows together
- Each interior square will be joined on 2-4 sides
**Alternative Joining Method** (Whip Stitch):
- Complete all 49 squares
- Block squares to exact 12 × 12 inch size
- Using yarn needle and black yarn, whip stitch squares together from wrong side, matching stitches
## Border
With right side facing, join yarn in any corner ch-3 space.
**Round 1**: Ch 1, *(sc, ch 3, sc) in corner space, sc in each st and each joining seam across to next corner; repeat from * around, sl st to first sc.
*Count stitches: Should have equal sc on each side.*
**Round 2**: Ch 3 (counts as dc), dc in each sc around working (2 dc, ch 3, 2 dc) in each corner ch-3 space, sl st to top of beginning ch-3.
**Round 3** (Shell Round): Sl st to next st, ch 1, sc in same st, *skip 2 sts, shell in next st, skip 2 sts, sc in next st; repeat from * around adjusting at corners to work shell in corner ch-3 space, sl st to first sc.
*This creates the ornate, filigree shell edging.*
**Round 4** (Picot Round): Ch 1, *sc in next sc, (sc, picot, sc) in corner shell ch-2 space, sc in each of next 2 dc, (sc, picot, sc) in ch-2 space of shell, sc in each of next 2 dc; repeat from * around, sl st to first sc. Fasten off.
## Finishing
### Weaving in Ends
- Each square generates 2 ends (beginning and end)
- 49 squares = 98 ends minimum
- Use yarn needle to weave ends through several stitches on wrong side
- Secure cotton ends well - they don't grip like acrylic
- Trim close but not too close (leave 1/2 inch)
### Blocking
**ESSENTIAL for cotton blankets:**
1. **Wet Blocking** (Recommended):
- Fill bathtub or large basin with cool water
- Submerge blanket completely, gently squeeze to saturate (do not wring)
- Let soak 15-20 minutes
- Drain water and gently press out excess water (roll in towels if needed)
- Lay flat on blocking surface (floor with towels, blocking mats, or bed)
- Pin corners to 90 × 90 inch square
- Use fingers to straighten edges and even out squares
- Pin out picots and shell points
- Allow to dry completely (may take 24-48 hours)
2. **Steam Blocking** (Alternative):
- Pin blanket to finished size
- Hold steam iron 2 inches above surface
- Steam each section thoroughly without touching iron to fabric
- Allow to cool and dry completely before unpinning
### Care Instructions
- **Machine wash** gentle cycle, cold water
- **Tumble dry** low heat or line dry (line drying prevents shrinkage)
- Cotton blankets soften and improve with each wash
- Expected slight shrinkage (2-3%) after first wash
- Do not use bleach (will weaken fibers even though yarn is black)
## Pattern Notes
**Working with Black Cotton Yarn:**
- Work in bright, natural light or use a lap lamp
- Use a light-colored work surface (white towel on lap)
- Count stitches at end of each round - don't rely on seeing them
- Stitch markers are essential
- Take breaks to rest eyes
**Project Timeline:**
- Each square takes approximately 45-60 minutes
- Total square-making time: 35-50 hours
- Joining time: 4-6 hours
- Border time: 3-4 hours
- **Total project time: 42-60 hours**
- Suggestion: Make 1 square per day for a 7-week project
**Cotton Yarn Characteristics:**
- Heavier than acrylic (blanket will weigh approximately 6-7 lbs)
- No stretch - final size is permanent
- Breathable - excellent for year-round use
- Gets softer with washing
- Excellent stitch definition for showing off textured moon motifs
## Design Variations
**For a Larger King Size** (108 × 108 inches):
- Make 81 squares (9 × 9 grid)
- Yarn needed: 8,500-9,000 yards (40-42 skeins)
**For Lap/Throw Size** (48 ×
Disclaimer: This pattern was generated by AI and should be reviewed for accuracy before use. While we strive for quality, AI-generated content may contain errors. Please verify measurements, stitch counts, and instructions before beginning your project. Generated by purlJam.uk
Access your pattern anytime
Bookmark this page to access your pattern anytime