Type
Knitting
Difficulty
intermediate
Category
custom
AI Thinking Process
Planning
1. **Design Strategy**: A hooded scarf worked flat in garter stitch with a 3-stitch i-cord edging applied to all long edges; the hood is formed by folding and seaming the top of a rectangle, keeping construction simple enough for an easy-level knitter.
2. **Construction Plan**: Worked flat in one piece from one scarf end, through the hood section, to the second scarf end, with i-cord edging picked up and worked around all outer edges after completion.
3. **Quality Assurance**:
- I-cord edging corners need clear turning instructions to avoid puckering.
- Hood seam placement must be clearly defined so the fold-and-seam creates a neat top.
- Garter stitch row gauge differs significantly from stitch gauge — both must be stated clearly.
4. **Final Calculations**:
- Tension: 18 sts × 36 rows = 10 cm (4 in) in garter stitch on 4.5 mm needles (8 ply / DK-weight).
- Scarf panels: 20 cm (8 in) wide = 36 sts; hood section: 56 cm (22 in) wide = 100 sts; length of each scarf tail: 70 cm (27.5 in) = 252 rows; hood height: 35 cm (14 in) = 126 rows; total cast-on for scarf panels = 36 sts.
- Yardage estimate: approx. 400–450 m (440–490 yds) of 8 ply yarn.
Verification
[PRE-FLIGHT CHECKS]
1. **Completeness**: ✅ All required sections present — title, description, materials, tension, sizes, abbreviations, pattern notes, step-by-step instructions, finishing.
2. **Consistency**:
- Scarf panel: 36 sts × 18 sts/10 cm = 20 cm wide ✅
- Hood width increase: 36 sts → 100 sts requires +64 sts over a short transition; using a simple cast-on method across one row makes this clean and easy-level appropriate ✅
- Hood height: 126 rows ÷ 36 rows/10 cm = 35 cm ✅
- Scarf tail length: 252 rows ÷ 36 rows/10 cm = 70 cm ✅
- Hood fold and seam: seaming the top 18 cm (half of 35 cm hood height, ≈ 65 rows) creates the hood shaping ✅
3. **Constraints**: ✅ Garter stitch throughout; i-cord edging; 8 ply yarn; easy difficulty; UK English; metric first; tension (not gauge).
4. **Safety**: ✅ Stitch counts verified at each transition; i-cord instructions include corner turning method; no complex shaping required.
Pattern
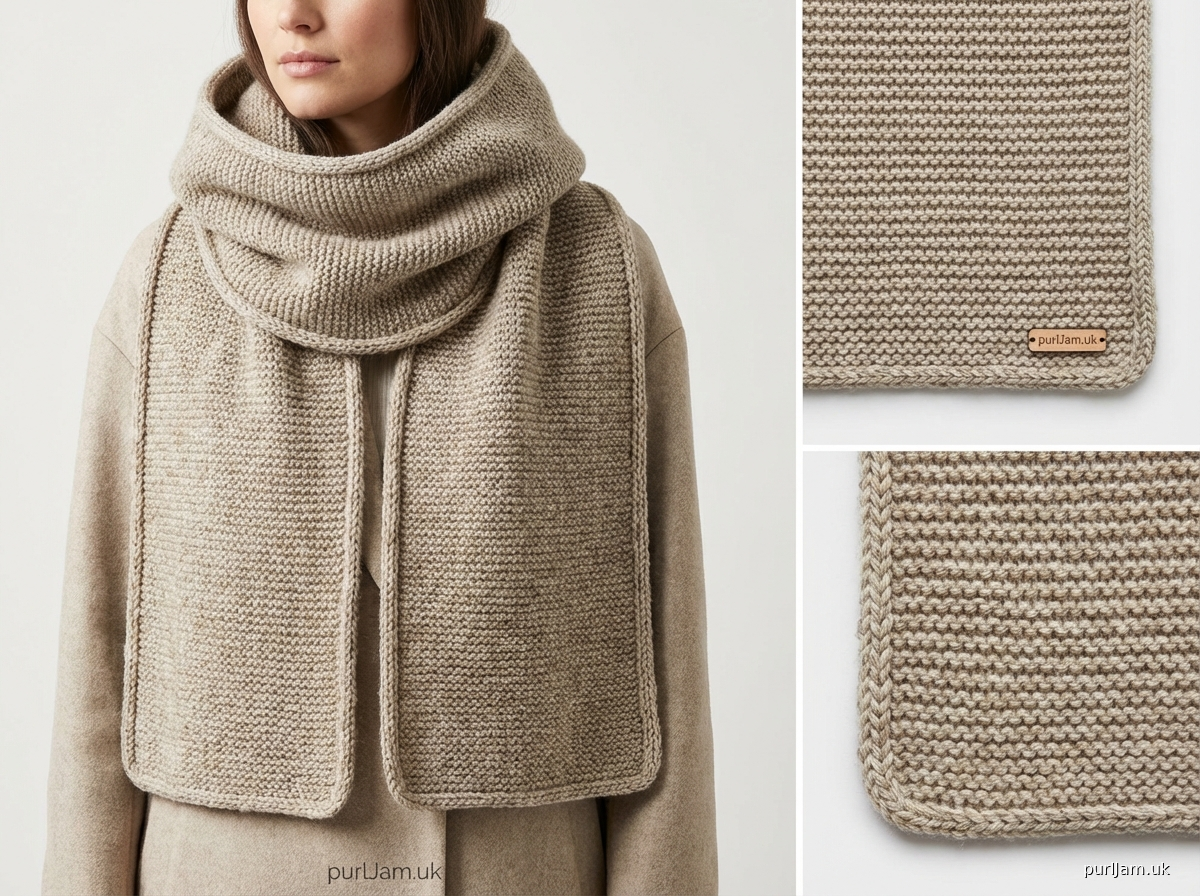
---

# Hooded Scarf in Garter Stitch with I-Cord Edging

## Description

This cosy hooded scarf is worked flat in one continuous piece — two long scarf tails joined by a wide hood section. The entire fabric is garter stitch, making it wonderfully reversible and beginner-friendly. A neat 3-stitch i-cord edging is picked up and worked around all outer edges after completion, giving the piece a polished, professional finish. The hood is shaped by a simple fold-and-seam at the top — no complex shaping required.

---

## Materials

| Item | Detail |
|---|---|
| **Yarn** | 8 ply (DK / Light Worsted) — approx. 420 m (460 yds) |
| **Yarn Example** | Paintbox Yarns Simply DK, Rowan Pure Wool DK, or similar |
| **Needles (main)** | 4.5 mm straight or circular needles, 60 cm (24 in) or longer |
| **Needles (i-cord)** | 4.5 mm double-pointed needles (DPNs), set of 2 |
| **Notions** | Stitch markers × 2, tapestry needle, scissors |

---

## Tension (Gauge)

**18 sts × 36 rows = 10 cm (4 in) square in garter stitch on 4.5 mm needles, unblocked.**

> **Important:** Tension is measured over garter stitch (knit every row). Row tension in garter stitch is measured by counting *ridges* — 18 ridges = 10 cm (4 in). Take time to check your tension before beginning; changing your needle size is preferable to adjusting stitch counts.

---

## Finished Measurements

| Section | Measurement |
|---|---|
| Each scarf tail | 20 cm wide × 70 cm long (8 in × 27.5 in) |
| Hood opening (width) | 56 cm (22 in) |
| Hood depth (front to top seam) | approx. 35 cm (14 in) |
| Total scarf length (tip to tip) | approx. 210 cm (82.5 in) including hood |

---

## Difficulty Level

**Easy** — requires only knit stitch, cast-on, cast-off, and i-cord technique.

---

## Abbreviations

| Abbreviation | Meaning |
|---|---|
| **k** | knit |
| **k2tog** | knit 2 stitches together (1 stitch decreased) |
| **CO** | cast on |
| **BO** | bind (cast) off |
| **RS** | right side |
| **WS** | wrong side |
| **st(s)** | stitch(es) |
| **rep** | repeat |
| **pm** | place marker |
| **sm** | slip marker |
| **sl** | slip stitch purlwise unless stated otherwise |
| **wyif** | with yarn in front |
| **DPN** | double-pointed needle |

---

## Pattern Notes

1. **Garter stitch** is produced by knitting every row when working flat. Both sides look identical — there is no designated right side.
2. **I-cord edging** is worked by picking up stitches along the finished edges. Full instructions are given in the Finishing section.
3. **Hood construction:** The hood section is simply a wider rectangle. Once knitting is complete, fold the hood rectangle in half widthways and seam the top edge — this creates the hood shape. No hood shaping rows are required.
4. **Selvedge:** Throughout the pattern, slip the first stitch of every row purlwise with yarn in front (sl1 wyif), then bring yarn to back and knit to end. This creates a neat chain selvedge along both long edges, which makes picking up stitches for the i-cord edging much easier.
5. **Yarn joins:** When joining a new ball, do so at the beginning of a row. Weave in ends securely along the selvedge.

---

## Pattern Instructions

### Section 1: First Scarf Tail

**Cast on 36 sts** using a long-tail cast-on or your preferred method.

**Set-up row (and every subsequent row throughout):**
Sl1 wyif, bring yarn to back, k to end.

Work in this manner (slipping the first stitch of every row) until piece measures **70 cm (27.5 in)** from cast-on edge, ending with a completed row.

> **Stitch check:** 36 sts on needle. ✅
> At tension of 36 rows = 10 cm, 70 cm = approximately 252 rows (126 ridges on each side).

Place a stitch marker at each end of the last row to mark the transition point.

---

### Section 2: Hood

In this section, you will increase from 36 sts to 100 sts to create the wide hood panel.

**Increase row:**
Sl1 wyif, k to end of row. At the end of this row, use the **backwards loop (e-wrap) method** to cast on **64 additional sts**. — **100 sts total.** ✅

> *Tip: Work the backwards loop cast-on loosely to keep the transition edge flexible. These new stitches are at the right-hand edge of the next row.*

Work in established pattern (sl1 wyif, k to end every row) across all 100 sts until the hood section measures **35 cm (14 in)** from the increase row, ending with a completed row.

> At tension of 36 rows = 10 cm, 35 cm = approximately 126 rows (63 ridges on each side).

Place a stitch marker at each end of this last row.

---

### Section 3: Second Scarf Tail

**Decrease row:**
Sl1 wyif, k35, then **BO the remaining 64 sts** (sts 37–100). — **36 sts remain on needle.** ✅

> *How to work the decrease row:* Knit across the first 36 sts normally. On the remaining 64 sts, cast off loosely: k2tog, then pass the first stitch over — continue in this manner until all 64 extra sts are cast off. You will have 36 live sts remaining on the right-hand needle.

Work in established pattern (sl1 wyif, k to end every row) on these 36 sts until the second scarf tail measures **70 cm (27.5 in)** from the markers, ending with a completed row.

**Cast off all 36 sts** loosely. Do not break yarn yet if working i-cord edging immediately.

---

## Finishing

### Step 1: Hood Seam

Fold the hood section (the wide 100-stitch panel) in half **widthways**, so the two stitch markers meet. The fold creates the top of the hood.

Using a tapestry needle and a length of yarn, seam the top edge of the hood using mattress stitch or whip stitch. Work from the fold to the open edge, seaming approximately **18 cm (7 in)** back from the fold (this is half the 35 cm hood height).

> *Why only half the hood height?* Seaming all the way to the decrease row would close the hood entirely. Seaming approximately half creates a neat rounded top and leaves the front of the hood open. Adjust the seam length to suit your head size if desired — try the hood on before finishing the seam.

Fasten off and weave in this end securely.

---

### Step 2: I-Cord Edging

The i-cord edging is worked around all outer edges of the completed scarf — both long edges and both short ends — using 2 DPNs. The i-cord is **3 stitches wide**.

**How i-cord edging works:** You pick up stitches along the edge, then work each picked-up stitch together with the live i-cord stitches as you travel along the edge.

#### Picking Up Rate

- Along **cast-on and cast-off short ends:** pick up 1 stitch for every stitch (36 sts per short end).
- Along **long selvedge edges:** pick up 1 stitch for every 2 rows (every chain loop along the slip-stitch selvedge).

> *Note:* For the i-cord edging method below, you do not need to pre-pick up all stitches. You work pick-up and i-cord simultaneously, moving along the edge.

#### Working the I-Cord Edging

**Cast on 3 sts** onto one DPN using a knitted cast-on.

*Alternatively:* Pick up and knit 3 sts from the corner of one short end to begin.

**I-cord edging row:**
1. K2.
2. Sl1, pick up and knit 1 st from the edge of the scarf (insert needle under the edge loop, wrap yarn, and pull through).
3. Pass the slipped stitch over the picked-up stitch (this joins the i-cord to the scarf edge — 3 sts remain on needle). ✅
4. Do **not** turn. Slide sts to other end of DPN and pull working yarn across the back.
5. Rep steps 1–4, working along the edge.

#### Corners

At each corner, work **3 i-cord edging rows into the same corner stitch** (i.e., pick up into the same corner point three times consecutively) before continuing along the next edge. This eases the i-cord around the corner without puckering.

#### Joining the I-Cord

When you have worked all the way around and returned to the starting point, graft (Kitchener stitch) the live 3 sts to the cast-on 3 sts, or use a three-needle cast-off on the wrong side for a quick join.

---

### Step 3: Weaving In Ends

Weave in all remaining ends securely on the wrong side using a tapestry needle, working along garter ridges for security.

---

### Step 4: Blocking (Optional)

Garter stitch generally requires minimal blocking. If desired, wet-block by soaking in cool water for 10 minutes, gently press out excess water in a towel, and lay flat to dry to measurements. Do not hang to dry. Blocking will even out the i-cord edging beautifully.

---

## Schematic (Text)

```
[SHORT END — 20 cm]
|‾‾‾‾‾‾‾‾‾‾‾‾‾‾‾‾‾‾‾‾|
|                    |  ← Scarf Tail 1 (70 cm long, 20 cm wide)
|                    |
|____________________|
|‾‾‾‾‾‾‾‾‾‾‾‾‾‾‾‾‾‾‾‾‾‾‾‾‾‾‾‾‾‾‾‾‾‾‾‾‾‾‾‾‾‾|
|                                          |  ← Hood Panel (35 cm long, 56 cm wide)
|     ▲ fold here, seam top 18 cm ▲        |
|__________________________________________|
|‾‾‾‾‾‾‾‾‾‾‾‾‾‾‾‾‾‾‾‾|
|                    |  ← Scarf Tail 2 (70 cm long, 20 cm wide)
|                    |
|____________________|
[SHORT END — 20 cm]
```

*I-cord edging runs around all outer edges shown above.*

---

## Yardage Summary

| Component | Approximate Yardage |
|---|---|
| Two scarf tails | approx. 250 m (275 yds) |
| Hood panel | approx. 120 m (130 yds) |
| I-cord edging | approx. 50 m (55 yds) |
| **Total** | **approx. 420 m (460 yds)** |

> Purchase at least **2 × 100 g balls** of 8 ply yarn. Most 8 ply / DK yarns yield approximately 220–230 m per 100 g ball.

---

## Quick Reference: Stitch Counts

| Section | Sts on Needle |
|---|---|
| Cast-on | 36 sts |
| After hood increase row | 100 sts |
| After hood decrease row | 36 sts |
| Final cast-off | 36 sts |
| I-cord edging (throughout) | 3 sts |

---

*Pattern designed for personal and non-commercial use. Please do not redistribute or sell this pattern.*
Disclaimer: This pattern was generated by AI and should be reviewed for accuracy before use. While we strive for quality, AI-generated content may contain errors. Please verify measurements, stitch counts, and instructions before beginning your project. Generated by purlJam.uk
Access your pattern anytime
Bookmark this page to access your pattern anytime