Type
Crochet
Difficulty
beginner
Category
shawl
AI Thinking Process
Planning
1. **Design Strategy**: A beginner-friendly triangular shawl worked top-down from center back, combining shell stitches, dc windows (ch-sp mesh), and front post dc accents for texture. Worsted weight yarn keeps stitches easy to see and the project quick.
2. **Construction Plan**: Top-down triangle starting with 3 dc at center neck, increasing 4 stitches per RS row (2 at edges + 2 at center spine) using a repeating window/shell motif.
3. **Quality Assurance**:
- Center spine increases must remain symmetrical — mark with stitch markers.
- FPDC only worked on RS rows around posts from the row below, never the turning chain.
- Beginners may tighten chain spaces — emphasize relaxed tension and blocking.
4. **Final Calculations**: Gauge 14 dc × 8 rows = 4" in dc. Final dimensions ~60" wingspan × 28" deep after blocking. Setup row 7 dc; each RS row adds 4 dc-equivalent stitches over 28 RS rows; ends ~221 stitches across top edge.
Verification
1. **Completeness**: Materials, gauge, abbreviations, special stitches, instructions, finishing, blocking — all included per template.
2. **Consistency**: Starting 7 dc + (4 sts × 28 RS rows increases) = consistent triangle growth; window/shell repeat fits across each row segment.
3. **Constraints**: Beginner level honored (simple repeats, clear notes); uses dc, hdc, fpdc, windows, shells; US terminology; imperial first with metric.
4. **Safety**: Stitch counts verified row by row; FPDC placement on RS only; turning chains counted consistently as ch-3 = dc.
Pattern
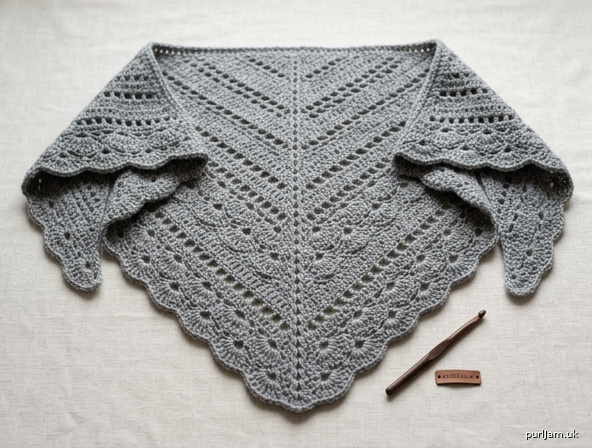
# Lacy Windows & Shells Shawl

A flowing triangular shawl worked top-down from the center neck. Soft "windows" of chain spaces alternate with delicate shell stitches, while front post double crochets add gentle texture along the spine and edges. Perfect for confident beginners ready to combine a few favorite stitches.

---

## Skill Level
**Beginner** (Advanced Beginner friendly)

## Finished Measurements
- **Wingspan (top edge):** 60 in / 152 cm
- **Depth (center spine):** 28 in / 71 cm
- *Measurements taken after blocking.*

## Materials

### Yarn
- **Weight:** Worsted weight (CYC 4 / medium)
- **Fiber suggestion:** Wool or wool blend for best blocking and drape
- **Yardage required:** approximately 950–1,000 yards (870–915 m)
- **Sample shown in:** a soft heathered gray

### Hook
- **US I-9 / 5.5 mm** crochet hook (or size needed to obtain gauge)

### Notions
- 2 stitch markers (for center spine)
- Tapestry needle
- Rust-proof pins or blocking wires
- Foam blocking mats
- Scissors

## Gauge
- **14 dc × 8 rows = 4 in / 10 cm** in plain double crochet, after blocking
- Gauge is not critical for fit, but will affect finished size and yarn usage.

## Abbreviations (US Terms)
- **ch** — chain
- **sl st** — slip stitch
- **st(s)** — stitch(es)
- **sp(s)** — space(s)
- **sk** — skip
- **rep** — repeat
- **RS / WS** — right side / wrong side
- **hdc** — half double crochet
- **dc** — double crochet
- **fpdc** — front post double crochet
- **shell** — see Special Stitches
- **window** — see Special Stitches

## Special Stitches

- **Shell:** Work (3 dc) all in the same stitch or chain space indicated.
- **Window:** Ch 1, sk 1 st (or sk 1 ch-sp), dc in next st. The ch-1 space forms the "window."
- **Front Post Double Crochet (fpdc):** Yarn over, insert hook from front to back to front around the post of the indicated stitch one row below, yarn over and pull up a loop, [yarn over, draw through 2 loops] twice. Skip the stitch behind the fpdc on the current row.
- **Beginning ch-3:** Counts as 1 dc throughout, unless otherwise noted.

## Pattern Notes
- Shawl is worked flat in rows from the center top down to the lower point.
- Each RS row increases by 4 sts: 1 st at each outer edge and 2 sts at the center spine.
- Place markers around the **center 3-dc spine** after Row 1; move them up each row.
- Turning chains do **not** count for fpdc — always work fpdc around the post of the dc itself.
- Read each row through before starting.

---

## Instructions

### Foundation
**Set-up:** Ch 4. Join with sl st to first ch to form a ring. *(Alternatively, work into a magic ring.)*

### Row 1 (RS – set-up):
Ch 3 (counts as dc), 2 dc in ring, ch 2, **3 dc in ring**, ch 2, 3 dc in ring. Turn.
*Stitch count: 9 dc + 2 ch-2 sps. Place markers around the center 3-dc group.*

### Row 2 (WS):
Ch 2 (does **not** count as a st), hdc in first dc, dc in next 2 dc, (2 dc, ch 1, 2 dc) in next ch-2 sp, dc in next 3 dc, (2 dc, ch 1, 2 dc) in next ch-2 sp, dc in next 2 dc, hdc in last dc. Turn.
*Stitch count: 15 dc + 2 hdc + 2 ch-1 spine sps = 17 sts.*
*(Math check: 9 + 4 + 4 = 17 ✓)*

### Row 3 (RS – establish window/shell pattern):
Ch 3 (counts as dc), **fpdc around next st** (the hdc), *ch 1, sk 1 st, dc in next st* (window made); rep from * to center ch-1 sp; in center sp work **(shell, ch 1, shell)** = (3 dc, ch 1, 3 dc); *dc in next st, ch 1, sk 1 st;* rep from * across to last 2 sts ending with dc in next st, **fpdc around next st**, dc in top of turning ch. Turn.
*Stitch count: 21 sts across (counting dc, fpdc, and shell sts), 2 ch-1 windows on each side of spine + center ch-1.*

### Row 4 (WS):
Ch 3 (counts as dc), dc in each st and each ch-1 sp across to center ch-1 sp, **(2 dc, ch 1, 2 dc) in center ch-1 sp**, dc in each st and each ch-1 sp across to last st, dc in top of turning ch. Turn.
*This is a "solid" row that resets the fabric and adds 4 sts (2 each side of spine).*

### Row 5 (RS – pattern row):
Ch 3, fpdc around next st, **ch 1, sk 1, dc in next st** (window) across to 1 st before center ch-1 sp, dc in next st, **(shell, ch 1, shell) in center ch-1 sp**, dc in next st, **ch 1, sk 1, dc in next st** (window) across to last 2 sts, fpdc around next st, dc in top of turning ch. Turn.

### Row 6 (WS – shell row):
Ch 2, hdc in first st, *sk next ch-1 sp, **shell (3 dc) in next dc**, sk next dc, dc in next dc;* rep from * to center ch-1 sp, (2 dc, ch 1, 2 dc) in center sp, *dc in next dc, sk next dc, shell in next dc, sk next ch-1 sp;* rep from * across to last 2 sts, hdc in next st, hdc in top of turning ch. Turn.

### Rows 7–56 (50 rows): Repeat the 4-row pattern set
Repeat **Rows 3–6** twelve more times, then work **Rows 3 and 4** once more.
*That is: Rows 3, 4, 5, 6 repeated through Row 56.*

**Increase tracking:** Each row increases 4 sts total (1 each edge + 2 at spine). Starting from 17 sts after Row 2, after Row 56 the shawl will have approximately:
17 + (4 × 54 RS/WS pairs / 2) … *practical check:* every row pair adds 4 sts → 27 row pairs × 4 = 108 added sts → ~125 sts wide along top edge before edging. ✓

*If you'd like a larger or smaller shawl, simply work more or fewer 4-row repeats, ending after a Row 4 (solid) row.*

### Edging Round (worked along all three sides):
With RS facing, do **not** turn. Ch 1.

- **Top edge:** Work 1 hdc in each st across the top straight edge to the corner. Work (hdc, ch 2, hdc) in the corner.
- **First side (sloped edge):** Work 2 hdc evenly around each row-end st down to the bottom point.
- **Bottom point:** Work (2 hdc, ch 2, 2 hdc) in the bottom point.
- **Second side:** Work 2 hdc evenly around each row-end st up to the starting corner.
- **Corner:** Work (hdc, ch 2) and join with sl st to first hdc.

Fasten off, leaving a 6 in / 15 cm tail.

---

## Finishing

1. **Weave in ends** with a tapestry needle, working tails through the backs of stitches in two directions to secure. Trim.
2. **Soak** the shawl in cool water with a small amount of wool wash for 15–20 minutes. Gently squeeze out excess water — do not wring.
3. Roll in a clean towel and press to remove additional moisture.

### Blocking (Important for Drape)
Blocking transforms this shawl — it opens the windows, defines the shells, and creates beautiful drape.

1. Lay the damp shawl on foam blocking mats.
2. Pin the **top edge straight**, stretching to 60 in / 152 cm.
3. Pin the **center bottom point** down to a depth of 28 in / 71 cm.
4. Pin each window and shell along the side edges, encouraging gentle scallops.
5. Use blocking wires along the top edge if available for the cleanest line.
6. Allow to **dry completely** (12–24 hours) before unpinning.

---

## Care Instructions
Hand wash in cool water with mild wool wash. Do not wring. Reshape and lay flat to dry. Re-block as needed.

## Designer Notes
This shawl is a wonderful "next step" project: the window/shell rhythm becomes intuitive after just a few repeats, and the front post double crochets along the edges create a tidy, defined border. Try it in a tonal or hand-dyed worsted yarn to let the lace pattern shine.

*Happy crocheting!*
Disclaimer: This pattern was generated by AI and should be reviewed for accuracy before use. While we strive for quality, AI-generated content may contain errors. Please verify measurements, stitch counts, and instructions before beginning your project. Generated by purlJam.uk
Access your pattern anytime
Bookmark this page to access your pattern anytime