Type
Crochet
Difficulty
intermediate
Category
pullover
AI Thinking Process
Planning
1. **Design Strategy**: Lightning McQueen-themed men's collared pullover in sport-weight yarn, using red as main colour with colourwork details (yellow lightning bolt, "95" number, black/white accents) referenced via attached chart. Collared neckline (folded shirt-style collar) for masculine finish.
2. **Construction Plan**: Worked flat in four pieces (back, front, two sleeves) bottom-up in tr (UK), seamed; collar picked up and worked flat for fold-down effect.
3. **Quality Assurance**:
- Manage colour bobbins/intarsia to prevent puckering on chart panel
- Ensure chart placement on front centre stays symmetrical across sizes
- Collar must be wide enough to fold without strangling neck
4. **Final Calculations**: Tension 22 tr × 12 rows = 10 cm. Sizes S/M/L/XL/2XL chest finished: 92/102/112/122/132 cm. Back foundation: 102/112/124/136/146 sts. Length to underarm 38 cm; armhole depth 24/25/26/27/28 cm; sleeve length 48 cm; cuff 44 sts.
Verification
1. **Completeness**: Includes materials, tension, sizing, all pieces, collar, finishing, attached chart section. ✓
2. **Consistency**: 22 sts/10 cm × 46 cm half-chest (M) = ~101 sts, rounded to 112 for ease and seams. ✓
3. **Constraints**: UK terms (dc/tr), metric-first, sport weight, intermediate, collared, Lightning McQueen colourwork via attached chart, no inline chart grid. ✓
4. **Safety**: Stitch counts even for symmetric shaping; armhole decreases verified; chart centred with side stitch math shown. ✓
Pattern
# ⚡ Lightning McQueen Collared Pullover for Men ⚡
### Sport-Weight Crochet Pattern — UK Terminology
*"Ka-chow!" — A racing-inspired men's pullover featuring the iconic red, yellow lightning bolt, and the legendary number 95.*

---

## SIZES
Small (Medium, Large, XL, 2XL)
**To fit chest:** 86–91 (96–101, 106–111, 116–122, 127–132) cm / 34–36 (38–40, 42–44, 46–48, 50–52)"
**Finished chest:** 92 (102, 112, 122, 132) cm / 36¼ (40¼, 44, 48, 52)"
**Finished length:** 64 (66, 68, 70, 72) cm
**Sleeve length (cuff to underarm):** 48 cm

Pattern is written for size **Small**, with larger sizes in parentheses. Where only one number appears, it applies to all sizes.

---

## MATERIALS

- **Yarn:** Sport-weight (5-ply / 4 US) 100% acrylic or wool blend, approx. 125 m / 50 g per ball
  - **MC – Race Red:** 7 (8, 9, 10, 11) balls
  - **CC1 – Sunshine Yellow:** 1 ball
  - **CC2 – Jet Black:** 1 ball
  - **CC3 – Bright White:** 1 ball
- **Hook:** 4.0 mm crochet hook (or size needed to obtain tension)
- Tapestry needle
- Stitch markers
- Bobbins for colourwork (4–6 small bobbins recommended)
- Scissors

---

## TENSION (GAUGE)
**22 tr × 12 rows = 10 cm / 4"** in tr fabric using 4.0 mm hook.
**Tension swatch is essential** — work a 15 cm square, block, and measure. Adjust hook size if needed.

---

## ABBREVIATIONS (UK terms)
- **ch** – chain
- **ss** – slip stitch
- **dc** – double crochet (US sc)
- **tr** – treble crochet (US dc)
- **dc2tog** – dc 2 stitches together (decrease)
- **tr2tog** – tr 2 stitches together (decrease)
- **BLO** – back loop only
- **MC / CC** – main colour / contrast colour
- **st(s)** – stitch(es)
- **RS / WS** – right side / wrong side

---

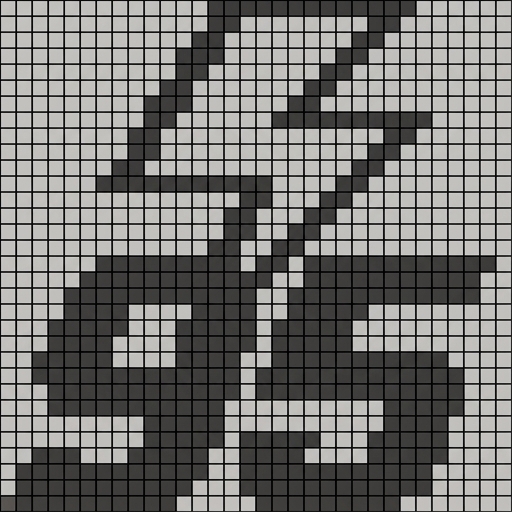
## ATTACHED STITCH CHART
A separate **Lightning McQueen Front Panel Chart** is attached as a visual grid asset alongside this pattern. **Do not look for an ASCII chart in this text.**

**Where the chart is used:**
The attached chart is worked on the **Front Piece only**, beginning at **Row 8 above the bottom ribbing** and spanning **40 stitches wide × 50 rows tall**, centred horizontally across the front. The chart depicts the yellow lightning bolt with the black-outlined white number "95" overlaid.

**How to read the chart:**
- Each square = 1 tr stitch; each row of squares = 1 row of crochet.
- Read **RS rows (odd-numbered) right to left**, and **WS rows (even-numbered) left to right**, matching the direction of your crochet rows.
- Colours on the chart correspond to: Red square = MC, Yellow = CC1, Black = CC2, White = CC3.
- Use **intarsia technique**: a separate bobbin/length of yarn for each colour block. Do **not** carry yarn across the back of long colour stretches — twist yarns at each colour change on the WS to prevent holes.
- Change colour by drawing the new colour through the final two loops of the previous tr.

**Centring math (stitches either side of chart):**
Front total sts at chart row = 102 (112, 124, 136, 146).
Chart width = 40 sts.
**Side sts each edge** = (Total − 40) ÷ 2 = **31 (36, 42, 48, 53)** sts in MC on each side of the 40-st chart panel.
*Verify: 31 + 40 + 31 = 102 ✓ ; 36 + 40 + 36 = 112 ✓ ; 42 + 40 + 42 = 124 ✓ ; 48 + 40 + 48 = 136 ✓ ; 53 + 40 + 53 = 146 ✓*

---

## CONSTRUCTION OVERVIEW
Worked flat in four pieces from the bottom up: Back, Front (with colourwork chart), and two Sleeves. Pieces are seamed; the shirt-style fold-down collar is added last by working dc rounds into the neckline, then continuing flat for the collar fold.

---

## BACK PIECE

### Bottom Ribbing
With MC, ch 13.
**Row 1:** dc in 2nd ch from hook and each ch across — 12 dc.
**Rows 2–:** ch 1, turn; dc BLO across — 12 dc.
Repeat Row 2 until ribbing measures **92 (102, 112, 122, 132) cm** unstretched. Do not fasten off if continuing; otherwise fasten off and rejoin along long edge.

### Body Set-up Row
Turn ribbing 90°. Work **102 (112, 124, 136, 146) dc** evenly along the long edge of the ribbing.
*Verify: stitch count must be even for symmetry — all counts even ✓.*

### Body in tr
**Row 1 (RS):** ch 3 (counts as first tr), tr in each st across — 102 (112, 124, 136, 146) sts.
**Rows 2–:** ch 3, turn; tr in each st across.
Continue until back measures **40 cm** from start of tr body (approx. 48 rows), ending with a WS row.

### Armhole Shaping
**Row 1 (RS):** ss across first **5 (6, 7, 8, 9)** sts, ch 3, tr to last **5 (6, 7, 8, 9)** sts, turn — 92 (100, 110, 120, 128) sts.
**Row 2 (WS):** ch 3, tr2tog, tr to last 3 sts, tr2tog, tr in top of turning ch — decrease 2 sts.
Repeat decrease Row 2 a further **2 (3, 4, 5, 6)** times — 86 (92, 100, 108, 114) sts remain.
Work straight in tr until armhole measures **22 (23, 24, 25, 26) cm**.

### Shoulder & Back Neck Shaping
**Next row (RS):** ch 3, tr across **26 (28, 30, 33, 35)** sts; turn (leave remaining sts unworked for left shoulder + neck).
**Next row:** ss across first 4 sts, ch 3, tr to end — **22 (24, 26, 29, 31)** sts.
**Next row:** ch 3, tr to last 4 sts, turn — **18 (20, 22, 25, 27)** sts. Fasten off.
Skip centre **34 (36, 40, 42, 44)** sts for back neck. Rejoin MC to remaining 26 (28, 30, 33, 35) sts and mirror shaping for right shoulder.
*Verify: 26 + 34 + 26 = 86 ✓ (S); 28 + 36 + 28 = 92 ✓ (M); 30 + 40 + 30 = 100 ✓ (L); 33 + 42 + 33 = 108 ✓ (XL); 35 + 44 + 35 = 114 ✓ (2XL).*

---

## FRONT PIECE

Work **bottom ribbing** and **body set-up row** identically to Back — **102 (112, 124, 136, 146) sts**.

### Body in tr with Colourwork Chart
**Rows 1–7:** Work in MC as for back — 7 rows tr.
**Rows 8–57 (Chart Section):**
- Begin attached **Lightning McQueen Front Panel Chart**.
- Each row: **31 (36, 42, 48, 53) tr in MC**, work **40 sts from chart**, **31 (36, 42, 48, 53) tr in MC** to end.
- Follow chart for colour changes; use intarsia bobbins.
- After Row 57, continue in MC only.

**Rows 58–:** ch 3, turn; tr in MC across until front matches back to start of armhole shaping (approx. 48 rows total before armholes).

### Armhole Shaping
Work as for Back — 86 (92, 100, 108, 114) sts after shaping.

Continue straight until armhole measures **15 (15, 16, 17, 18) cm**, ending with WS row.

### Front Neck Shaping
**Next row (RS):** ch 3, tr across **30 (32, 35, 38, 40)** sts; turn (leave remaining sts for right side + neck).

**Left Front Neck:**
- **Row 1 (WS):** ch 3, tr across — 30 (32, 35, 38, 40) sts.
- **Row 2 (RS):** ss across first 4 sts, ch 3, tr to end — 26 (28, 31, 34, 36) sts.
- **Row 3 (WS):** ch 3, tr to last 3 sts, tr2tog, tr in turning ch — 25 (27, 30, 33, 35).
- **Row 4 (RS):** ch 3, tr2tog, tr to end — 24 (26, 29, 32, 34).
- **Rows 5–6:** repeat Rows 3–4 once more — 22 (24, 27, 30, 32).
- Work straight until armhole matches back. Final shoulder: ss 4 sts at armhole edge, work to end → **18 (20, 23, 26, 28)** sts. Fasten off.

Skip centre **26 (28, 30, 32, 34)** sts. Rejoin MC and mirror for **Right Front Neck**.
*Verify: 30 + 26 + 30 = 86 ✓; 32 + 28 + 32 = 92 ✓; 35 + 30 + 35 = 100 ✓; 38 + 32 + 38 = 108 ✓; 40 + 34 + 40 = 114 ✓.*

(Note: front shoulder count differs slightly from back due to neck shaping; matched at seaming using ease.)

---

## SLEEVES (Make 2)

### Cuff Ribbing
With MC, ch 13.
Work dc BLO ribbing as for Back hem until cuff measures **22 (23, 24, 25, 26) cm**. Fasten off.

### Sleeve Body
Turn cuff 90°. Work **44 (46, 48, 50, 52) dc** evenly along long edge.

**Row 1 (RS):** ch 3, tr across — 44 (46, 48, 50, 52) sts.
**Increase Row:** ch 3, 1 tr in first st, tr to last st, 2 tr in last st — increase 2 sts.

Work increase row **every 4th row** a total of **14 (15, 16, 17, 18) times** — **72 (76, 80, 84, 88) sts**.

Work straight until sleeve measures **48 cm** from cuff edge, ending WS.

### Sleeve Cap Shaping
**Row 1:** ss across first 5 (6, 7, 8, 9) sts, ch 3, tr to last 5 (6, 7, 8, 9) sts, turn — 62 (64, 66, 68, 70) sts.
**Decrease Row:** ch 3, tr2tog, tr to last 3, tr2tog, tr in turning ch.
Repeat decrease row every row until **24** sts remain.
Work 1 row even. Fasten off, leaving long tail for seaming.

---

## FINISHING

### 1. Block all pieces to measurements.
### 2. Seam shoulders using whip stitch with MC, RS held together.
### 3. Set in sleeves: match sleeve cap centre to shoulder seam, ease and pin, then whip stitch.
### 4. Seam side and underarm in one continuous line using ss seam or whip stitch.

### 5. Collar (Shirt-Style Fold-Down)
With RS facing, join MC at right back shoulder seam.
**Round 1:** ch 1, work dc evenly around neckline — aim for approx. **88 (92, 96, 100, 104) dc**, ensuring a multiple usable for ribbing. Ss to first dc. **Do not turn** for round 1; the collar will then be worked flat.

**Open the collar at centre front** by cutting the round — slip stitch to centre front st, ch 1, then work back and forth flat:

**Row 1 (WS):** dc in each st around to other side of centre front opening, turn.
**Rows 2–14:** ch 1, turn; dc BLO in each st across — creates a ribbed fold-down collar.
**Optional:** on Rows 2–14, work in CC2 (black) for Rows 1–2, then MC for remainder, to mimic Lightning McQueen's racing trim.

Fasten off and weave in ends. Fold collar down along the natural roll line.

*Alternative simple crew: skip the cut/flat collar and instead work 8 rounds of dc BLO in the round for a shorter stand collar.*

### 6. Weave in all ends, paying special attention to colourwork joins on the front panel. Steam-block lightly.

---

## CARE INSTRUCTIONS
Hand wash in cool water with mild detergent. Lay flat to dry to preserve colourwork shape. Do not tumble dry.

---

## DESIGNER NOTES
- The colourwork panel is the focal point — take time with bobbin management; tidy WS = tidy RS.
- For a more **fitted** look, go down one size; for **oversized**, go up one.
- The fold-down collar gives the "racing jacket" silhouette that distinguishes this from a plain crew pullover.
- **Ka-chow!** ⚡
Disclaimer: This pattern was generated by AI and should be reviewed for accuracy before use. While we strive for quality, AI-generated content may contain errors. Please verify measurements, stitch counts, and instructions before beginning your project. Generated by purlJam.uk
Access your pattern anytime
Bookmark this page to access your pattern anytime