Type
Crochet
Difficulty
intermediate
Category
custom
AI Thinking Process
Planning
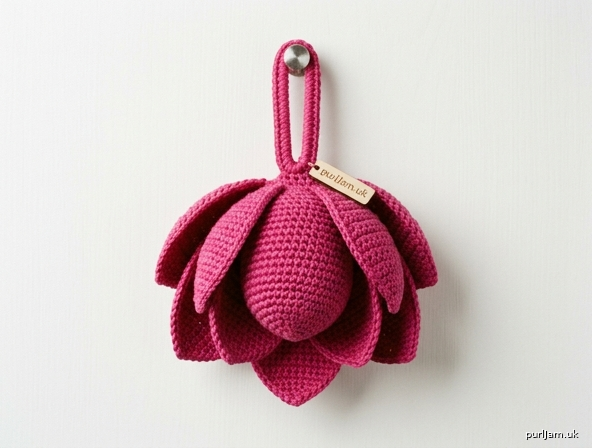
1. **Design Strategy**: A decorative lotus bud motif in fuchsia pink worsted yarn, designed as a door-frame hanging. Beginner-friendly using simple dc (UK), tr, and chain work to form overlapping petals around a central bud, finished with a hanging loop.
2. **Construction Plan**: Worked as a flat layered motif — a central cone-shaped bud worked in joined rounds, surrounded by individually worked petals attached around the base, then a chain loop added for hanging.
3. **Quality Assurance**:
- Keep petal counts even so they sit symmetrically around the bud base.
- Ensure the hanging loop is reinforced to bear the motif's weight.
- Maintain firm tension so petals hold their curved bud shape.
4. **Final Calculations**: Tension 16 dc x 18 rows = 10 cm. Bud base round = 12 dc → diameter ≈ 7.5 cm. 6 outer + 6 inner petals. Finished motif ≈ 14 cm wide x 16 cm tall incl. hanging loop (loop ch 30 ≈ 18 cm circumference).
Verification
[PRE-FLIGHT CHECKS]
1. **Completeness**: All required sections present — title, materials, tension, abbreviations, notes, instructions, finishing.
2. **Consistency**: Bud base of 12 dc supports 6 inner + 6 outer petals (one petal per 2 base sts → 6+6=12 anchor points). Tension 16 dc/10 cm → 12 dc base ≈ 7.5 cm. Consistent.
3. **Constraints**: Single colour (fuchsia pink), beginner level, door-frame hanging with loop — all addressed.
4. **Safety**: Petal increases/decreases verified below; hanging loop reinforced with two passes of dc.
Pattern
# Lotus Bud Door Hanging

A pretty, single-colour lotus bud worked in fuchsia-pink worsted yarn, designed to hang from a door frame. The closed-bud silhouette is formed from a central cone surrounded by two rings of overlapping petals, topped with a sturdy hanging loop. A lovely quick make for beginners.

**Finished size:** Approximately 14 cm wide × 16 cm tall (including hanging loop).

---

## Materials

- **Yarn:** Worsted weight (Aran/medium, #4) acrylic or cotton blend, in fuchsia pink. Approx. **70 m (75 yd)** — one 50 g ball is ample.
- **Hook:** 4.5 mm crochet hook.
- **Notions:** Tapestry/yarn needle, scissors, toy stuffing or yarn scraps (small amount, optional, to plump the bud), stitch marker.

---

## Tension (Gauge)

16 dc × 18 rows = 10 cm × 10 cm in double crochet (UK).

Tension is not critical for a hanging decoration, but a firm fabric helps the bud hold its shape. If your fabric is loose and floppy, drop to a 4.0 mm hook.

---

## Sizes

One size, as a decorative motif. Adjust by changing hook/yarn weight if desired.

---

## Abbreviations (UK terminology)

- **ch** – chain
- **ss** – slip stitch
- **dc** – double crochet (= US single crochet)
- **htr** – half treble (= US half double)
- **tr** – treble (= US double)
- **dc2tog** – double crochet 2 stitches together (1 stitch decreased)
- **st(s)** – stitch(es)
- **rep** – repeat
- **sp** – space

> **Note for US crocheters:** UK dc = US sc; UK htr = US hdc; UK tr = US dc.

---

## Pattern Notes

- The lotus is made in **three parts**, all in the same colour: a **central bud cone**, **6 inner petals**, and **6 outer petals**. These are sewn together, then a **hanging loop** is added.
- The bud cone is worked **in joined rounds**; do not turn between rounds unless stated.
- Petals are worked **flat in rows**, both loops unless stated.
- Stitch counts are given in parentheses at the end of each round/row.
- Turning chains on petals **do not** count as a stitch.
- Use a stitch marker to track the first stitch of each round on the cone.

---

## Special Stitch

- **dc2tog:** Insert hook into next st, yarn over (yo), pull up a loop (2 loops on hook), insert hook into following st, yo, pull up a loop (3 loops), yo, pull through all 3 loops. (1 st decreased.)

---

## Instructions

### Part 1 — Central Bud Cone (make 1)

Worked from the top (tip) down to the open base, in joined rounds.

**Round 1:** Make a magic ring. Work 6 dc into ring. Pull tight. Join with ss to first dc. **(6 sts)**
- *Check: 6 dc = 6 sts. ✓*

**Round 2:** ch 1 (does not count), 2 dc in each st around. Join with ss to first dc. **(12 sts)**
- *Check: 6 × 2 = 12. ✓*

**Round 3:** ch 1, dc in each st around. Join with ss. **(12 sts)**

**Round 4:** ch 1, dc in each st around. Join with ss. **(12 sts)**

**Round 5:** ch 1, dc in each st around. Join with ss. **(12 sts)**

Lightly stuff the cone with a small amount of stuffing or yarn scraps if you'd like a plumper bud (optional).

Fasten off, leaving a 20 cm tail for sewing. The open edge of Round 5 (12 sts) is the **base ring** the petals attach to.

---

### Part 2 — Inner Petals (make 6)

Worked flat. Each petal starts with a small chain and grows then tapers to a point.

**Foundation:** ch 4.

**Row 1:** dc in 2nd ch from hook, dc in next 2 ch, turn. **(3 sts)**
- *Check: 3 ch worked = 3 dc. ✓*

**Row 2:** ch 1 (does not count), 2 dc in first st, dc in next st, 2 dc in last st, turn. **(5 sts)**
- *Check: 3 + 2 increases = 5. ✓*

**Row 3:** ch 1, dc in each st across, turn. **(5 sts)**

**Row 4:** ch 1, dc2tog, dc in next st, dc2tog, turn. **(3 sts)**
- *Check: 5 − 2 = 3. ✓*

**Row 5:** ch 1, dc3tog over the 3 sts** (work as dc2tog but across all 3 sts) to bring to a point. **(1 st)**

Fasten off, leaving a 20 cm tail. Make **6 inner petals** in total.

> **dc3tog:** [insert in next st, yo, pull up loop] 3 times (4 loops on hook), yo, pull through all 4.

---

### Part 3 — Outer Petals (make 6)

Worked flat, slightly larger than the inner petals.

**Foundation:** ch 5.

**Row 1:** dc in 2nd ch from hook, dc in next 3 ch, turn. **(4 sts)**

**Row 2:** ch 1, 2 dc in first st, dc to last st, 2 dc in last st, turn. **(6 sts)**
- *Check: 4 + 2 = 6. ✓*

**Row 3:** ch 2 (does not count), htr in first st, tr in each st to last st, htr in last st, turn. **(6 sts)**
- *This row adds gentle height/curve to the outer petals.*

**Row 4:** ch 1, dc in each st across, turn. **(6 sts)**

**Row 5:** ch 1, dc2tog, dc in next 2 sts, dc2tog, turn. **(4 sts)**
- *Check: 6 − 2 = 4. ✓*

**Row 6:** ch 1, dc2tog twice, turn. **(2 sts)**
- *Check: 4 − 2 = 2. ✓*

**Row 7:** ch 1, dc2tog. **(1 st)**

Fasten off, leaving a 20 cm tail. Make **6 outer petals** in total.

---

## Assembly

1. **Position the cone** open-base up. The 12 base stitches are your anchor points (think of them as 12 points around a clock).

2. **Attach outer petals first** (so inner petals sit in front). Using the long tails and a tapestry needle, sew the foundation (Row 1) edge of each **outer petal** to the **outside** of the base ring. Space them evenly — one petal every **2 base stitches** → 6 petals around the 12-st ring.
   - *Check: 12 sts ÷ 6 petals = 1 petal per 2 sts. ✓*
   - Angle the petal tips slightly outward so they cup the bud.

3. **Attach inner petals** to the **inside** of the base ring, positioning each one **between** two outer petals (offset by one base stitch). Sew the foundation edge of each inner petal to the ring.
   - This gives the classic overlapping closed-bud look.

4. **Close the base slightly:** thread one remaining tail through the 12 base loops, draw up gently to gather (do not close fully — leave a small flat base), and secure. This forms the rounded bottom of the bud.

5. Weave in all petal tails on the wrong side.

---

## Hanging Loop

Worked directly into the top tip of the bud cone (Round 1 area).

1. Join yarn with a ss to the very tip of the cone (the magic-ring centre point).
2. **ch 30.**
3. Fold the chain to form a loop and ss back into the **same** tip stitch to close the loop.
4. **Reinforce:** work **dc evenly along the entire chain loop** (approximately 30 dc), then ss to the tip again. **(approx. 30 dc)**
   - This double pass makes the loop strong enough to bear the motif over a door-frame hook or nail.
   - *Loop circumference ≈ 30 ch × 0.6 cm ≈ 18 cm, giving a hanging drop of ~7–8 cm.*
5. Fasten off and weave in the end securely.

---

## Finishing

- Weave in any remaining ends on the wrong side and trim.
- Gently shape the petals with your fingers, curving the outer petals outward and pinching the inner petals toward the tip to emphasise the bud shape.
- For extra crispness, lightly steam-block the petals (hold a steam iron above — do not press directly, especially on acrylic) and let dry.
- Hang from a small hook, screw, or adhesive door-frame hook.

---

## Tips

- **Tail management:** Leaving generous 20 cm tails makes sewing the petals far easier — you won't need to join new yarn.
- **Symmetry:** Pin all petals in place before sewing to check even spacing.
- **Sturdier hang:** If hanging outdoors or on a frequently used door, use cotton yarn and add a second ch-30 reinforcement pass to the loop.
- **Colour:** This pattern uses a single colour throughout (fuchsia pink), as requested — no colour changes needed.

Enjoy your blooming lotus bud! 🌸
Disclaimer: This pattern was generated by AI and should be reviewed for accuracy before use. While we strive for quality, AI-generated content may contain errors. Please verify measurements, stitch counts, and instructions before beginning your project. Generated by purlJam.uk
Access your pattern anytime
Bookmark this page to access your pattern anytime