Type
Knitting
Difficulty
beginner
Category
pullover
AI Thinking Process
Planning
Verification
Pattern
Lou Reed Drop-Shoulder Pullover
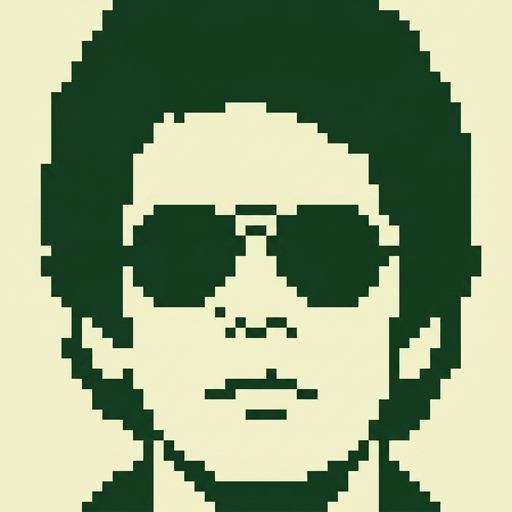
Basic Boxy Boatneck Sweater with Portrait Colorwork
Difficulty: Beginner construction (colorwork portrait on front is intermediate—use the attached chart and bobbins or strands as preferred).
Style: Drop-shoulder, boxy, relaxed ease (~6–8" positive ease), boatneck, long sleeves.
Sizes
S (M, L, XL, 2XL)
To fit bust: 34 (38, 42, 46, 50)" [86.5 (96.5, 106.5, 117, 127) cm]
Shown in size M.
Finished Measurements
- Bust circumference: 41½ (46½, 49½, 54½, 57½)" [105.5 (118, 125.5, 138.5, 146) cm]
- Back length from shoulder: 24 (24½, 25, 25½, 26)" [61 (62, 63.5, 65, 66) cm]
- Armhole depth (straight side edge used for sleeve pickup): 9 (9½, 10, 10½, 11)" [23 (24, 25.5, 26.5, 28) cm]
- Sleeve length from underarm to cuff: 17½ (18, 18, 18½, 18½)" [44.5 (45.5, 45.5, 47, 47) cm]
- Upper arm circumference: 17½ (18¾, 20, 21¼, 22½)" [44.5 (47.5, 51, 54, 57) cm]
- Boatneck opening width: 8 (8¾, 9½, 10½, 11¼)" [20.5 (22, 24, 26.5, 28.5) cm]
Yarn
Worsted weight yarn (approx 180–200 yd / 165–183 m per 100 g).
- MC (Main Color): 980 (1100, 1220, 1360, 1480) yd [896 (1006, 1116, 1244, 1353) m] — solid background (black, charcoal, or deep purple recommended for Lou Reed aesthetic).
- CC yarns for portrait: Small amounts (25–80 yd / 23–73 m each) of 2–4 contrasting colors as indicated on the attached chart (typical palette: cream/white, light gray, dark gray, accent). Exact yardage depends on chart density; wind bobbins for intarsia or manage floats for stranded work.
Sample yarn suggestion: any smooth worsted wool or wool-blend that knits to gauge.
Needles
- US 7 (4.5 mm) straight or circular needles for ribbing.
- US 8 (5 mm) straight or circular needles for stockinette and chart.
- (Optional) US 8 (5 mm) circular for preferred sleeve pickup / working in the round if desired after seaming.
- Adjust needle size to obtain gauge.
Gauge
20 sts and 28 rows = 4" (10 cm) in stockinette stitch on larger needles, blocked.
Always swatch. Colorwork sections can tighten gauge—swatch a portion of the chart if possible and go up a needle size for the chart area if needed so the front width matches the back.
Notions
- Stitch markers
- Stitch holders or waste yarn
- Tapestry needle
- Bobbins (if working intarsia)
- Row counter
- The attached Lou Reed stitch chart panel (separate asset)
Abbreviations (US)
BO = bind off
CO = cast on
k = knit
p = purl
pm = place marker
RS = right side
st(s) = stitch(es)
St st = stockinette stitch (knit RS, purl WS)
WS = wrong side
M1L / M1R = make 1 left / right (optional; not required in this pattern)
k2tog = knit 2 together
ssk = slip, slip, knit
** = repeat instructions between asterisks
Notes
- This is a classic drop-shoulder pullover: front and back are plain rectangles with no armhole indentation. Shoulders are seamed; sleeves are picked up along the straight armhole edge and worked downward.
- Boatneck requires no neck shaping—simply leave center stitches unjoined.
- Work the Lou Reed image from the attached chart on the Front only. Back and sleeves are solid MC.
- Colorwork method: intarsia (recommended for large portrait blocks) or stranded. Twist yarns at color changes; keep floats loose if stranding.
- All measurements are after light wet-blocking. Block pieces flat before seaming so the chart lies smooth and the rectangles match.
- When instructions give one number, it applies to all sizes. Sequences are written S (M, L, XL, 2XL).
Attached Stitch Chart
Use the separate attached chart panel supplied with this pattern for the Lou Reed portrait visual grid. Do not rely on any inline grid—the attached panel is the only chart.
Where it is placed: The chart is worked on the Front piece only, centered horizontally, beginning after the lower ribbing and a short band of plain MC stockinette so the image sits on the upper chest. Exact starting row is given in the Front instructions.
How to read the chart (knitting):
- Read RS (knit) rows from right to left; WS (purl) rows from left to right.
- Each square = 1 stitch and 1 row.
- Work chart colors as labeled in the panel legend (MC background + CC portrait colors).
- If a row ends mid-motif, maintain the established color across that stitch; do not add extra stitches—the chart stitch count is fixed and already centered inside the Front stitch count.
- Begin and end each chart row with the stated number of MC border stitches so total sts remain 104 (116, 124, 136, 144) throughout.
Color / yarn management:
- Wind separate bobbins for large isolated color areas (intarsia) to avoid long floats across the face.
- If stranding, catch floats every 3–4 sts and keep them elastic so the fabric does not pucker.
- Weave in portrait ends as you go or duplicate-stitch tiny details after blocking if the chart indicates single-stitch accents.
Stitch-count integration:
Chart width is designed to be no more than 60 sts.
MC border each side = [104 (116, 124, 136, 144) − chart width] ÷ 2.
Example if chart = 60 sts: borders = 22 (28, 32, 38, 42) sts MC each side (22 + 60 + 22 = 104 ✓ for size S; larger sizes add extra MC at sides).
If your attached chart width differs, recalculate borders so: left MC border + chart sts + right MC border = Front CO sts. Keep borders equal (or differ by 1 st if odd total).
Pattern Instructions
BACK
With smaller needles and MC, CO 104 (116, 124, 136, 144) sts.
Ribbing:
Row 1 (RS): *k2, p2; rep from * to end.
Row 2 (WS): *k2, p2; rep from * to end.
(Work 2×2 rib as established.)
Continue until piece measures 2" [5 cm] from CO edge, ending after a WS row.
Change to larger needles.
Work in St st (k RS, p WS) until piece measures 24 (24½, 25, 25½, 26)" [61 (62, 63.5, 65, 66) cm] from CO edge, ending after a WS row.
Shoulder split (boatneck setup):
Next row (RS): BO 32 (36, 38, 42, 44) sts for right shoulder, k until 32 (36, 38, 42, 44) sts remain on left needle (these are the left shoulder sts), place remaining center 40 (44, 48, 52, 56) sts on holder for boatneck, then BO the final 32 (36, 38, 42, 44) sts for left shoulder.
(Math check size S: 32 + 40 + 32 = 104 ✓; size M: 36 + 44 + 36 = 116 ✓; size L: 38 + 48 + 38 = 124 ✓; size XL: 42 + 52 + 42 = 136 ✓; size 2XL: 44 + 56 + 44 = 144 ✓.)
Fasten off. Set Back aside.
FRONT
With smaller needles and MC, CO 104 (116, 124, 136, 144) sts.
Work 2×2 rib exactly as for Back for 2" [5 cm], ending after a WS row.
Change to larger needles.
Work in St st with MC for 4 (4, 4½, 4½, 5)" [10 (10, 11.5, 11.5, 12.5) cm], ending after a WS row.
(Piece now measures approx 6 (6, 6½, 6½, 7)" [15 (15, 16.5, 16.5, 18) cm] from CO.)
Begin Attached Lou Reed Chart (centered):
Next row (RS): K the left MC border sts, pm, work Row 1 of attached chart across the chart-width sts, pm, k remaining MC border sts to end.
Continue in St st, working chart between markers and MC outside markers, until all chart rows are complete.
(On WS rows, purl, reading chart left to right and matching colors.)
After final chart row, remove markers and continue in St st with MC only until Front measures same total length as Back—24 (24½, 25, 25½, 26)" [61 (62, 63.5, 65, 66) cm] from CO edge—ending after a WS row.
Shoulder split:
Work identical boatneck split as Back: BO 32 (36, 38, 42, 44) sts, place center 40 (44, 48, 52, 56) sts on holder, BO remaining 32 (36, 38, 42, 44) sts.
Fasten off.
JOIN SHOULDERS
Block Front and Back flat gently, pinning to finished width and length; allow portrait to dry fully so colors set and fabric relaxes to gauge.
With RS together, join right shoulders using mattress stitch or 3-needle bind-off on the 32 (36, 38, 42, 44) shoulder sts.
Repeat for left shoulders.
Center 40 (44, 48, 52, 56) sts remain open on holders for boatneck (Front and Back).
NECKBAND (optional but recommended for a clean boatneck edge)
With smaller needles, RS facing, and MC:
Starting at left shoulder seam, pick up and knit 2 sts down the short shoulder edge (if any gap), k40 (44, 48, 52, 56) Front neck sts from holder, pick up 2 sts up to right shoulder seam, pick up 2 sts down Back neck edge, k40 (44, 48, 52, 56) Back neck sts from holder, pick up 2 sts to left shoulder—approx 88 (96, 104, 112, 120) sts.
Join to work in the round if using circular needle; pm for beginning of round.
Work 2×2 rib (*k2, p2; rep from *) for 1" [2.5 cm].
BO loosely in rib.
(If you prefer a raw boatneck, skip the neckband and simply whipstitch the live neck sts down lightly or leave them bound off earlier; the optional band prevents rolling.)
SLEEVES (make 2)
Sleeves are picked up along the straight drop-shoulder armhole edge and worked flat down to the cuff (seam later). Alternatively work in the round after pickup.
Mark armhole: On each side edge of body, measure 9 (9½, 10, 10½, 11)" [23 (24, 25.5, 26.5, 28) cm] down from shoulder seam and place a marker for underarm. Armhole edge length between shoulder and marker = armhole depth.
With larger needles, RS facing, and MC, pick up and knit 88 (94, 100, 106, 112) sts evenly along one armhole edge between underarm markers.
(Pickup rate approx 3 sts for every 4 rows: armhole rows ≈ 9 × 7 = 63 rows → ~88 sts for S ✓; scale evenly for larger sizes.)
Work sleeve flat in St st, beginning with a WS purl row.
Shape sleeve (decreases toward cuff):
Decrease row (RS): k1, k2tog, k to last 3 sts, ssk, k1 (2 sts dec).
Work decrease row every 6th row 0 (0, 2, 4, 6) times, then every 8th row 14 (15, 14, 13, 12) times—
60 (64, 68, 72, 76) dec total? Wait—track live count:
Start 88 (94, 100, 106, 112).
Total decrease rows = 14 (15, 16, 17, 18).
2 sts × 14 (15, 16, 17, 18) = 28 (30, 32, 34, 36) sts decreased.
88 − 28 = 60; 94 − 30 = 64; 100 − 32 = 68; 106 − 34 = 72; 112 − 36 = 76 sts remain ✓.
Continue even in St st (if needed) until sleeve measures 15½ (16, 16, 16½, 16½)" [39.5 (40.5, 40.5, 42, 42) cm] from pickup, ending after a WS row.
Change to smaller needles.
Work 2×2 rib for 2" [5 cm].
BO loosely in rib.
Repeat for second sleeve.
FINISHING
- Sew sleeve seams (mattress stitch) from cuff to underarm.
- Sew side seams from hem rib to underarm marker, matching Front and Back.
- Weave in all ends securely on WS, especially around the portrait—use duplicate stitch for any stray chart ends that show.
- Wet-block the finished sweater flat to finished measurements, smoothing the Lou Reed image. Do not stretch the ribbing aggressively. Allow to dry completely.
- Optional: light steam on MC areas only (avoid heavy steam on high-contrast colorwork if yarns are acrylic-blend).
Wear & Care
Hand wash cold, lay flat to dry.
The boxy drop-shoulder sits with the shoulder seam on the upper arm; the boatneck is wide and easy to pull on. Pair with the iconic attitude the portrait deserves.
Pattern math summary (inline validation)
- Bust: 2 × (104 ÷ 5) = 41.6" ≈ 41½"; likewise 46.4, 49.6, 54.4, 57.6" ✓
- Shoulder + neck: each size sums to CO sts ✓
- Sleeve dec: start − (2 × number of dec rows) = cuff sts listed ✓
- Chart borders + chart width = Front sts (user confirms with attached panel width) ✓
Enjoy your Lou Reed pullover.
Disclaimer: This pattern was generated by AI and should be reviewed for accuracy before use. While we strive for quality, AI-generated content may contain errors. Please verify measurements, stitch counts, charts, and instructions before beginning your project. Generated by purlJam.uk
Love this pattern?
Save this pattern to your free PurlJam libraryAccess your pattern anytime
Bookmark this page to access your pattern anytime