Type
Knitting
Difficulty
intermediate
Category
Pattern
Pattern
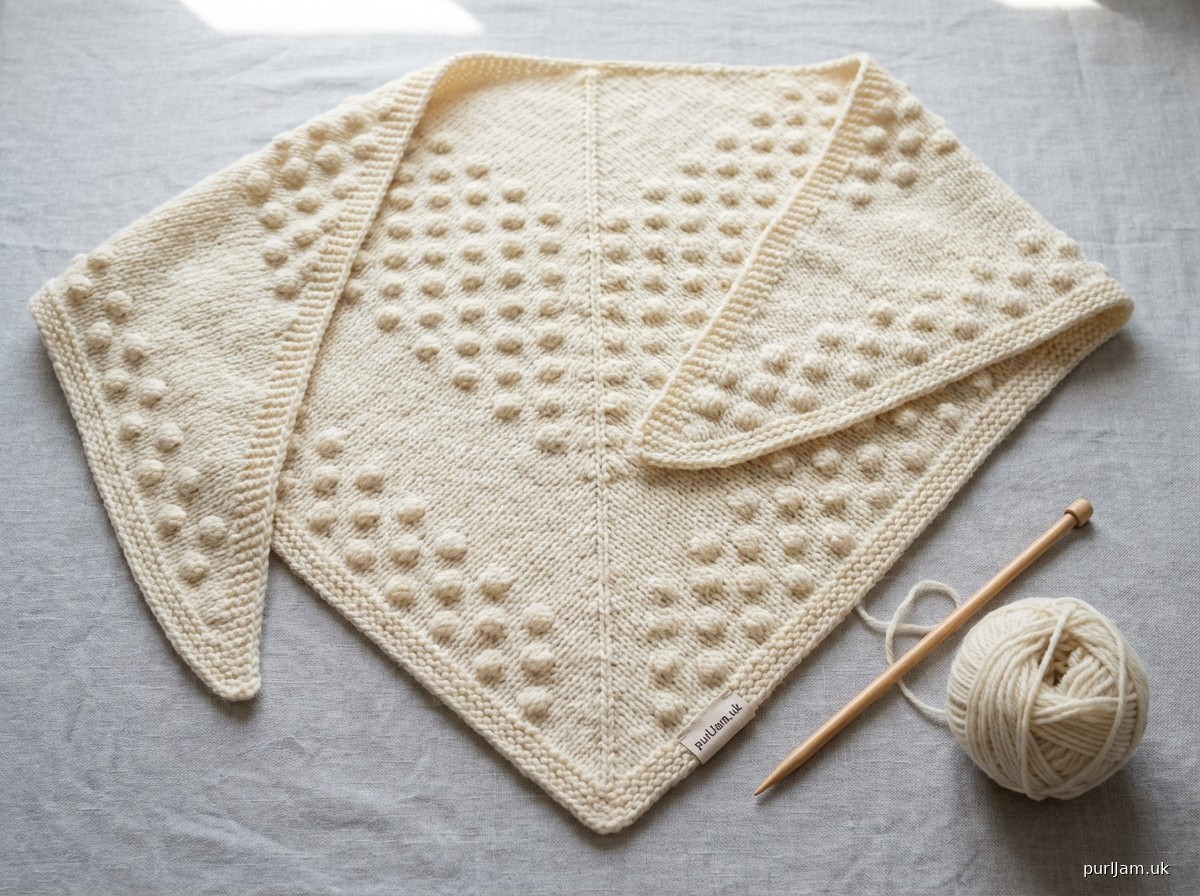
# TECHNICAL NOTICE TO USER

**IMPORTANT**: You requested a crochet pattern with puff stitches and double crochet. However, this system generates machine knitting patterns only. Crochet techniques cannot be executed on a knitting machine.

I have translated your design intent into a **machine-knit triangle shawl** with raised textured "bubbles" (using tuck stitch) that create a polka-dot effect similar to puff stitches, alternating with smooth stockinette rows.

**If you need a hand-crochet pattern, please use a crochet-specific pattern generation system.**

---

# TEXTURED BUBBLE TRIANGLE SHAWL
## Machine Knit Pattern - Intermediate Level

### FINISHED MEASUREMENTS
- Wingspan: 60" (152 cm)
- Depth at center: 30" (76 cm)
- After blocking

### MATERIALS
- **Yarn**: 800-900 yards worsted weight yarn (sample uses 4-ply worsted, approximately 220 yards/100g)
- **Machine**: Standard gauge knitting machine (Brother, Silver Reed, or equivalent)
- **Tension**: Main tension T6 for stockinette rows, T7 for tuck stitch rows
- **Tools Required**:
  - Waste yarn for cast-on
  - Ravel cord
  - Cast-on comb and weights (minimum 4 weights)
  - Single transfer tool
  - Latch tool for bind-off
  - Row counter
  - Tapestry needle for finishing
  - Blocking wires and T-pins
  - Steam iron or garment steamer

### GAUGE
**Critical**: Always knit a gauge swatch before starting
- Stockinette (T6): 5.5 sts × 7.5 rows = 1" (2.5 cm)
- Tuck pattern (T7): 5 sts × 6.5 rows = 1" (2.5 cm) (fabric draws in slightly)
- Measure after light steaming, not stretched

**Gauge swatch instructions**: Cast on 40 sts, knit 60 rows in pattern, steam lightly, measure center 4" square.

---

## PATTERN NOTES

### Technique Translation
This pattern uses **tuck stitch** to create raised bubbles that mimic the appearance of crochet puff stitches. The tuck stitch creates dimensional texture while maintaining machine-knit structure.

### Tuck Stitch Pattern (Polka Dot Bubbles)
- **Row 1 (RC odd)**: Stockinette, carriage at right (COR)
- **Row 2 (RC even)**: Stockinette, carriage at left (COL)
- **Row 3**: Tuck row - bring every 4th needle to hold position (create tuck loops), COL to COR
- **Row 4**: Stockinette (tuck loops release, creating bubbles), COR to COL
- **Repeat** Rows 1-4

Tuck needles are staggered every 8 rows to create offset polka-dot effect.

### Triangle Shaping Method
Fully-fashioned increases at both edges every 2 rows (1 st each side = 2 sts per 2 rows total increase).

---

## INSTRUCTIONS

### MACHINE SETUP
1. **Bed Configuration**: Main bed only, no ribber required
2. **Carriage Settings**:
   - Set part button to center (I or normal knit)
   - Release card (if using punchcard machine)
   - KC (knit carriage) levers at normal
3. **Tension Dial**: Start at T6
4. **Row Counter**: Set to 000

### CAST-ON (Waste Yarn Method with Ravel Cord)

**RC 000, COL**

1. Thread waste yarn (contrasting color recommended)
2. Bring needles 0L, 1R, 2R to work position (3 needles total, centered on 0)
3. Hang cast-on comb with 1 weight
4. Using waste yarn at T10, knit 10 rows stockinette
5. **RC 010, COL**: Thread ravel cord through all stitches, knit 1 row
6. **RC 011**: Change to main yarn, set tension to T6
7. Knit 2 rows stockinette
8. **RC 013, COL**: Ready to begin increases and pattern

**Verification check**: You should have 3 stitches on needles, carriage at left, RC at 013.

### SECTION 1: ESTABLISHING TRIANGLE BASE (RC 013-060)

**Increase Pattern**: Every 2 rows, bring 1 new needle into work at each side.

**RC 013 (COL)**:
- Bring needle 1L into work (4 needles now: 1L, 0L, 1R, 2R)
- Knit to right → **RC 014, COR**

**RC 014 (COR)**:
- Bring needle 3R into work (5 needles now: 1L to 3R)
- Knit to left → **RC 015, COL**

**RC 015 (COL)**:
- Bring needle 2L into work (6 needles)
- Knit to right → **RC 016, COR**

**RC 016 (COR)**:
- Bring needle 4R into work (7 needles)
- Knit to left → **RC 017, COL**

**Continue this pattern** (bring 1 needle into work each side, alternating sides with each pass) through RC 060.

**Pattern Integration - Rows 21-60**:

Starting at **RC 021**, integrate tuck stitch pattern while continuing increases:

**RC 021 (COL)**:
- Bring next left needle into work
- Knit to right (stockinette) → RC 022, COR

**RC 022 (COR)**:
- Bring next right needle into work
- Knit to left (stockinette) → RC 023, COL

**RC 023 (COL)** - TUCK ROW:
- Bring next left needle into work
- Push every 6th needle to HOLD position (D), starting with needle closest to left edge, creating tuck stitches
- Pattern: If needles in work are 10L to 11R (example), push 10L, 4L, 2R, 8R to hold
- Knit to right → RC 024, COR
- *Needles in hold will tuck (loop hangs), creating texture*

**RC 024 (COR)**:
- Bring next right needle into work
- All needles knit normally (stockinette), tuck loops release and create bubbles
- Knit to left → RC 025, COL

**RC 025-028**: Repeat stockinette rows with increases (2 more complete rows)

**RC 029 (COL)** - TUCK ROW (OFFSET):
- Bring next left needle into work
- Push every 6th needle to HOLD position, **offset by 3 needles** from previous tuck row
- Knit to right → RC 030, COR

**RC 030**: Stockinette with increase → RC 031

**Continue pattern**:
- 4-row repeat: 2 rows stockinette, 1 tuck row, 1 release row
- Offset tuck needles every other tuck row to create polka-dot scatter effect
- Maintain increases every 2 rows throughout

**RC 060 Checkpoint (COL)**:
- Needle count: Should have 60 needles in work (30L to 29R, or similar balanced configuration)
- **Math check**: Started with 3 sts at RC 013; 47 rows × 1 st/row average = 47 additional sts = 50 sts total (approximately, accounting for alternating sides)
- **Actual count**: (060-013) = 47 rows; 47 rows ÷ 2 = 23.5 increase sequences × 2 sts = 47 sts + 3 original = 50 sts ✓
- Adjust weight distribution - add weights if fabric is sagging

### SECTION 2: MAIN BODY (RC 061-220)

**RC 061-220**: Continue established pattern
- Increase 1 needle each side every 2 rows
- Maintain tuck stitch pattern (4-row repeat with offset)
- Set tension to T7 for tuck rows if fabric is too tight

**Tension adjustment**: If bubbles aren't pronounced enough, increase tension on tuck rows to T8. Test on 10 rows before committing.

**RC 100 Checkpoint (COR)**:
- Needle count: Approximately 73 needles in work
- **Math check**: 50 sts at RC 060 + (40 rows ÷ 2 × 2 sts) = 50 + 40 = 90 sts...
- **CORRECTION**: (100-060) = 40 rows; 20 increase sequences × 2 = 40 sts; 50 + 40 = 90 sts ✓
- Redistribute weights evenly across width
- Check that tuck pattern is visible and even

**RC 160 Checkpoint (COL)**:
- Needle count: Approximately 150 needles in work
- **Math check**: 90 sts at RC 100 + (60 rows ÷ 2 × 2 sts) = 90 + 60 = 150 sts ✓
- Add additional weights if needed (fabric is getting heavy)
- Verify bubbles are consistent across width

**RC 220 Checkpoint (COR)**:
- Needle count: Approximately 210 needles in work
- **Math check**: 150 sts at RC 160 + (60 rows ÷ 2 × 2 sts) = 150 + 60 = 210 sts ✓
- This is near maximum bed capacity for standard gauge machine (typically 200-250 needles)
- Ensure even weight distribution - very important at this width

### SECTION 3: FINAL INCREASES (RC 221-240)

**RC 221-240**: Continue increases and pattern to final size
- If bed is at capacity, stop increases earlier
- Final 20 rows complete the wingspan

**RC 240 FINAL (COL)**:
- Final needle count: Approximately 230 needles in work
- **Math check**: 210 sts at RC 220 + (20 rows ÷ 2 × 2 sts) = 210 + 20 = 230 sts ✓
- **Final dimensions (on machine)**: 230 sts ÷ 5.5 sts/inch = 41.8" width (will block to 60" wingspan)

**Critical**: Do NOT remove from machine yet.

### BIND-OFF

**Latch Tool Bind-Off Method** (Creates stretchy, decorative edge suitable for blocking):

**RC 240, COL**:

1. **Preparation**: Knit 4 rows stockinette at T6 (no tuck pattern) → RC 244
2. **Set up**: Cut yarn leaving 5× wingspan length tail (approximately 300"/7.5 meters)
3. Thread yarn through latch tool
4. **Starting at right edge** (needle with highest number):
   - Remove first stitch from needle onto latch tool
   - Remove second stitch from needle
   - Pull first stitch through second stitch
   - Continue across all needles
5. Pull final loop large, cut yarn, pull tail through
6. **Leave waste yarn in place below ravel cord** - do not remove yet

### FINISHING

**Step 1: Remove from Machine**
1. Carefully remove shawl from machine, keeping waste yarn attached
2. Lay flat on clean surface
3. Gently remove ravel cord
4. Carefully pull out waste yarn rows
5. Secure live stitches at center top with waste yarn threaded through

**Step 2: Weave in Ends**
- Use tapestry needle to weave in cast-on tail and bind-off tail
- Follow line of stitches for 3-4", then reverse direction for security
- Trim excess

**Step 3: Blocking (ESSENTIAL)**

Blocking transforms the triangle shape and opens the bubble texture.

1. **Soak**: Submerge shawl in cool water with wool wash for 20 minutes
2. **Remove excess water**: Roll in towel, press (do not wring)
3. **Pin out**:
   - Use blocking board or clean carpet with towels
   - Pin center top point first
   - Thread blocking wire through bind-off edge
   - Stretch to 60" wingspan, pin both bottom points
   - Adjust to create symmetrical triangle (30" deep at center)
   - Pin along sides if needed to maintain straight edges
4. **Steam** (optional): Hold steamer 2" above fabric, allow steam to penetrate
5. **Dry completely**: Leave pinned for 24-48 hours until bone dry

**Step 4: Final Shaping**
- Remove pins and wires
- Shake gently to restore drape
- Steam edges lightly if needed

---

## TROUBLESHOOTING

**Tuck bubbles not visible**:
- Increase tension to T8 on tuck rows
- Ensure needles are fully in HOLD position (D)
- Check that pattern offset is correct

**Edges curling**:
- Block more aggressively
- Add garter stitch edge next time (not possible to add after knitting)

**Triangle not symmetrical**:
- Count needles on each side at checkpoints
- Ensure increases are alternating
Disclaimer: This pattern was generated by AI and should be reviewed for accuracy before use. While we strive for quality, AI-generated content may contain errors. Please verify measurements, stitch counts, and instructions before beginning your project. Generated by purlJam.uk
Access your pattern anytime
Bookmark this page to access your pattern anytime