Type
Machine Knitting
Difficulty
intermediate
Category
custom
AI Thinking Process
Planning
Verification
Pattern
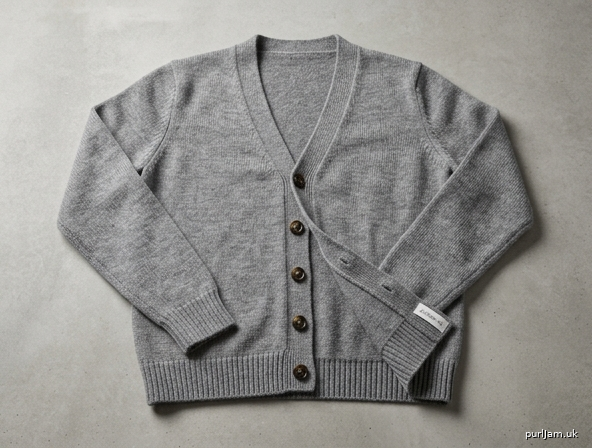
Machine-Knit V-Neck Cardigan (DK)
A classic open-front V-neck cardigan with set-in sleeves, knitted entirely on a standard-gauge machine. Intermediate level: uses hold (partial knitting) for shaping, simple transfers, and optional ribber. Finished with machine-knit button and neck bands.
Materials
- Yarn: DK weight (approx. 11 wpi), 950 (1050, 1150, 1300, 1450) m. Smooth wool or wool-blend recommended for clear stitch definition and easy blocking.
- Machine: Standard gauge (4.5 mm) punchcard or electronic. Ribber optional (for true 1×1 rib); pattern also gives mock-rib/hand-transferred alternative.
- Tools: Cast-on comb, ravel cord, weights, transfer tool, latch tool, garter bar (optional), tapestry needle, stitch markers or claw weights, 6–7 buttons 15–18 mm.
- Notions: Waste yarn, row counter.
Tension / Gauge
- Main tension: T7 (stocking stitch) → 24 sts and 34 rows = 10 cm after light steaming/blocking.
- Rib tension: T5 / T5 (or T4 if mock rib feels loose).
- Always knit a 40-st × 60-row swatch, wash/block exactly as finished garment, and adjust tension dial before starting. Change of 1 full tension number ≈ 1 st / 10 cm.
Sizes
Women’s XS (S, M, L, XL)
- Finished bust (buttoned): 90 (100, 110, 120, 130) cm
- Back width: 45 (50, 55, 60, 65) cm
- Length to shoulder: 57 (58, 60, 61, 63) cm
- Sleeve length to underarm: 45 cm (all sizes; adjustable)
- Upper arm: 36 (38, 40, 43, 46) cm Shown in size M. Choose size with 8–10 cm positive ease over actual bust.
Abbreviations & Machine Terms
- COR / COL: carriage on right / left
- RC: row counter
- T#: tension dial setting
- N: needle(s)
- WP: working position
- NWP: non-working position
- HP: holding position
- EON: every other needle
- CO: cast on
- BO: bind off
- sts: stitches
- dec / inc: decrease / increase
- HH: holding (partial knitting)
- 0: reset row counter
- FNR: full needle rib (ribber)
- SS: stocking stitch (main bed only, plain knit)
Carriage settings default to plain knit (both side levers forward, Russell levers in N, cams for stockinette) unless noted.
Pattern Notes
- Knit all pieces flat on main bed unless ribber is specified.
- Always use weights evenly; move them up every 20–30 rows.
- Selvedge: keep end needles in WP; use claw weights on edges during hold shaping.
- When holding, set carriage to hold (partial knit) position so it knits only needles in WP.
- Neck and armhole edges are left live or on waste for clean seaming/rehanging.
- Buttonholes are worked on the right front band; place markers on body to align later.
- Electronic machines: no patterning required; punchcard users simply leave card out or set to plain.
- All measurements assume blocked gauge. Re-measure after blocking pieces before seaming.
Instructions
BACK
Machine set-up: Main bed only. Carriage COR. T7. Waste yarn + ravel cord CO.
- Push 110 (122, 134, 146, 158) N to WP. CO with waste yarn and ravel cord. Knit 6–8 rows waste. COR. 0 RC.
- Change to main yarn. Knit 1 row to right (this is the first garment row).
Optional ribber hem: After waste, set ribber for 1×1 FNR, T5/T5, transfer EON to ribber, knit 20 rows rib, transfer all sts back to main bed, change to T7, proceed.
Mock-rib alternative: Knit 20 rows SS at T5, then pick up every other sinker-loop from CO edge onto empty N and knit them together with live sts (creates folded mock 1×1). Return to T7. - RC 000. Knit straight in SS to RC 130 (38 cm to underarm). COR.
- Shape armholes (HH method):
- Place 5 (6, 7, 8, 9) N at left into HP. Knit 1 row (COL).
- Place 5 (6, 7, 8, 9) N at right into HP. Knit 1 row (COR).
- Now dec 1 st at each armhole edge every 2 rows (return 1 N from HP to WP on each side and transfer the adjacent end st onto it, or simply push 1 N fully out of work and knit across remaining) 5 (6, 6, 7, 7) times.
- Then dec 1 st each side every 4 rows 2 (2, 3, 3, 4) times.
Stitches remaining: 88 (94, 102, 108, 116).
RC will read approx. 130 + 20–28 = 150–158 depending on size. Continue until armhole depth measures 19 (20, 21, 22, 23) cm from first hold row (total RC ≈ 195 (200, 205, 210, 215)). COR.
- Shape shoulders & neck (short-row / hold):
Place centre 28 (30, 32, 34, 36) N into HP for neck.
Working right shoulder only:- Hold outer 6 (7, 8, 8, 9) N, knit to neck, wrap, knit back.
- Hold next 6 (7, 7, 8, 8) N, knit to neck, wrap, knit back.
- Hold remaining shoulder sts, knit 1 row to neck.
- Scrap off right shoulder 30 (32, 35, 37, 40) sts onto waste.
- Rejoin yarn at left neck edge and mirror for left shoulder.
- Scrap centre neck sts onto waste or leave on needles for later pick-up.
Back complete. Remove from machine.
LEFT FRONT
- CO 55 (61, 67, 73, 79) N same method as back. Rib or mock-rib 20 rows as Back. T7, RC 000.
- Knit straight to RC 130. COR. Place marker for start of V-neck.
- Shape armhole (right edge of piece when COR) and V-neck (left edge) simultaneously:
- Armhole: identical holds/decs as Back right armhole — first hold 5 (6, 7, 8, 9) N at armhole edge, then dec 1 st at armhole edge every 2 rows 5 (6, 6, 7, 7) times, then every 4 rows 2 (2, 3, 3, 4) times.
- V-neck: at the same time, dec 1 st at neck edge every 3 rows 14 (15, 16, 17, 18) times, then every 4 rows 4 (4, 5, 5, 6) times.
(Use transfer tool: move end neck st one needle inward and empty the outer needle.)
When armhole shaping is finished, continue neck decs only until 30 (32, 35, 37, 40) sts remain.
Work until armhole matches Back depth (same RC).
- Shape shoulder with short rows exactly as Back right shoulder. Scrap off.
Left Front complete.
RIGHT FRONT
Mirror of Left Front.
CO same number of N. Work rib.
At RC 130 begin armhole holds on left edge of piece and V-neck decs on right edge.
Place 6 buttonhole markers on the centre-front edge spaced evenly from 2 cm above rib to start of V-neck (approx. every 6–7 cm). These are visual guides only; actual buttonholes are worked later on the band.
Finish shoulder to match. Scrap off.
SLEEVES (make 2)
- CO 56 (58, 60, 64, 68) N. Rib or mock-rib 20 rows at T5. Change to T7, RC 000.
- Knit 4 rows.
Inc for sleeve shaping: Inc 1 st each end of next row, then every 6 rows 0 (0, 2, 4, 6) times, then every 8 rows 14 (15, 14, 13, 12) times.
Method: bring empty N into WP at each end and pick up the purl bump from the row below to create a clean lifted increase.
Total sts: 86 (90, 96, 102, 110).
Continue straight until RC 154 (45 cm from end of rib) or desired length to underarm. COR. - Shape sleeve cap (HH):
- Hold 5 (6, 6, 7, 8) N each side. Knit 2 rows.
- Then hold 1 N each side every 2 rows 12 (13, 14, 15, 16) times.
- Then hold 2 N each side every 2 rows 4 (4, 5, 5, 6) times.
- BO remaining 28 (28, 28, 30, 30) centre sts.
Scrap any remaining held sts or knit them off onto waste for seaming ease.
Cap height should measure approx. 14 (15, 16, 17, 18) cm.
Sleeve complete. Make second identical.
BUTTON BAND, BUTTONHOLE BAND & NECKBAND
Option A – Ribber (preferred)
- With right side facing, rehang entire right-front centre edge onto needles at a rate of 3 sts for every 4 rows of body (approx. 110–130 N depending on size). Include rib section.
- Set for 1×1 FNR, T5/T5. Knit 12 rows.
- Buttonholes (right band only): On row 6, work 6–7 buttonholes spaced to match markers. Method: transfer 2 adjacent sts to neighbouring needles, leave 2 N empty, cast on 2 new sts over the gap on the next row (or use your machine’s preferred 2-st buttonhole).
- Knit remaining 6 rows. Transfer all ribber sts to main bed. Latch-tool BO or use linker.
- Repeat for left front (no buttonholes).
- Neckband: Rehang left-front neck edge, back neck, right-front neck edge continuously (approx. 120–150 N). Same 1×1 rib, 10–12 rows, BO.
Option B – No ribber (main bed only)
- Rehang edges the same way. Knit 6 rows T5.
- Make buttonholes as above on row 3 of right band.
- Knit 6 more rows. BO with latch tool around gate pegs for a firm edge, or use a hung hem finish.
Finishing
- Block all pieces to measurements given in Sizes section. Steam lightly on WS or wet-block; pin out and dry flat. Do not stretch ribs.
- Join shoulder seams: mattress stitch or rehang both shoulders on machine and bind off together.
- Set in sleeves: match centre cap to shoulder seam, ease cap into armhole, mattress stitch.
- Join side and sleeve seams in one continuous mattress stitch.
- Sew bands in place if knitted separately (or they are already attached if rehung).
- Sew buttons to left band opposite buttonholes.
- Weave in all ends. Final light steam on seams.
Tips for Success
- Reset RC at every major section start and write the target RC on a sticky note on the machine.
- When holding many needles, use additional claw weights on the held section to prevent flares.
- If your machine has a knit-in elastic setting, a single strand of clear elastic in the rib cuffs and bands improves recovery.
- Try the cardigan on after seaming one sleeve to check armhole depth before finishing the second.
- Lengthen or shorten body by adding/subtracting rows before RC 130; alter sleeves before cap shaping. Keep any changes equal on both fronts and back.
Enjoy your new machine-knit cardigan!
Disclaimer: This pattern was generated by AI and should be reviewed for accuracy before use. While we strive for quality, AI-generated content may contain errors. Please verify measurements, stitch counts, charts, and instructions before beginning your project. Generated by purlJam.uk
Love this pattern?
Save this pattern to your free PurlJam libraryAccess your pattern anytime
Bookmark this page to access your pattern anytime