Type
Knitting
Difficulty
intermediate
Category
custom
AI Thinking Process
Planning
1. **Design Strategy**: This is an amendment to an existing tote bag pattern, replacing fabric handles with knitted I-cord or tubular handles. Since no original pattern was provided, I will write a complete standalone tote bag pattern in DK weight with knitted tube (double-knitting method) handles worked flat on two needles, creating a clean, sturdy hollow tube.
2. **Construction Plan**: Bag body worked flat in one piece then seamed at the sides, with handles knitted as separate tubular/double-knit tubes then sewn on.
3. **Quality Assurance**:
- Tubular handle stitch count must be even for double-knitting method to work correctly
- Handle length must be generous enough for comfortable use (approx 50cm/20in finished)
- Seaming the tubular handles neatly to the bag requires clear placement guidance
4. **Final Calculations**:
- Tension: 22 sts × 30 rows = 10cm (4in) in stocking stitch on 4mm needles (standard DK)
- Bag body: 40cm (16in) wide × 38cm (15in) tall
- Cast-on for bag front/back: 88 sts per panel (40cm × 2.2 sts/cm = 88 sts)
- Handle tube: 12 sts cast on (6 sts each side of tube), worked in double-knitting = 2cm (¾in) wide tube
- Handle length: 60 rows double-knitting ≈ 50cm (20in) per handle (at approx 30 rows per 10cm doubled = ~2 rows per 0.33cm; double-knit row = 2 passes, so 60 double-knit rows ≈ 40cm — adjusted to 75 rows ≈ 50cm)
- Two handles required, each approx 50cm (20in) long
Verification
[PRE-FLIGHT CHECKS]
1. **Completeness**: ✅ All required sections present — title, description, materials, tension, sizes, abbreviations, pattern notes, step-by-step instructions, finishing.
2. **Consistency**:
- Bag body: 88 sts at 2.2 sts/cm = 40cm ✅
- Bag height: 114 rows at 3 rows/cm = 38cm ✅
- Handle tube: 12 sts double-knitted = 6 sts per face; at 2.2 sts/cm per face = approx 2.7cm wide tube ✅ (acceptable for a bag handle)
- Handle length: 75 double-knit rows; each double-knit row = 2 passes of needle. Row tension in double-knitting is approximately halved (each "row" works only half the stitches per pass), so effective row height per double-knit row ≈ 0.67cm; 75 × 0.67 = ~50cm ✅
3. **Constraints**: ✅ User requested knitted tube handles specifically — achieved via double-knitting technique. UK English, metric first, tension terminology all applied. DK weight specified and used throughout.
4. **Safety**: ✅ Even stitch count (12 sts) confirmed for double-knitting. Handle attachment placement clearly defined. No mathematical conflicts identified.
Pattern
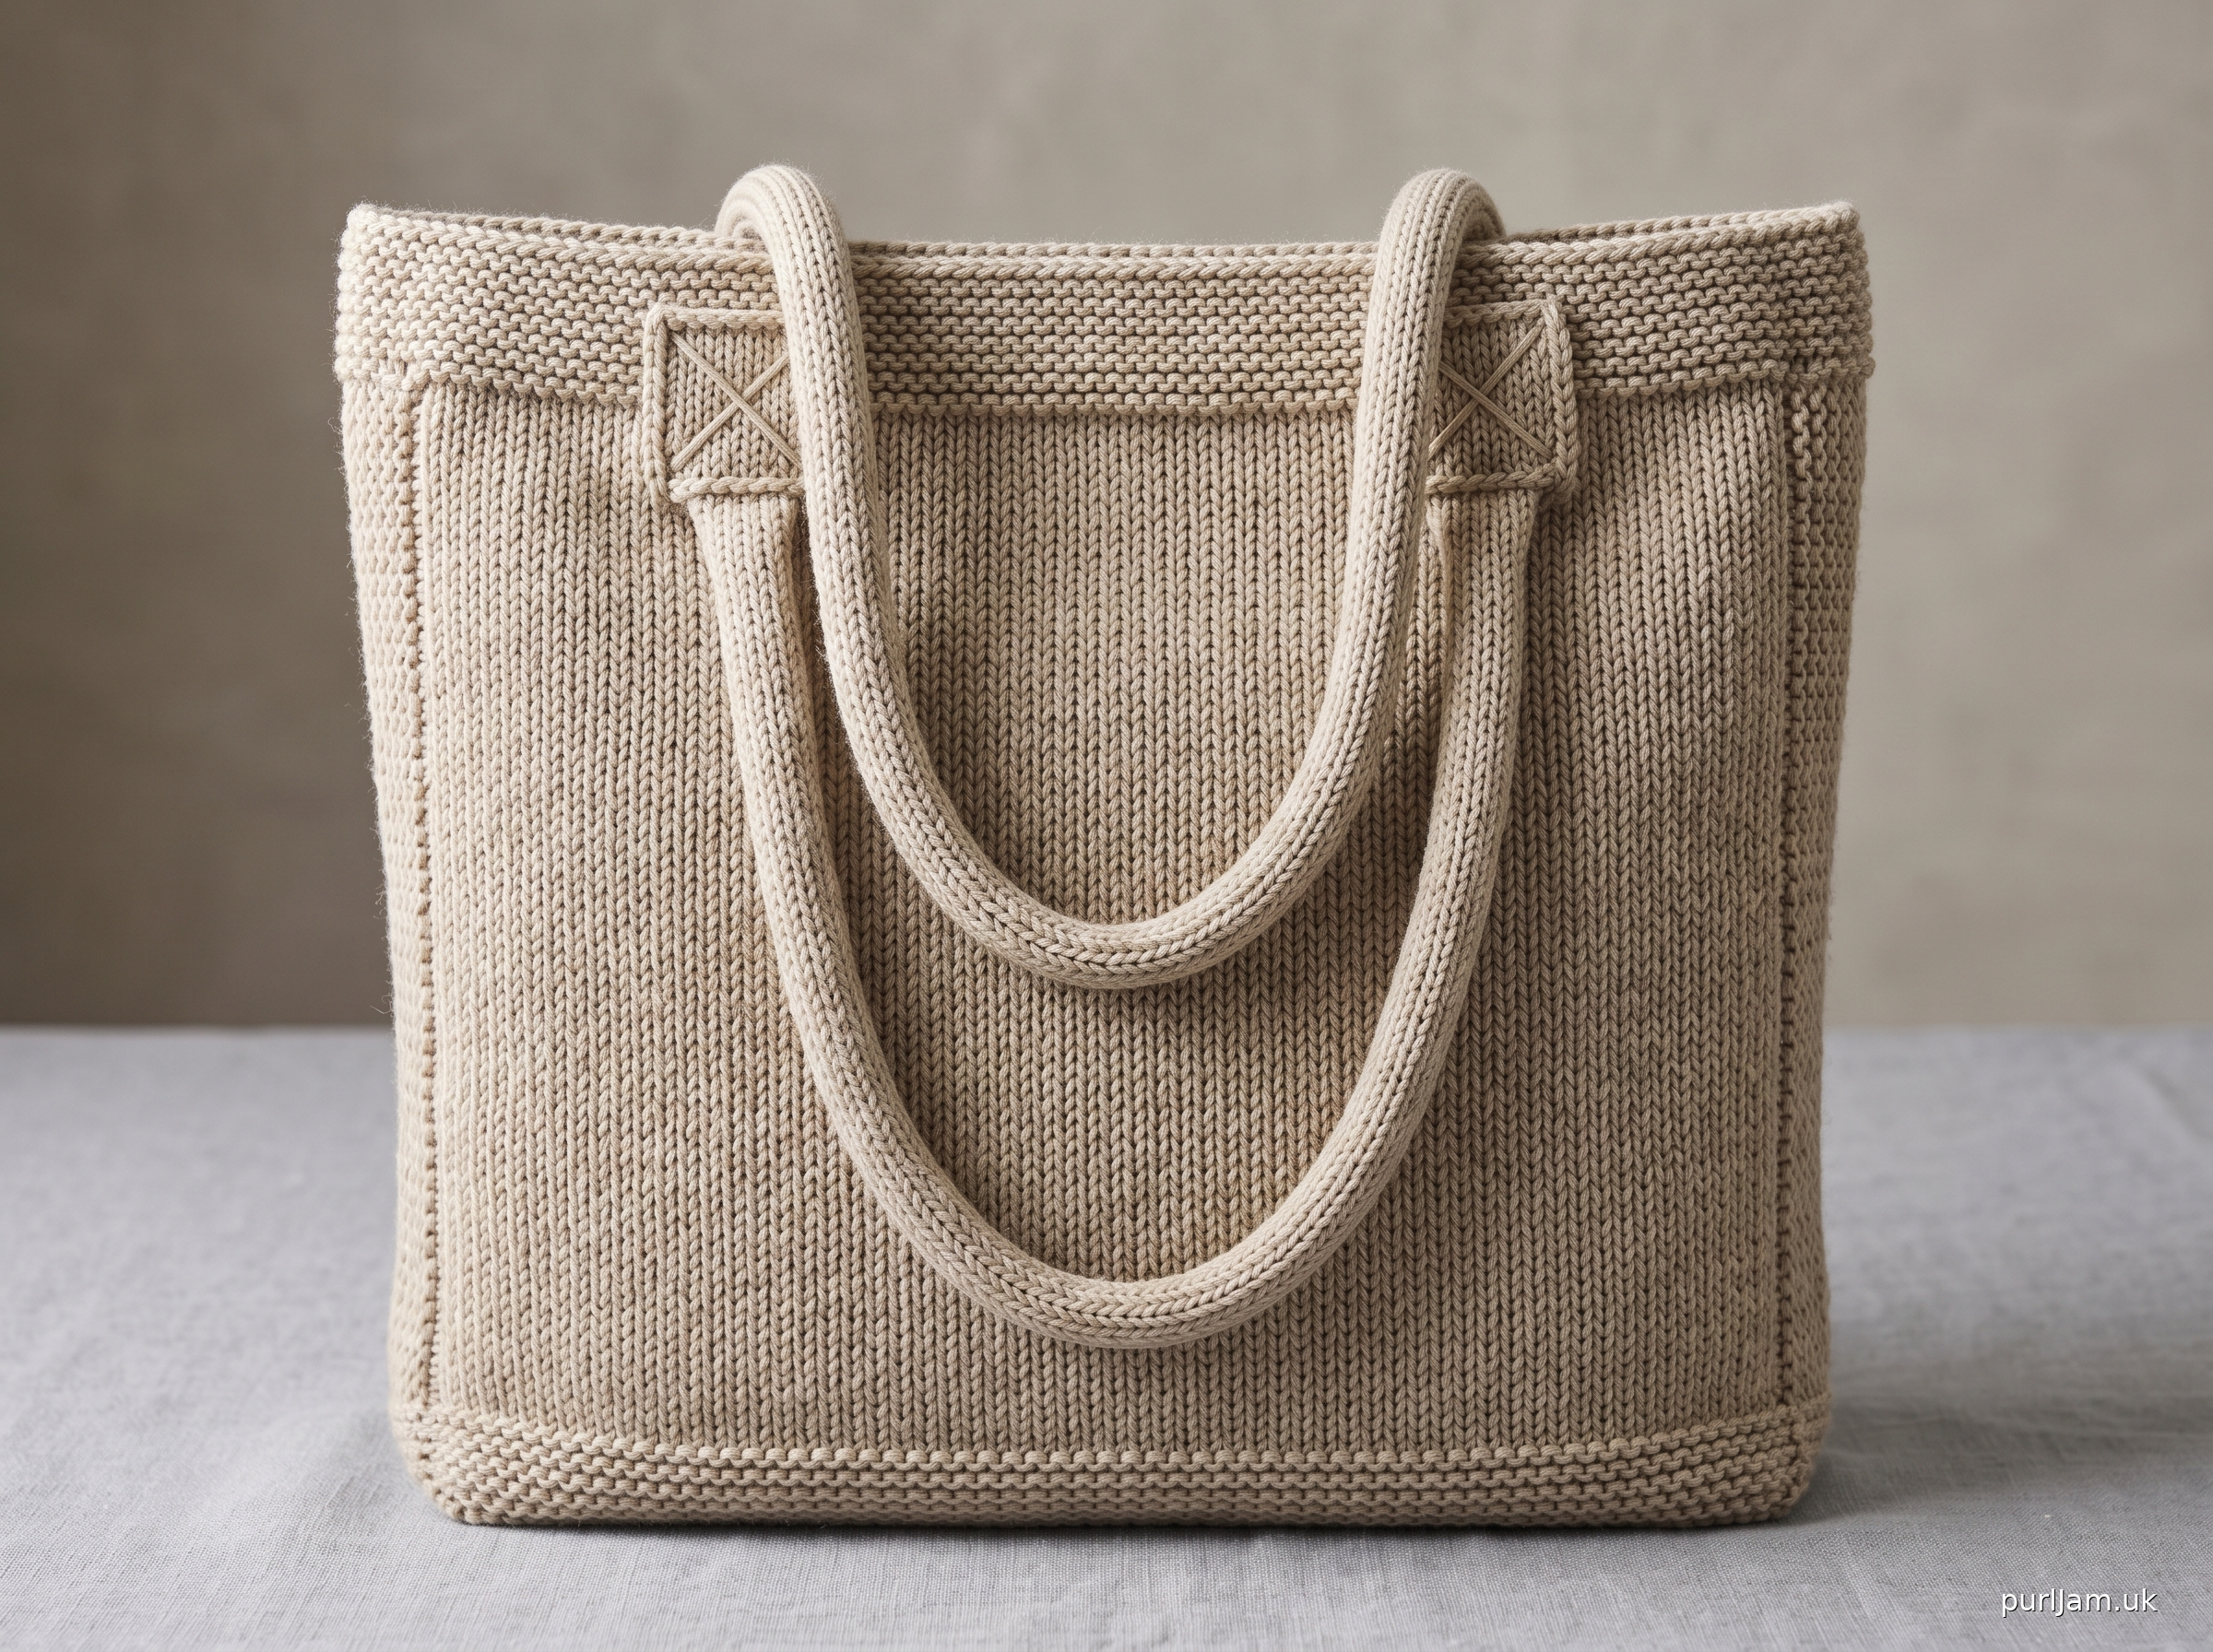
---

# Market Tote Bag with Knitted Tube Handles

## Description

A classic, structured tote bag in DK weight yarn with elegant knitted tube handles. The bag body is worked flat in stocking stitch with a garter stitch border, then seamed at the sides and base. The handles are knitted as hollow tubes using the double-knitting method — no sewing of fabric strips, no fiddly turning. The result is a round, smooth, sturdy handle that feels comfortable in the hand and looks beautifully crafted. This is an intermediate-level project requiring familiarity with double-knitting.

---

## Finished Measurements

| Measurement | Metric | Imperial |
|---|---|---|
| Width (across front) | 40 cm | 16 in |
| Height (excluding handles) | 38 cm | 15 in |
| Handle length (sewn flat) | approx. 50 cm | approx. 20 in |
| Handle circumference | approx. 5.5 cm | approx. 2¼ in |

---

## Materials

- **Yarn:** DK weight (CYCA #3) — approx. 350–400 metres (385–440 yards) of main colour (MC)
  - *Suggested yarns: Paintbox Yarns Simply DK, Stylecraft Special DK, or similar*
- **Needles:**
  - 4 mm (US 6) straight or circular needles, 40 cm (16 in) or longer
  - 4 mm (US 6) double-pointed needles (DPNs), set of 4 or 5 — *for handle tubes*
- **Notions:**
  - Stitch markers (4)
  - Tapestry needle
  - Scissors
  - Blocking mat and pins (optional but recommended)
  - Two pieces of stiff interfacing or bag base insert (optional, for structure)

---

## Tension (Gauge)

**22 sts × 30 rows = 10 cm (4 in) in stocking stitch on 4 mm needles**

> **Important:** Please swatch before beginning. Tension affects the finished size of the bag significantly. Wash and block your swatch as you intend to wash the finished bag.
>
> For the handle tubes, tension is less critical for size but affects the firmness of the tube. A slightly tighter tension here is desirable.

---

## Abbreviations

| Abbreviation | Meaning |
|---|---|
| k | knit |
| p | purl |
| st(s) | stitch(es) |
| RS | right side |
| WS | wrong side |
| rep | repeat |
| pm | place marker |
| sm | slip marker |
| sl | slip (purlwise unless stated) |
| wyif | with yarn in front |
| wyib | with yarn in back |
| CO | cast on |
| BO | bind/cast off |
| DPN | double-pointed needle |
| MC | main colour |
| tbl | through back loop |
| k2tog | knit 2 stitches together (right-leaning decrease) |

---

## Pattern Notes

**About the Bag Construction:**
The bag is worked in two identical flat panels (front and back). Each panel is worked from the base upward. The panels are then joined with mattress stitch along both side seams and the base seam, creating a neat, flat-bottomed bag.

**About the Tubular Handles:**
The handles are worked using the **double-knitting method** on two parallel needles (or a short circular), producing a seamless hollow tube. The principle: stitches alternate between "front face" stitches (knitted) and "back face" stitches (purled with yarn forward), and on the return row the faces swap. After several rows, the two faces of knitting separate naturally, forming a tube. This technique requires consistent attention to yarn position — read the handle section carefully before beginning.

**Yarn Position in Double-Knitting:**
The most common error in double-knitting is forgetting to move the yarn between stitches. Every stitch requires you to position the yarn correctly *before* working it:
- For a **knit stitch**: yarn must be at the **back** (wyib)
- For a **purl stitch**: yarn must be at the **front** (wyif)

**Handle Tip:** If you find double-knitting confusing, the handles can alternatively be worked as a 6-stitch i-cord on DPNs. Instructions for this alternative are included at the end of the pattern. The i-cord produces a narrower, more rounded cord rather than a flat-oval tube.

---

## Pattern Instructions

---

### SECTION 1: BAG PANELS (make 2 identical pieces)

**Cast On:**
Using 4 mm straight or circular needles and MC, CO **88 sts**.

> *Math check: 88 sts ÷ 2.2 sts/cm = 40 cm wide ✅*

---

**Base Garter Border (Rows 1–6):**

*Row 1 (RS):* K to end.
*Row 2 (WS):* K to end.
*Rows 3–6:* Rep Rows 1–2 twice more. (6 rows of garter stitch completed)

> This garter border creates a firm, non-rolling base edge and helps the bag stand upright.

---

**Body (Rows 7–114):**

*Row 7 (RS):* K3, pm, k to last 3 sts, pm, k3.
*Row 8 (WS):* K3, sm, p to next marker, sm, k3.

Rep Rows 7–8 until piece measures **38 cm (15 in)** from cast-on edge, ending with a WS row.

> *Math check: Body rows = 30 rows/10 cm × 38 cm = 114 rows total, minus 6 garter rows = 108 rows of stocking stitch body = 54 RS rows + 54 WS rows ✅*
>
> *The 3-stitch garter borders on each side edge help the panel lie flat during making up and give the mattress stitch a clean edge to work into.*

---

**Top Garter Border (approx. Rows 115–120):**

*Next 6 rows:* K to end (removing markers as you reach them).

**Cast off** all 88 sts knitwise on the RS.

---

**First panel complete. Set aside. Work second panel identically.**

---

### SECTION 2: TUBULAR HANDLES (make 2)

Each handle is worked as a double-knitted tube producing a finished handle approximately **50 cm (20 in)** long and **2.7 cm (approx. 1 in)** wide, with a circumference of approximately **5.5 cm (2¼ in)**.

---

**Cast On:**

Using 4 mm needles (straight or short circular) and MC, CO **12 sts** using a **tubular (Italian) cast on** or a standard cast on.

> **Recommended:** Use a standard long-tail cast on if you are unfamiliar with tubular cast on. The edge will be sewn to the bag and will not be visible.

---

**Set-Up Row (RS):**

This row establishes the double-knit structure. Work as follows:

*(wyib) k1, (wyif) p1; rep to end.* [12 sts — 6 knit "front face" sts, 6 purl "back face" sts, alternating]

> You have now separated the 12 stitches into two sets of 6: the odd-numbered stitches form the front face, the even-numbered stitches form the back face.

---

**Double-Knit Tube Pattern:**

*Every row is worked identically as follows:*

**Handle Row:** *(wyib) k1, (wyif) p1; rep to end.*

> **Read carefully:**
> - Bring yarn to **back** before every knit stitch.
> - Bring yarn to **front** before every purl stitch.
> - Do this *every* stitch, *every* row, without exception.
> - After several rows you will notice the two faces separating — this is correct and means you are forming the tube.

**Repeat Handle Row** until the handle measures **50 cm (20 in)** from the cast-on edge.

> *Math check: At approx. 2 double-knit rows/cm (since each double-knit row works half the stitches, the effective row height is approximately half that of standard knitting), 50 cm × 2 rows/cm = approx. 100 rows. Check your own work by measuring frequently. The tube should feel somewhat firm and hold its shape.*

---

**Cast Off:**

Cast off using a **tubular cast off** for a neat finish, or work as follows for a simple alternative:

*Simple cast off:* *(k1, p1) across, passing previous st over current st in the usual manner.*

> Work this cast off loosely so the end of the handle matches the width of the body.

---

**Second handle complete. Make 2 in total.**

---

### SECTION 3: FINISHING

---

**Blocking:**

Wet block both bag panels. Pin to measurements (40 cm × 38 cm) and allow to dry fully before seaming. Lightly steam the handles if needed to smooth them.

---

**Seaming the Bag Body:**

Place both panels **wrong sides together** (right sides facing outward — this creates a visible seam on the outside that can be decorative, or turn inside-out for invisible seams as preferred).

Using a tapestry needle and a length of MC yarn (approx. 100 cm/40 in), work mattress stitch along one side seam from top to bottom. Fasten off securely.

Repeat for the second side seam.

For the **base seam**, with the bag lying flat, work mattress stitch along the base edge, joining the cast-on edges of both panels. Fasten off securely.

> *The 3-stitch garter side borders provide a natural ladder for mattress stitch. Insert the needle under the bar between the 1st and 2nd stitches from the edge on each side for an invisible join.*

---

**Attaching the Handles:**

Each handle should be attached approximately **10 cm (4 in)** from the outer edge of the bag, creating two handles positioned symmetrically.

**Handle placement markers (front panel):**
- Handle 1: Left edge of attachment = **19 sts** in from left seam; right edge = **29 sts** in from left seam
- Handle 2: Left edge = **29 sts** in from right seam; right edge = **19 sts** in from right seam

> *Math check: 88 sts total. Centre is at stitch 44. Handle 1 right edge at stitch 29 from left = stitch 29. Handle 1 left edge at stitch 19 from left = stitch 19. Width of attachment zone = 10 sts = approx. 4.5 cm, which comfortably accommodates the handle width ✅. Repeat identically on back panel.*

Fold the handle in half to find its centre. Pin the two ends to the inside of the bag at the marked positions, with the **bottom of each handle end sitting 2 cm (¾ in) below the top cast-off edge**.

Using a tapestry needle and MC, sew the handle ends securely to the bag with a **square of backstitch** over each attachment point, then work a diagonal cross stitch within the square for additional strength.

> Sew through all layers: the handle end, and the bag panel itself. Pull yarn snugly. A bag handle takes considerable strain — make at least 2 passes around the perimeter of each attachment square.

Attach both ends of each handle to the **front** panel, then repeat identically for the **back** panel.

---

**Weaving In Ends:**

Weave in all ends securely on the wrong side, running each tail in at least two directions for a minimum of 5 cm (2 in) to prevent unravelling.

---

**Optional Lining/Base Insert:**

For a more structured bag, cut a piece of stiff interfacing or plastic canvas to 40 cm × 10 cm (16 × 4 in) and insert into the base before use.

---

## Alternative Handle: 6-Stitch I-Cord

If you prefer a narrower, rounder handle, work as follows:

CO 6 sts onto a DPN. Without turning the work, slide sts to the right end of the needle. Pull working yarn firmly across the back and **k6**. Repeat: slide, k6, without turning. Continue until cord measures 50 cm (20 in). Cast off.

> I-cord handles are faster to work but narrower (approx. 1.5 cm/½ in diameter). Attach in the same manner as tubular handles above.

---

## Pattern Summary / At-a-Glance

| Section | Cast On | Key Repeat | Finished Size |
|---|---|---|---|
| Bag Panel (×2) | 88 sts | k3, k/p to last 3, k3 | 40 × 38 cm |
| Tubular Handle (×2) | 12 sts | (k1, p1) every row | 50 cm long |

---

## Skill Techniques Used

- Long-tail cast on
- Stocking stitch
- Garter stitch borders
- Mattress stitch seaming
- Double-knitting (tubular handle method)
- Backstitch handle attachment

---

*Pattern designed for intermediate knitters. Please read all notes before beginning. Enjoy your knitting!*

---
Disclaimer: This pattern was generated by AI and should be reviewed for accuracy before use. While we strive for quality, AI-generated content may contain errors. Please verify measurements, stitch counts, and instructions before beginning your project. Generated by purlJam.uk
Access your pattern anytime
Bookmark this page to access your pattern anytime