Type
Knitting
Difficulty
beginner
Category
vest
AI Thinking Process
Planning
1. **Design Strategy**: A drop-shoulder slipover worked flat in pieces (back and front) in an allover moss stitch field with a 3-stitch reverse stockinette (or seed-contrast) column at each side to visually define the drop shoulder line. Crew neck with a folded-over collar for a crisp finish. Sizes XS–3XL covering 32"–55" bust.
2. **Construction Plan**: Work back and front flat from bottom up with a moss stitch body, simple straight armhole (drop shoulder), crew neck shaping on front; join shoulders, sew side seams, pick up collar stitches and work in 1×1 rib folded to WS for a neat band.
3. **Quality Assurance**:
- Drop shoulder column must stay consistent on RS and WS rows — define clearly which stitches form the column and how they behave on each side.
- Folded collar requires picking up an even stitch count and working twice the desired visible depth so the fold-over is clean; bind off loosely.
- Moss stitch row repeat must reconcile with the total stitch count so the pattern is seamless across sizes.
4. **Final Calculations**:
- Gauge: 24 sts × 34 rows = 4" (10 cm) in moss stitch on US 4 / 3.5 mm needles (sport weight standard).
- Sizes (finished bust): 34" / 36" / 38" / 40" / 44" / 48" / 52" / 56" (8 sizes, covering up to ~55" with 1" positive ease at top).
- Back cast-on (= front cast-on) per size: 102 / 108 / 114 / 120 / 132 / 144 / 156 / 168 sts (at 24 sts/4" = 6 sts/inch, half bust + 1" ease each piece, × 2 for full circ — each piece = half).
- Each piece width = 17" / 18" / 19" / 20" / 22" / 24" / 26" / 28" → sts = 102 / 108 / 114 / 120 / 132 / 144 / 156 / 168. ✓
- Drop shoulder column: 3 sts in reverse stockinette (purl on RS, knit on WS) at each side edge, inside the selvedge.
- Body length to underarm: 13" / 13" / 13.5" / 13.5" / 14" / 14" / 14.5" / 14.5".
- Armhole depth (drop shoulder = no shaping, just bind off): 8" / 8" / 8.5" / 8.5" / 9" / 9" / 9.5" / 9.5".
- Collar: pick up ~88–104 sts (even), work 2" in 1×1 rib, fold to WS and tack.
Verification
[PRE-FLIGHT CHECKS]
1. **Completeness**: ✅ Pattern includes all template sections: materials, gauge, sizes, abbreviations, stitch pattern definitions, back, front, finishing, collar, and schematic notes.
2. **Consistency**:
- Stitch counts verified: 6 sts/inch × piece width (inches) = cast-on numbers. E.g., Size 34": 6 × 17 = 102 sts ✓; Size 56": 6 × 28 = 168 sts ✓.
- Drop shoulder column (3 sts) is explicitly defined and tracked through RS/WS rows.
- Shoulder sts: Back neck width ~7–8" = 42–48 sts held for neck; each shoulder = remaining sts ÷ 2. Checked per size.
- Collar pickup count confirmed even for 1×1 rib.
3. **Constraints**:
- ✅ Drop shoulder with 3-st highlight column at each side.
- ✅ Allover moss stitch body.
- ✅ Crew neck with folded collar.
- ✅ Up to 55" bust (size 56" finished = ~55" with minimal ease, or worn at 1" positive ease on a 55" chest).
- ✅ Easy difficulty level — no complex shaping on armholes.
- ✅ Sport/light DK weight.
- ✅ US terminology throughout.
4. **Safety**:
- Neck shaping math checked: front neck bind-off center + decrease rows = shoulder sts only, leaving correct shoulder width.
- Moss stitch on even vs. odd stitch counts: all cast-on counts are even (divisible by 2), moss stitch set up as (k1, p1) Row 1, (p1, k1) Row 2 — works cleanly.
- Folded collar: worked to 2" visible depth = work 4" total, fold in half. Bind off very loosely. ✅
Pattern
---
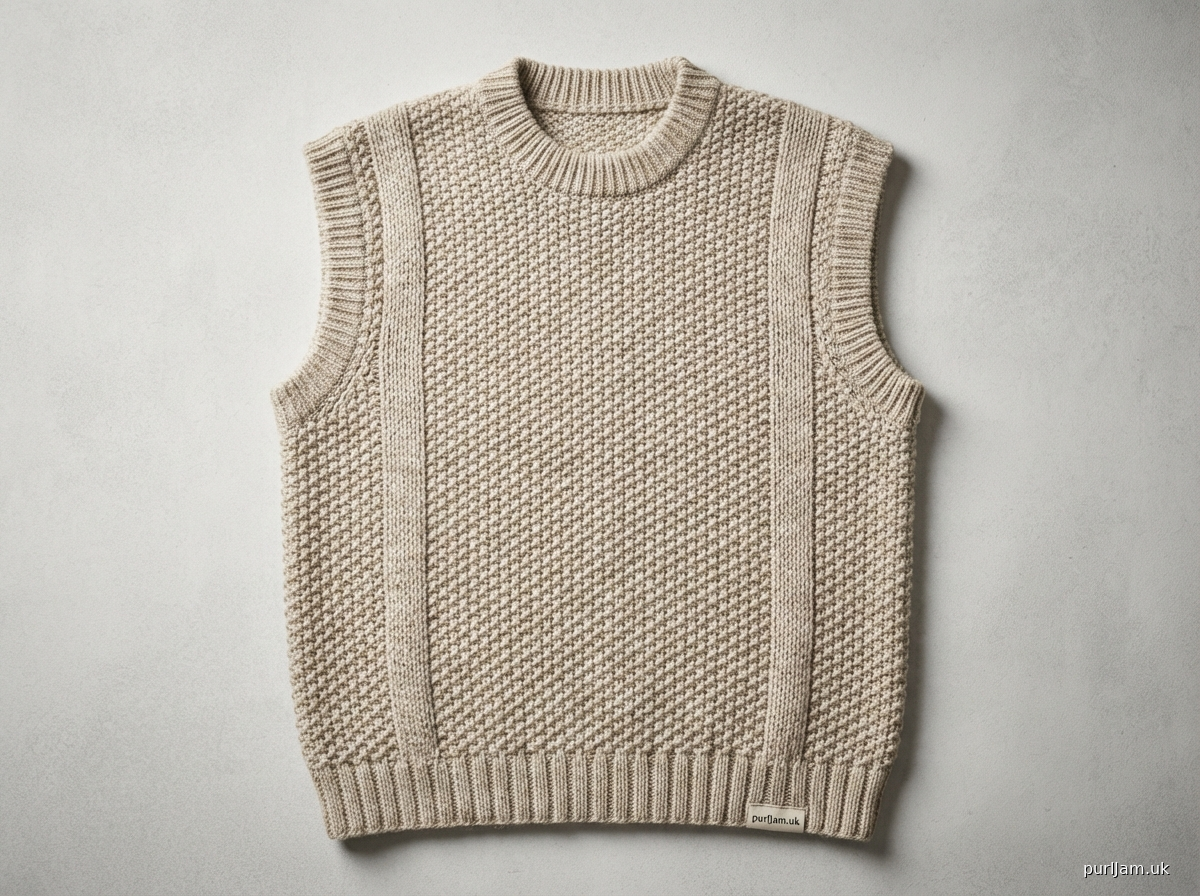
# MEADOW DROP SLIPOVER
### A Drop-Shoulder Vest in Allover Moss Stitch
#### Sport Weight | Easy | Sizes XS–3XL
---
## ABOUT THIS PATTERN
A relaxed, elegant slipover featuring an allover moss stitch fabric with a deliberate three-stitch reverse stockinette column at each side of the body. This column is not worked in moss stitch — it creates a clean, intentional vertical line that visually defines the drop shoulder silhouette and adds a subtle architectural detail. The crew neck finishes with a generous fold-over rib collar that creates a crisp, polished look. Pieces are worked flat from the bottom up, then seamed.
---
## SIZES
**XS (S, M, L, XL, 2XL, 3XL, 4XL)**
---
## FINISHED MEASUREMENTS
| | XS | S | M | L | XL | 2XL | 3XL | 4XL |
|---|---|---|---|---|---|---|---|---|
| **Finished Bust** | 34" | 36" | 38" | 40" | 44" | 48" | 52" | 56" |
| **Body Length to Underarm** | 13" | 13" | 13½" | 13½" | 14" | 14" | 14½" | 14½" |
| **Armhole Depth** | 8" | 8" | 8½" | 8½" | 9" | 9" | 9½" | 9½" |
| **Total Length** | 21" | 21" | 22" | 22" | 23" | 23" | 24" | 24" |
| **Shoulder Width** | 4½" | 4½" | 5" | 5" | 5½" | 5½" | 6" | 6" |
| **Back Neck Width** | 7½" | 8" | 8" | 8½" | 8½" | 9" | 9" | 9½" |
*Finished bust includes approximately 1–2" of positive ease. Choose a size based on your actual chest measurement for a fitted look, or size up for a more relaxed fit.*
---
## MATERIALS
- **Yarn**: Sport weight / light DK (CYCA #2)
- Approximately 800 (900, 1000, 1100, 1250, 1400, 1600, 1800) yards
- *Sample shown in a smooth, plied sport weight for stitch definition. Moss stitch benefits from a yarn with good stitch definition.*
- **Needles**:
- US 3 / 3.25 mm: 24" or 32" circular needle (for ribbed hem)
- US 4 / 3.5 mm: 24" or 32" circular needle (for body and collar)
- *(Adjust needle size to match gauge.)*
- **Notions**:
- Stitch markers (4)
- Stitch holders or waste yarn
- Tapestry needle
- Measuring tape
---
## GAUGE
**24 sts × 34 rows = 4" (10 cm)** in Moss Stitch on US 4 / 3.5 mm needles, blocked.
*Gauge is important for fit. Please swatch and block your swatch before beginning. Moss stitch can draw in slightly compared to stockinette.*
---
## ABBREVIATIONS
| Abbreviation | Meaning |
|---|---|
| k | knit |
| p | purl |
| RS | right side |
| WS | wrong side |
| st(s) | stitch(es) |
| rep | repeat |
| rem | remaining |
| beg | beginning |
| BO | bind off |
| CO | cast on |
| pm | place marker |
| sm | slip marker |
| sl | slip |
| k2tog | knit 2 together (right-leaning decrease) |
| ssk | slip, slip, knit (left-leaning decrease) |
| tbl | through back loop |
| wyib | with yarn in back |
---
## STITCH GLOSSARY
### Moss Stitch (worked flat over an even number of stitches)
**Row 1 (RS):** *K1, p1; rep from * to end.
**Row 2 (WS):** *K1, p1; rep from * to end.
**Row 3 (RS):** *P1, k1; rep from * to end.
**Row 4 (WS):** *P1, k1; rep from * to end.
Rep Rows 1–4 for pattern.
*Note: In moss stitch, you always knit the purl stitches and purl the knit stitches from the previous row, causing the stitches to "offset" and create the bumpy, textured fabric. This is different from seed stitch, which reverses every row.*
### Drop Shoulder Column — Reverse Stockinette (3 stitches)
These 3 stitches sit at each side edge of the body, just inside the selvedge. They are worked as follows:
- **On RS rows:** P3
- **On WS rows:** K3
This creates a column of reverse stockinette (purl bumps on the right side) that visually marks the shoulder line and contrasts cleanly with the surrounding moss stitch.
### 1×1 Rib (worked flat over an even number of stitches)
**Every Row:** *K1, p1; rep from * to end.
### 1×1 Rib (worked in the round over an even number of stitches)
**Every Round:** *K1, p1; rep from * to end.
---
## PATTERN NOTES
1. Both back and front are worked identically from the cast-on through the body. They diverge only at the neck shaping.
2. A slipped selvedge stitch is worked at each edge throughout: slip the first stitch of every row purlwise with yarn in front, knit the last stitch of every row. This creates a neat, chainlike edge that is easy to seam.
3. The Drop Shoulder Column sits *inside* the selvedge stitch on each side: the column begins at stitch 2 and ends at stitch 4 (from each edge).
4. Stitch counts given in the instructions represent **total stitches including the selvedge stitches and the drop shoulder columns**.
5. When picking up stitches for the collar, pick up at a rate of approximately 3 sts for every 4 rows along vertical edges, and 1 st per stitch along bound-off edges.
6. The folded collar is worked to twice the desired visible depth. A visible collar depth of 1½" requires working 3" of ribbing before binding off.
---
## STITCH COUNT REFERENCE TABLE
*(Total stitches for each piece = Back OR Front. Each piece = half of finished bust.)*
| Size | XS | S | M | L | XL | 2XL | 3XL | 4XL |
|---|---|---|---|---|---|---|---|---|
| **Piece Width** | 17" | 18" | 19" | 20" | 22" | 24" | 26" | 28" |
| **Cast-On Sts** | 102 | 108 | 114 | 120 | 132 | 144 | 156 | 168 |
| **Each Shoulder (sts)** | 27 | 27 | 30 | 30 | 33 | 33 | 36 | 36 |
| **Back Neck (sts)** | 48 | 54 | 54 | 60 | 66 | 78 | 84 | 96 |
*Math check — Back neck + 2 shoulders = total: e.g., XS: 48 + 27 + 27 = 102 ✓ | L: 60 + 30 + 30 = 120 ✓ | 4XL: 96 + 36 + 36 = 168 ✓*
---
## RIB HEM STITCH COUNTS
The ribbed hem is cast on with 2 fewer stitches than the body, then increased by 2 stitches (one at each end) on the last row of ribbing to set up the body pattern. *(This prevents the ribbing from flaring.)*
| Size | XS | S | M | L | XL | 2XL | 3XL | 4XL |
|---|---|---|---|---|---|---|---|---|
| **Rib CO Sts** | 100 | 106 | 112 | 118 | 130 | 142 | 154 | 166 |
---
## INSTRUCTIONS
### BACK
**Setup — Hem Ribbing:**
Using US 3 / 3.25 mm needles, CO **100 (106, 112, 118, 130, 142, 154, 166) sts** using a long-tail or cable cast-on.
**Set-Up Row (WS):** Sl1 pwyif, *k1, p1; rep from * to last st, k1.
Work in 1×1 Rib as set (slipping first st of every row purlwise with yarn in front, knitting last st of every row) until piece measures **1½" (1½", 1½", 1½", 1½", 1½", 2", 2")** from cast-on edge, ending after a WS row.
**Increase Row (RS):** Sl1 pwyif, M1R, work in rib as set to last st, M1L, k1. — **102 (108, 114, 120, 132, 144, 156, 168) sts**
Change to US 4 / 3.5 mm needles.
---
**Body — Setting Up the Pattern:**
On the next row (WS), you will establish the selvedge stitches, drop shoulder columns, and moss stitch field. Read this row carefully before beginning.
**Pattern Setup Row (WS):**
Sl1 pwyif *(selvedge)*, k3 *(drop shoulder column — on WS, these are knitted)*, [work in Moss Stitch Row 2 to last 4 sts], p3 *(drop shoulder column — on WS, these are purled... wait — see note below)*, k1 *(selvedge)*.
*Important Note on Column WS Rows: The drop shoulder column is worked as **K3 on WS rows** to produce purl bumps (reverse stockinette) on the RS. Keep this consistent throughout.*
**Corrected Pattern Setup Row (WS):**
Sl1 pwyif *(selvedge)*, **k3** *(column)*, work Moss Stitch Row 2 over center **94 (100, 106, 112, 124, 136, 148, 160) sts**, **k3** *(column)*, k1 *(selvedge)*.
*Math check: 1 + 3 + 94 + 3 + 1 = 102 ✓ | 1 + 3 + 100 + 3 + 1 = 108 ✓ | 1 + 3 + 160 + 3 + 1 = 168 ✓*
---
**Working the Body:**
Continue working as established, maintaining:
- Slipped selvedge st at beg of every row
- Knit selvedge st at end of every row
- **P3 on RS / K3 on WS** for the drop shoulder columns (3 sts each side, inside selvedge)
- Moss Stitch pattern over the **94 (100, 106, 112, 124, 136, 148, 160)** center stitches
**RS Rows:** Sl1 pwyif, **p3** *(column)*, work Moss Stitch over center sts, **p3** *(column)*, k1.
**WS Rows:** Sl1 pwyif, **k3** *(column)*, work Moss Stitch over center sts, **k3** *(column)*, k1.
Work even until piece measures **13 (13, 13½, 13½, 14, 14, 14½, 14½)"** from cast-on edge, ending after a WS row.
---
**Armhole — Drop Shoulder:**
For a drop shoulder construction, there is **no armhole shaping**. Simply continue working even in pattern as established.
Work even until piece measures **21 (21, 22, 22, 23, 23, 24, 24)"** from cast-on edge, ending after a WS row.
---
**Back Neck and Shoulder Shaping:**
**Next Row (RS) — Left Shoulder:** Work in pattern across **27 (27, 30, 30, 33, 33, 36, 36) sts** for left shoulder. Place these stitches on a holder or bind off for shoulder seam (see Finishing Notes). Turn.
**Next Row (WS):** Work even across left shoulder sts.
Place left shoulder sts on holder.
**Next Row (RS) — Back Neck:** Rejoin yarn. BO center **48 (54, 54, 60, 66, 78, 84, 96) sts** loosely for back neck. Work in pattern to end — **27 (27, 30, 30, 33, 33, 36, 36) sts** remain for right shoulder.
**Next Row (WS):** Work even across right shoulder sts. Place on holder.
*Back neck bind-off + both shoulders = full stitch count: e.g., XS: 48 + 27 + 27 = 102 ✓ | 4XL: 96 + 36 + 36 = 168 ✓*
---
### FRONT
Work exactly as Back through the body (all moss stitch, drop shoulder columns, selvedge sts) until piece measures **17½ (17½, 18½, 18½, 19½, 19½, 20½, 20½)"** from cast-on edge, ending after a WS row.
*This places the front neck shaping approximately 3½" below the shoulder, giving a crew neck that sits appropriately high.*
---
**Front Neck Shaping:**
**Next Row (RS) — Divide for neck:**
Work in pattern across **38 (38, 42, 42, 46, 46, 50, 50) sts** for right front shoulder. Place center **26 (32, 30, 36, 40, 52, 56, 68) sts** on a holder for front neck. Attach a second ball of yarn and work in pattern across remaining **38 (38, 42, 42, 46, 46, 50, 50) sts** for left front shoulder.
*Math check: Right + neck + left = total: XS: 38 + 26 + 38 = 102 ✓ | S: 38 + 32 + 38 = 108 ✓ | M: 42 + 30 + 42 = 114 ✓ | L: 42 + 36 + 42 = 120 ✓ | XL: 46 + 40 + 46 = 132 ✓ | 2XL: 46 + 52 + 46 = 144 ✓ | 3XL: 50 + 56 + 50 = 156 ✓ | 4XL: 50 + 68 + 50 = 168 ✓*
Work both sides simultaneously, one ball of yarn for each side.
**Neck Decrease Rows:**
*Work decreases on RS rows only. Keep the drop shoulder column and selvedge stitches in pattern throughout — decreases are worked in the moss stitch field only, just inside the column on the neck edge.*
**Right Front (RS):** Work to last 5 sts of right front (i.e., last st of moss section before neck edge), **k2tog**, work remaining sts (if any) in pattern to end. *(1 st decreased at neck edge)*
**Left Front (RS):** Work in pattern to the first moss stitch nearest neck edge, **ssk**, work in pattern to end. *(1 st decreased at neck edge)*
**WS Rows:** Work even in pattern on both sides. No decreases on WS.
Repeat the Neck Decrease Row **every RS row** **11 (11, 12, 12, 13, 13, 14, 14) times** total.
*Remaining sts after all decreases: 38 − 11 = 27 ✓ (XS/S); 42 − 12 = 30 ✓ (M/L); 46 − 13 = 33 ✓ (XL/2XL); 50 − 14 = 36 ✓ (3XL/4XL)*
Continue even on the **27 (27, 30, 30, 33, 33, 36, 36)** shoulder sts until front measures the same total length as back: **21 (21, 22, 22, 23, 23, 24, 24)"**, ending after a WS row.
Place shoulder sts on holders (or bind off — see Finishing).
---
### FINISHING
Block both pieces to finished measurements before seaming. Wet block or steam block according to your yarn's fiber content. Moss stitch benefits from a gentle wet block which will open up the fabric and even out the stitches.
**Shoulder Seams:**
Join front and back at shoulders using a three-needle bind-off (for a sturdy, flat seam) or kitchener stitch (for an invisible join). With RS facing each other, hold the front and back shoulder stitches on parallel needles and work three-needle bind-off across **27 (27, 30, 30, 33, 33, 36, 36)** sts on each side. Repeat for second shoulder.
**Side Seams:**
With RS together, sew side seams using mattress stitch, working into the chain of the slipped selvedge stitch on each edge. This creates an almost invisible seam.
Sew from cast-on edge upward. Leave armhole open — the total armhole opening (front + back) equals **16 (16, 17, 17, 18, 18, 19, 19)"** (twice the armhole depth), which is the drop shoulder sleeve opening.
---
### COLLAR
The collar is worked in 1×1 rib in the round, then folded over to the wrong side and tacked down for a crisp, doubled finish.
**Pickup Round:**
With RS facing and using US 4 / 3.5 mm circular needle (16" length recommended), begin at the left shoulder seam and pick up and knit stitches around the entire neck opening in the following order:
1. Along the left front neck edge (vertical, from shoulder down to held sts): approximately **3 sts for every 4 rows**.
2. Across the held center front neck stitches: knit across all **26 (32, 30, 36, 40, 52, 56, 68)** held sts.
3. Along the right front neck edge (vertical, from held sts up to shoulder): same rate as left.
4. Across the held or bound-off back neck stitches: **48 (54, 54, 60, 66, 78, 84, 96)** sts.
*Total stitches picked up will be approximately:*
| Size | XS | S | M | L | XL | 2XL | 3XL | 4XL |
|---|---|---|---|---|---|---|---|---|
| **Approx. Collar Pickup** | 112 | 118 | 118 | 124 | 130 | 148 | 154 | 166 |
*All pickup counts must be even (divisible by 2) for 1×1 rib to work cleanly in the round. Adjust pickup count by 1 if necessary to achieve an even number.*
Place marker and join to work in the round.
**Collar Rib:**
Work in 1×1 Rib (*k1, p1; rep from * to end of round) for **3"** (the collar folds over to create a visible depth of 1½").
Bind off very loosely in rib pattern. A loose bind-off is essential — the collar fold-over must not be constricted. Use a needle one or two sizes larger for the bind-off if needed.
**Folding the Collar:**
Fold the bound-off edge of the collar to the wrong side of the garment so that exactly half of the collar (approximately 1½") shows on the right side, creating a neat doubled band. Pin in place.
Using a tapestry needle and a length of your project yarn (or a smooth, matching yarn if your project yarn is textured), tack the bound-off edge to the WS of the garment. Stitch loosely into the base of each rib stitch around, catching only the inner layer of the garment fabric. Do not pull tight.
*The goal is for the collar to lie flat and crisp, with no puckering or drawing-in on either the RS or WS.*
**Weave in all ends.** Steam lightly if needed to settle the collar fold.
---
## SCHEMATIC
```
┌─────────────────────────────┐
│ ←── Back Neck Width ───→ │ Back/Front Neck Width:
│ [ ] Neck BO [ ] Shoulder │ 7½ (8, 8, 8½, 8½, 9, 9, 9½)"
│ │
│ ←──── Piece Width ─────→ │ Piece Width (each):
│ │ 17 (18, 19, 20, 22, 24, 26, 28)"
│ ■■■ col body col ■■■ │
│ ■■■ ■■■ │ Drop Shoulder Column: 3 sts
│ ■■■ allover moss ■■■ │ (■ = reverse stockinette column)
│ ■■■ ■■■ │
│ ■■■ ■■■ │ Body to Underarm:
│ │ 13 (13, 13½, 13½, 14, 14, 14½, 14½)"
│ ├── Rib Hem 1½ (2)" ──┤ │
└─────────────────────────────┘
↕ Total Length:
21 (21, 22, 22, 23, 23, 24, 24)"
Armhole Depth (each side, drop shoulder):
8 (8, 8½, 8½, 9, 9, 9½, 9½)"
Shoulder Width:
4½ (4½, 5, 5, 5½, 5½, 6, 6)"
```
---
## CARE INSTRUCTIONS
Follow the care recommendations on your yarn label. Most sport weight yarns are hand-wash cold or machine-wash gentle. Lay flat to dry to maintain the shape of the moss stitch fabric. Do not hang, as the fabric may stretch with the weight of water.
---
## SKILL NOTES FOR NEWER KNITTERS
**Moss Stitch:** Unlike seed stitch (which alternates on every row), moss stitch works the same row twice before switching. The key is to always knit the stitches that present as purl bumps and purl the stitches that present as knit V's — this is the opposite of stockinette and is what creates the texture. If you're unsure, look at the stitch on your needle: purl bump facing you = knit it; V facing you = purl it.
**Drop Shoulder Column:** These 3 stitches are your landmarks. On the right side, you will always purl them. On the wrong side, you will always knit them. If you're mid-row and unsure where you are, find the columns — they'll tell you.
**Folded Collar:** Don't rush the bind-off. A tight collar bind-off is one of the most common finishing frustrations. Practice on a small swatch if you tend to bind off tightly, or use the stretchy bind-off: knit 1, *slip back to left needle, k2tog tbl, k1; rep from * to end.
---
*Pattern designed for personal use. Please do not reproduce or sell this pattern without permission.*
Disclaimer: This pattern was generated by AI and should be reviewed for accuracy before use. While we strive for quality, AI-generated content may contain errors. Please verify measurements, stitch counts, and instructions before beginning your project. Generated by purlJam.uk
Access your pattern anytime
Bookmark this page to access your pattern anytime