Type
Crochet
Difficulty
intermediate
Category
pullover
AI Thinking Process
Planning
Verification
Pattern
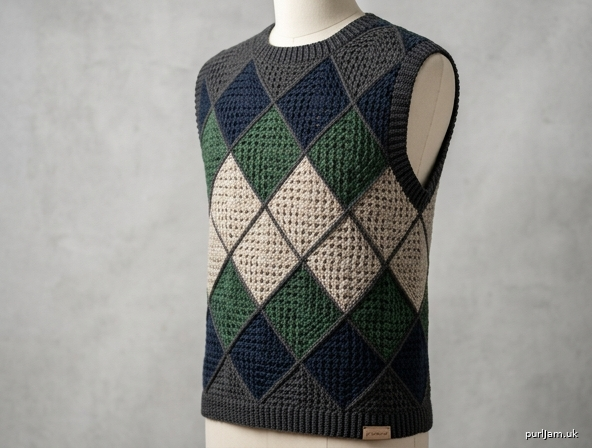
Men’s Diamond Granny Square Tank Top
Intermediate
A relaxed, oversized men’s tank top constructed entirely from 24 large granny squares set on point and joined in staggered diamond ranks. The diamond layout creates natural armhole shaping and a modern geometric silhouette. Worked in worsted-weight yarn with classic granny clusters and finished with stretchy ribbed edging. Designed for comfort and drape with generous positive ease.
Sizes
Small (Medium, Large, XL, 2XL) To fit chest: 86–91 (96–101, 106–111, 116–121, 127–132) cm / 34–36 (38–40, 42–44, 46–48, 50–52) in
Finished measurements (after joining and edging, blocked)
- Chest circumference: 100 (108, 115, 122, 130) cm / 39½ (42½, 45¼, 48, 51¼) in
- Length (hem to shoulder): 72 (79, 86, 93, 100) cm / 28¼ (31, 33¾, 36½, 39½) in
- Armhole depth: 25 (26, 28, 29, 30) cm / 9¾ (10¼, 11, 11½, 11¾) in
Large uses exactly 24 squares of 40.5 cm. Other sizes adjust the number of diamonds per rank (make additional or fewer squares as needed). Ease is intentionally generous (approx. +10–15 cm) for a contemporary oversized tank fit.
Yarn
Worsted weight (UK aran-adjacent / 10-ply) cotton or cotton-blend recommended for drape and summer wear.
- Approx. 1800 (2100, 2400, 2700, 3000) m / 1970 (2300, 2625, 2950, 3280) yd main colour(s) Sample uses 24 squares; calculate extra yardage if adding rounds or colours. Any fibre with good stitch definition works. Solid, variegated or planned colour-pooling all suit the diamond layout.
Tension (Gauge)
One blocked granny square = 40.5 cm × 40.5 cm (16 × 16 in) using 5 mm hook (or size needed to obtain tension). Check tension after 5 rounds and again at full size. Adjust hook size to hit exactly 40.5 cm — this is critical for the finished chest and length. (US readers: tension = gauge.)
Hooks & Notions
- 5 mm (UK 6 / US H/8) crochet hook, or size to obtain tension
- 4.5 mm (UK 7 / US 7) hook for edging
- Yarn needle
- Stitch markers
- Blocking mats and pins
- Optional: locking markers for rank alignment
Abbreviations (UK terminology)
- ch – chain
- dc – double crochet (US sc)
- tr – treble (US dc)
- sl st – slip stitch
- sp(s) – space(s)
- st(s) – stitch(es)
- yrh – yarn round hook
- RS – right side
- WS – wrong side
- BLO – back loop only
- cl – cluster (3 tr group)
- [] – work instructions as a group
- … – repeat between asterisks
- ( ) – size variations or explanatory notes
Pattern Notes
- Squares are worked in the round, RS always facing.
- All squares must be identical in size after blocking before joining.
- Diamond layout = squares rotated 45° (one corner pointing up) and joined in staggered horizontal ranks.
- Joining method: continuous join-as-you-go (JAYG) preferred for strength, or whip-stitch seams after full blocking.
- When changing colour, do so at a corner ch-sp.
- The staggered ranks automatically shape the armholes and create a gentle A-line.
- Neck is formed by leaving the centre top diamonds unjoined or by simple seaming that leaves a crew opening.
- Edging is worked in the round after assembly for a clean professional finish.
- Inline validation appears as (calculation ✓).
Granny Square (make 24 for Large; see size chart for others)
With 5 mm hook and chosen colour, make a magic ring (or ch 4 and sl st to form ring).
Round 1: Ch 3 (counts as 1 tr throughout), 2 tr into ring, ch 2, [3 tr into ring, ch 2] 3 times, sl st to top of beg ch-3. (4 clusters, 4 corner ch-2 sps)
Round 2: Sl st into next 2 tr and into corner ch-2 sp, ch 3, (2 tr, ch 2, 3 tr) in same sp (first corner), *ch 1, (3 tr, ch 2, 3 tr) in next corner ch-2 sp; rep from * twice more, ch 1, sl st to top of beg ch-3.
Round 3: Sl st into next 2 tr and into corner ch-2 sp, ch 3, (2 tr, ch 2, 3 tr) in same sp, *ch 1, 3 tr in next ch-1 sp, ch 1, (3 tr, ch 2, 3 tr) in next corner ch-2 sp; rep from * twice more, ch 1, 3 tr in last ch-1 sp, ch 1, sl st to top of beg ch-3.
Round 4: Sl st to corner ch-2 sp, ch 3, (2 tr, ch 2, 3 tr) in same sp, *[ch 1, 3 tr in next ch-1 sp] twice, ch 1, (3 tr, ch 2, 3 tr) in corner ch-2 sp; rep from * twice more, [ch 1, 3 tr in next ch-1 sp] twice, ch 1, sl st to top of beg ch-3.
Continue in established granny pattern: each round increases by one additional (ch 1, 3 tr) group along each side between corners. Work until the square measures 40.5 cm (16 in) from side to side when lightly blocked, ending after a complete round. For most worsted yarns this is 14–18 rounds; stop when the measurement is reached. Fasten off, leaving a 30 cm tail if whip-stitch joining later. Weave in all other ends.
Blocking (mandatory): Wet-block or steam-block every square to exactly 40.5 cm × 40.5 cm. Pin corners sharply. Allow to dry completely. (All 24 squares identical ✓)
Square Count by Size
- S: 16 squares (8 front + 8 back)
- M: 20 squares (10 + 10)
- L: 24 squares (12 + 12)
- XL: 28 squares (14 + 14)
- 2XL: 32 squares (16 + 16)
Diamond Rank Arrangement
All squares are oriented on point (rotated 45°, one corner pointing straight up and one straight down). Ranks are horizontal rows of diamonds. Each successive rank is staggered by half a diamond so side points nestle into the V of the rank below — this produces the diamond lattice and the natural armhole indent.
Back Panel Layout (RS facing, bottom to top)
Large (12 squares) — main size using all 24
Rank 5 (shoulders):     D1       D2
Rank 4:              D3      D4      D5
Rank 3 (widest):   D6     D7     D8     D9
Rank 2:              D10     D11     D12
Rank 1 (hem):           (points form zigzag hem)
Rank counts: 2 + 3 + 4 + 3 = 12 squares ✓
Visual schematic (each Dn = one square on point):
          /\      /\
         /D1\    /D2\          ← Rank 5 (shoulder)
        /____\  /____\
       /\    /\    /\
      /D3\  /D4\  /D5\         ← Rank 4
     /____\/____\/____\
    /\    /\    /\    /\
   /D6\  /D7\  /D8\  /D9\      ← Rank 3 (chest widest)
  /____\/____\/____\/____\
     /\    /\    /\
    /D10\ /D11\ /D12\          ← Rank 2
   /____\/____\/____\
      \/    \/    \/             ← Rank 1 points (hem)
Other sizes (Back)
- S (8 sq): Ranks 2 + 3 + 2 + 1 → shorten Rank 3 to 3 diamonds, omit one from Rank 2
- M (10 sq): Ranks 2 + 3 + 3 + 2
- XL (14 sq): Ranks 2 + 3 + 4 + 3 + 2 (add Rank 6 of 2 at shoulders)
- 2XL (16 sq): Ranks 2 + 4 + 4 + 4 + 2
Front Panel Layout
Identical rank structure to Back for all sizes, except neck opening. On Front only, leave the centre top of Rank 5 (or final shoulder rank) open:
- Do not join the inner upper sides of the two shoulder diamonds for a depth of approx. 8–10 cm.
- This forms a crew neck approximately 18 (19, 20, 21, 22) cm wide.
Colour tip for stronger diamond pattern: place contrasting or gradient colours so that diagonal lines of colour run continuously across ranks (e.g., dark-light-dark on each diagonal axis).
Joining the Squares (Diamond Lattice)
Method A – Join-As-You-Go (recommended) Work the final round of each new square while attaching it to its neighbours already in the panel. At each side that touches an adjacent square, replace the ch-1 (or corner ch-2) with a sl st or dc into the corresponding sp of the neighbouring square. Maintain the 45° orientation at all times. Align points carefully with markers before joining.
Method B – Sewn Block all squares first. Arrange on a large flat surface exactly as the schematic. Using yarn needle and matching yarn, whip-stitch through outer loops only along full adjacent sides. Keep seams flat and elastic.
Join order for each panel:
- Join Rank 1 diamonds to each other at side points.
- Join Rank 2 into the V’s of Rank 1 and to each other.
- Continue upward rank by rank. (Each new rank nests into the previous ✓)
After both panels are fully joined, block the completed Front and Back panels gently to measurements:
- Widest point (Rank 3): approx. 57 (58, 57.5, 61, 65) cm across
- Length: as given in finished measurements
Assembly
-
Shoulder seams
Place Front and Back RS together. Join the outer halves of the top rank diamonds (Rank 5) with whip stitch or dc seam for 8 (8.5, 9, 9.5, 10) cm from each armhole edge toward the neck. Leave centre neck open as noted. (Shoulder seam length leaves adequate neck width ✓) -
Side seams
With RS together, join side edges from hem upward, leaving the top 25 (26, 28, 29, 30) cm open for armholes. Seam through the outer points and sides of the diamonds that meet. The staggered layout already indents the armhole; the partial seam simply closes the lower body. (Armhole depth matches size chart ✓) -
Turn garment RS out.
Edging (all sizes)
Change to 4.5 mm hook. All edging is worked with RS facing.
Hem
Join yarn at one side seam. Work evenly in dc around the entire zigzag hem, placing 3 dc into each downward point and 1 dc into each side edge stitch/sp, adjusting count so the edge lies flat (approx. 180–240 dc depending on size).
Ribbing rounds:
Round 1: Ch 1, dc in BLO of each dc around, sl st to first dc.
Rounds 2–4: Rep Round 1.
Fasten off. (2–3 cm ribbing ✓)
Armholes (both alike)
Join yarn at underarm seam. Work 1 round dc evenly around armhole (approx. 70 (74, 80, 84, 88) dc), placing extra sts at any concave points so the edge does not pull.
Work 3 rounds dc BLO ribbing as for hem. Fasten off.
Neckband
Join yarn at either shoulder seam. Work 1 round dc evenly around neck opening (approx. 80 (84, 88, 92, 96) dc), keeping the front neck flat.
Work 3 rounds dc BLO ribbing. Fasten off.
Weave in all remaining ends. Final light steam block if needed, concentrating on seams and edgings. Do not flatten the diamond texture.
Finishing Checklist
- All 24 (or size-appropriate) squares measure 40.5 cm after blocking
- Ranks follow the diamond schematic exactly
- Shoulder seams equal length and symmetric
- Armhole depth matches chart
- Ribbed edges sit flat without flaring or cupping
- Chest and length match finished measurements for your size within 2 cm
Schematic (text)
        shoulders
     /\          /\
    /  \ neck  /  \
   /    \____ /    \
  /                 \
 /    FRONT/BACK     \     ← widest diamond rank
 \                   /
  \                 /
   \               /
    \             /
     \___________/         ← zigzag hem (later straightened by ribbing)
         side seams ↑ to armhole
Care
Follow yarn label. Generally cool wash, reshape flat to dry, especially the diamond points.
Enjoy your diamond-lattice tank — the on-point ranks give excellent drape and a distinctive geometric look that is instantly recognisable as intentional design rather than simple grid joining.
Disclaimer: This pattern was generated by AI and should be reviewed for accuracy before use. While we strive for quality, AI-generated content may contain errors. Please verify measurements, stitch counts, charts, and instructions before beginning your project. Generated by purlJam.uk
Love this pattern?
Save this pattern to your free PurlJam libraryAccess your pattern anytime
Bookmark this page to access your pattern anytime