Type
Crochet
Difficulty
intermediate
Category
custom
AI Thinking Process
Planning
Verification
Pattern
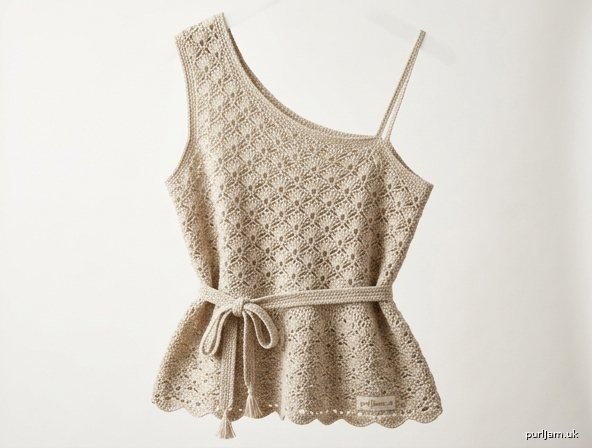
"Natural Linen" One-Shoulder Lace Tank Top
An elegant fan/shell lace tank with asymmetric straps, flared peplum & matching waist tie
A breezy, textured one-shoulder tank worked flat in two simple panels, then seamed. The delicate 6-dc fan/shell pattern gives an airy, handmade look in natural oatmeal linen. Beginner-friendly: if you can chain, single crochet, and double crochet, you can make this.
MATERIALS
- Yarn: Lace weight (#0 Lace) 100% linen or linen/cotton blend, in light beige / oatmeal (natural linen).
- Approx. yardage (single color throughout, incl. belt & straps):
- XS: 900 yds • S: 975 yds • M: 1,075 yds • L: 1,175 yds • XL: 1,300 yds
- 2XL: 1,425 yds • 3XL: 1,550 yds • 4XL: 1,675 yds • 5XL: 1,800 yds
- Approx. yardage (single color throughout, incl. belt & straps):
- Hook: US B/1 (2.25 mm) for main fabric; US 7 (1.65 mm) steel hook optional for tighter edging (or use same B/1).
- Notions: Tapestry needle, stitch markers (4–6), scissors, rustproof pins, measuring tape.
GAUGE
Worked in fan/shell lace pattern with B/1 (2.25 mm) hook:
- 1 shell repeat = 6 sts = 1½ in (3.8 cm) wide
- 4 pattern rows = 2 in (5 cm) tall
- Reference: 4 sts = 1 in in pattern.
Check gauge: Chain 25, work Rows 1–4 of the Fan/Shell pattern. Blocked swatch of ~4 shells should measure 6 in wide. Gauge is essential for correct fit — adjust hook size if needed.
SIZES (XS–5XL)
Designed for 2–3 in (5–7.5 cm) positive ease at bust for a fitted-but-comfortable look.
| Size | Finished Bust | Shells per Panel | Bodice Foundation (sts) |
|---|---|---|---|
| XS | 33 in | 11 | 67 |
| S | 36 in | 12 | 73 |
| M | 39 in | 13 | 79 |
| L | 42 in | 14 | 85 |
| XL | 45 in | 15 | 91 |
| 2XL | 48 in | 16 | 97 |
| 3XL | 51 in | 17 | 103 |
| 4XL | 54 in | 18 | 109 |
| 5XL | 57 in | 19 | 115 |
Bust = 2 panels. Example XS: 11 shells × 1.5 in = 16.5 in per panel × 2 = 33 in. ✓ Foundation formula: (Shells × 6) + 1 chain.
The peplum adds 2 extra shells per panel (flare), which are decreased away at the waist. All numbers below use the bracket format XS (S, M, L, XL, 2XL, 3XL, 4XL, 5XL).
ABBREVIATIONS (US Terms)
- ch = chain
- sc = single crochet
- dc = double crochet
- sk = skip
- sp = space
- st(s) = stitch(es)
- sl st = slip stitch
- rep = repeat
- RS / WS = right side / wrong side
- beg = beginning
- [ ] = repeat instructions within brackets as directed
SPECIAL STITCH: FAN/SHELL
Shell = 5 dc worked into the same stitch or space (a "fan"). The pattern alternates shells and single crochet "anchor" points to create the classic wave lace.
Fan/Shell Lace Pattern (multiple of 6 sts + 1)
- Row 1 (RS): 1 sc in 2nd ch from hook, sk 2 ch, 5 dc in next ch (shell), sk 2 ch, 1 sc in next ch; rep from * across. Turn.
- Row 2: ch 3 (counts as 1 dc), 2 dc in first sc, sk 2 dc, 1 sc in 3rd (center) dc of shell, sk 2 dc, 5 dc in next sc; rep from * to last sc, ending 3 dc in last sc (half shell). Turn.
- Row 3: ch 1, 1 sc in first dc, sk 2 dc, 5 dc in next sc, sk 2 dc, 1 sc in center dc of next shell; rep from *, ending 1 sc in top of turning ch. Turn.
- Rep Rows 2–3 for pattern.
Note: Rows 1 and 3 begin/end with sc; Row 2 begins/ends with a half-shell (3 dc). This keeps edges straight for seaming.
PATTERN NOTES
- Tank is worked flat in two panels (Front & Back), bottom-up.
- Both panels are worked identically through the body; only the strap/neck shaping differs (Front has the one-shoulder neckline).
- ch-3 at the start of shell rows counts as a dc.
- Stitch counts are given per shell count — count your shells, not individual dc, to stay on track.
- Slight waist shaping is done by working peplum shells → decreasing 2 shells at the waist → straight bodice.
- Work loosely and block firmly for best lace drape.
INSTRUCTIONS
Throughout, "Panel shells" refers to the shell count for your size: Bodice shells = XS 11 (S 12, M 13, L 14, XL 15, 2XL 16, 3XL 17, 4XL 18, 5XL 19). Peplum shells = Bodice shells + 2 = XS 13 (S 14, M 15, L 16, XL 17, 2XL 18, 3XL 19, 4XL 20, 5XL 21).
PART 1 — BACK PANEL
Peplum (flared hem)
Foundation ch: (Peplum shells × 6) + 1 = ch 79 (85, 91, 97, 103, 109, 115, 121, 127).
Row 1 (RS): Work Fan/Shell Row 1 across. → You now have 13 (14, 15, 16, 17, 18, 19, 20, 21) shells.
Rows 2–9: Work Fan/Shell Rows 2–3 in sequence (ending on a Row 3). Peplum measures approx. 4½ in (11.5 cm) from foundation. Peplum shell count unchanged.
Waist Decrease (shape the waist)
You will remove 2 shells total across the next row to draw in the waist.
Waist Row (works like Row 2 with 2 shell decreases): ch 3, 2 dc in first sc, work in pattern to the 2nd shell; sk that shell (work sc-to-sc directly, no shell) — this eliminates 1 shell. Continue in pattern to the 2nd-to-last shell; skip it the same way to eliminate the 2nd shell. Finish row in pattern. → 11 (12, 13, 14, 15, 16, 17, 18, 19) shells (= Bodice shells). ✓
Tip: To "skip a shell," where a shell would go, work sc directly into the next sc anchor, keeping the fabric continuous. Space the two decreases evenly (roughly ¼ and ¾ across).
Bodice (fitted, straight)
Rows continue in Fan/Shell pattern (Rows 2–3) on Bodice shells until Back measures approx. 13½ in (34 cm) from foundation (or desired underarm length). End having worked a Row 3.
Armhole Shaping
Next Row (dec both edges): ch 1, sl st across first shell to reach center, ch 1, sc in center dc, work in pattern across, stopping 1 shell before end (leave last shell unworked). Turn. → Removes 1 shell each side = 2 shells total. → 9 (10, 11, 12, 13, 14, 15, 16, 17) shells.
Continue even in pattern until armhole measures approx. 7 in (18 cm). Fasten off. Back complete.
PART 2 — FRONT PANEL
Work exactly as Back through the Armhole Shaping row. → After armholes: 9 (10, 11, 12, 13, 14, 15, 16, 17) shells.
Continue even until armhole measures approx. 3 in (7.5 cm), ending on a Row 3.
One-Shoulder Neckline Shaping
This tank has a wide strap on the LEFT and a thin spaghetti strap on the RIGHT (as worn). The Front neckline slopes down toward the right.
Divide work: you will keep the left ~⅓ of stitches for the wide shoulder area and slope the rest down.
Neck Row 1: Work in pattern across the first 3 (3, 4, 4, 5, 5, 6, 6, 7) shells only (left/wide-strap side). Turn, leaving remaining shells unworked.
Left (wide-strap) side:
- Work even in pattern on these shells until this section measures 4 in (10 cm) from neck divide. This forms the wide shoulder shelf.
- Fasten off.
Right (thin-strap) side:
- Rejoin yarn to the innermost unworked shell.
- Dec Row: work across, decreasing 1 shell every row (skip end shell as in armhole method) until 1 shell remains.
- Work even on this 1 shell for 2 in (5 cm) to form the base anchor for the spaghetti strap.
- Fasten off.
PART 3 — EDGING
Block both panels to measurements before edging.
Seam side seams and shoulder (see Assembly), then:
Neckline & Armhole edging (work after assembly): Join yarn at any underarm. Rnd 1: sc evenly around each armhole and the neckline, working 1 sc in each dc and 2 sc in each sc anchor / shell dip to keep edges flat. Work 1 more round of sc, then 1 round of reverse sc (crab stitch) for a firm, elegant edge. Sl st, fasten off.
Bottom peplum edging: Join at a side seam. Work 1 round sc evenly around the hem, then 1 round of small shells: sk 2, 5 dc in next, sk 2, sc in next; rep around for a scalloped finish. Sl st, fasten off.
PART 4 — STRAP CONSTRUCTION
Left WIDE Shoulder Strap
The wide left section of the Front (the "shelf") connects to the Back over the shoulder.
- Measure over the shoulder from Front left shelf to the corresponding Back edge.
- Strap width: work across the full width of the left shelf (3–7 shells depending on size = approx. 4½–10½ in).
- Rejoin yarn at Front left shelf top edge. Work sc rows (1 sc in each st) back and forth to the desired shoulder length (approx. 2½–3 in / 6–7.5 cm), then seam the strap end to the Back top-left edge.
- Edge the strap with 1 round sc for a clean finish.
Right THIN Spaghetti Strap
- From the single-shell anchor on the Front right side, make a cord: ch 4, sc in 2nd ch from hook and each ch (3 sc); ch 1, turn. Repeat sc rows on these 3 sts to form a narrow band, OR make a simple chain cord: ch a length equal to shoulder span + 1 in, then sc back along the chain for stability.
- Length: measure Front-right anchor over shoulder to Back-right edge, approx. 9–11 in (23–28 cm).
- Seam the strap end securely to the Back top-right edge. Reinforce with several tight stitches.
PART 5 — WAIST TIE BELT
Worked as a long, sturdy cord in matching linen.
- Ch 240 (or bust measurement + 40 in for wrapping/tying).
- Row 1: sc in 2nd ch from hook and in each ch across. Turn. → (239 sc)
- Row 2: ch 1, sc in each sc across. Turn.
- Row 3: ch 1, sc in each sc across. Fasten off. (3 rows = firm ~½ in belt)
Tassel/fringe ends (optional): Cut 6 strands of yarn (8 in each) per end; fold in half, attach with a lark's-head knot through the end stitches; trim even.
Thread the belt through the fabric at the natural waist (weave under/over shell posts every few inches), or simply tie around the waist over the tank.
ASSEMBLY
- Block all pieces flat to listed measurements; let dry fully (linen relaxes when blocked).
- Shoulder – Left: Seam the wide left strap Front-to-Back over the shoulder using mattress/whip stitch.
- Side seams: With RS together (or invisibly with RS out), seam Front to Back down each side from underarm to peplum hem, matching shells row-for-row. Leave peplum flare seamed but easing the extra width.
- Right strap: Attach the thin spaghetti strap Front-to-Back as in Part 4.
- Work Edging rounds (Part 3) around neck, armholes, and hem.
- Weave in all ends.
FINISHING
- Weave in all ends securely with a tapestry needle; linen can be slippery, so knot/weave twice.
- Give a final light steam block to set the lace and even out the shells.
- Try on and adjust strap lengths before final reinforcing — tack straps at exact fit.
- The belt can be tied at front, side, or back.
SIZE ADJUSTMENT NOTES
- Length: Add or subtract full Row 2–3 repeats (each = ~1 in) in the peplum or bodice to lengthen/shorten. Keep shell counts unchanged.
- Bust: Move up/down a size by adding/removing whole shells (6 sts + adjust ease). Each shell = 1.5 in of circumference (0.75 in per panel).
- Waist: For more waist definition, decrease 3 shells instead of 2 at the waist row, then increase back to bodice shells with an increase row (work an extra shell into a wide sc anchor) before the armhole. For a straighter fit, decrease only 1 shell.
- Ease: For a looser tank, choose the size with finished bust 4–5 in larger than your actual bust.
- Armhole depth: Adjust the "work even" rows before neckline (each row ≈ ½ in).
QUICK REFERENCE — SHELL COUNTS
| Stage | XS | S | M | L | XL | 2XL | 3XL | 4XL | 5XL |
|---|---|---|---|---|---|---|---|---|---|
| Peplum foundation shells | 13 | 14 | 15 | 16 | 17 | 18 | 19 | 20 | 21 |
| Bodice (post-waist dec) | 11 | 12 | 13 | 14 | 15 | 16 | 17 | 18 | 19 |
| Post-armhole | 9 | 10 | 11 | 12 | 13 | 14 | 15 | 16 | 17 |
| Left wide-strap shells | 3 | 3 | 4 | 4 | 5 | 5 | 6 | 6 | 7 |
Math check (XS): Peplum 13 shells − 2 waist dec = 11 bodice ✓ − 2 armhole = 9 ✓. Bust = 11 × 1.5 × 2 = 33 in ✓.
Enjoy your elegant, handmade Natural Linen One-Shoulder Tank!
Disclaimer: This pattern was generated by AI and should be reviewed for accuracy before use. While we strive for quality, AI-generated content may contain errors. Please verify measurements, stitch counts, and instructions before beginning your project. Generated by purlJam.uk
Access your pattern anytime
Bookmark this page to access your pattern anytime