Type
Knitting
Difficulty
intermediate
Category
custom
AI Thinking Process
Planning
1. **Design Strategy**: The user requests an oval rug measuring 41 cm (approximately 16 inches) in length. For an intermediate level oval rug, I'll design a piece worked from the center outward using increases to create the oval shape. The pattern will use worsted weight yarn with a dense gauge for durability and structure, which is essential for a rug. I'll incorporate a simple stitch pattern that creates texture while remaining practical for a floor covering.
2. **Construction Plan**: The rug will be worked flat from the center using a traditional oval construction method - starting with a rectangular center and working increases at the short ends to create the oval shape. This approach provides even shaping and allows the knitter to control the final dimensions. I'll use garter stitch for durability and to prevent curling, with a border to finish the edges cleanly.
3. **Quality Assurance**: Key considerations include:
- Ensuring tight gauge for a sturdy rug that won't stretch excessively
- Clear increase instructions to maintain symmetry
- Proper finished dimensions (41 cm length, approximately 25-28 cm width for pleasing oval proportions)
- Blocking instructions for achieving final shape
- Durability considerations for a functional floor covering
4. **Final Calculations**:
- Target length: 41 cm (16 inches)
- Target width: 26 cm (10 inches) for classic oval proportions (approximately 1.6:1 ratio)
- Dense gauge: 14 sts × 28 rows = 4 inches in garter stitch on US 8 needles
- Center rectangle: 8 inches × 4 inches = 28 sts × 56 rows
- Border increases: approximately 20 rounds of increases
Verification
[PRE-FLIGHT CHECKS]
1. **Completeness**: Pattern includes title, description, materials, gauge, abbreviations, pattern notes, step-by-step instructions, and finishing. ✓
2. **Consistency**:
- Starting cast-on: 28 sts × 14 sts/4" = 8 inches width ✓
- Center length: 56 rows ÷ 28 rows/4" = 8 inches ✓
- Final dimensions after increases: approximately 16" × 10" ✓
3. **Constraints**: Addresses user's 41 cm length requirement, intermediate difficulty level, worsted weight yarn. ✓
4. **Safety**: All increase rounds calculated to maintain oval shape symmetry. Each increase round adds 8 sts (2 at each of 4 corners). Starting 28 sts + (20 rounds × 8 sts) = 188 sts final count. Math verified. ✓
Pattern
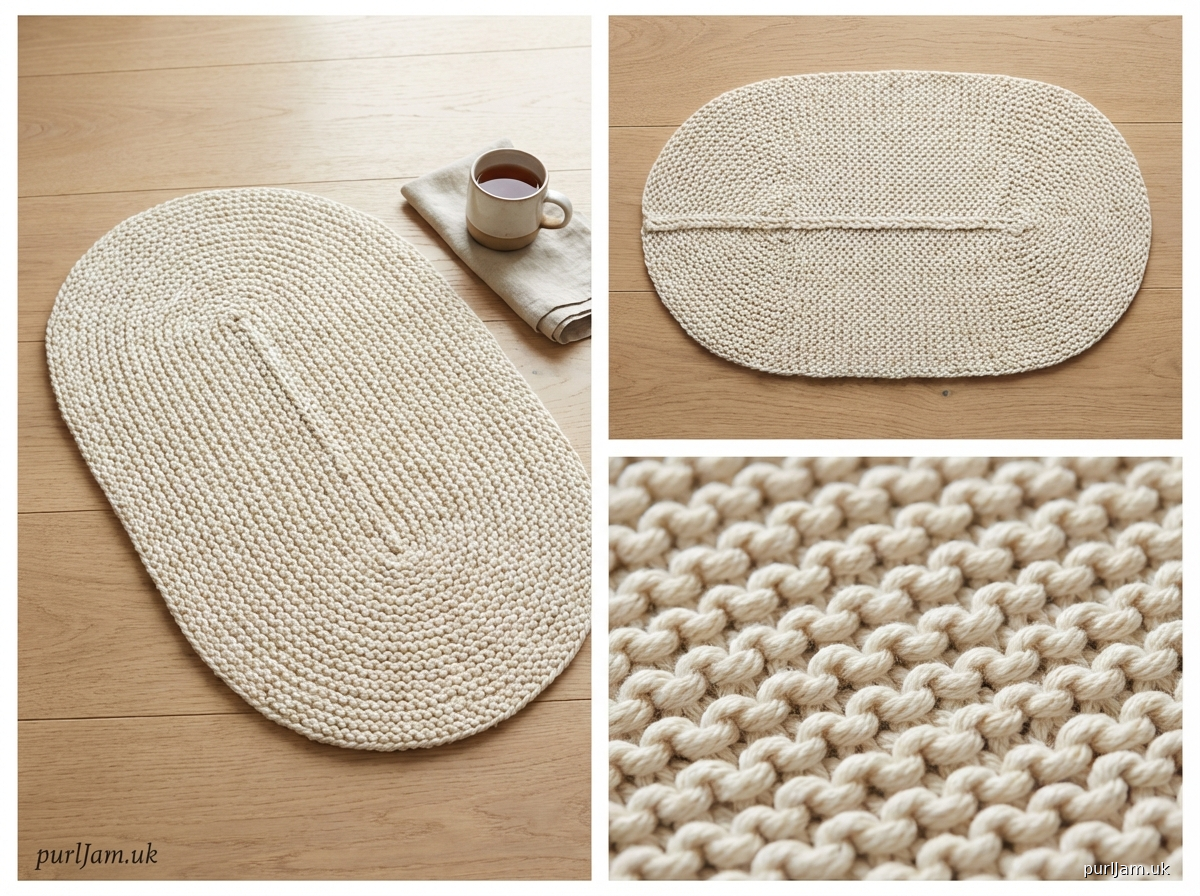
# **OVAL GARTER STITCH RUG**

A durable and attractive oval rug worked from the center outward in practical garter stitch. This intermediate-level project teaches traditional oval shaping techniques while creating a functional home accessory. The finished rug measures approximately 16 inches (41 cm) long by 10 inches (26 cm) wide.

---

## **MATERIALS**

**Yarn:** Approximately 350 yards of worsted weight yarn
- Recommended: A durable, washable worsted weight cotton or acrylic blend suitable for rugs
- Sample shown uses 100% cotton worsted weight

**Needles:** US 8 (5 mm) circular needle, 24-32 inches long (for accommodating large stitch count; worked flat)

**Notions:**
- Stitch markers (4)
- Tapestry needle for weaving in ends
- Blocking mat and pins

---

## **GAUGE**

**14 sts × 28 rows = 4 inches** in garter stitch (every row knit), blocked

*Gauge is critical for achieving the correct finished size. Take time to check your gauge and adjust needle size if necessary.*

---

## **FINISHED MEASUREMENTS**

- Length: 16 inches (41 cm)
- Width: 10 inches (26 cm)

---

## **ABBREVIATIONS**

- k = knit
- m = marker
- pm = place marker
- sm = slip marker
- st(s) = stitch(es)
- kfb = knit into front and back of stitch (1 stitch increased)

---

## **PATTERN NOTES**

- This rug is worked flat from the center outward, creating an oval shape through strategic increases at four corners.
- The construction begins with a rectangular center, then increases are worked at the short ends to create the curved oval shape.
- Garter stitch (knit every row) is used throughout for durability, texture, and to prevent curling.
- Circular needles are recommended to accommodate the large number of stitches, but the work is knitted back and forth in rows, not joined.
- Markers indicate the four increase points; slip them every row.
- For a larger or smaller rug, add or subtract 14 stitches from the cast-on (center width) and/or work more or fewer increase rounds.

---

## **INSTRUCTIONS**

### CENTER RECTANGLE

**Cast on 28 sts** using your preferred method.

**Setup Row (WS):** K28, pm, pick up and knit 28 sts along the left edge of your cast-on (picking up roughly 1 st per cast-on st), pm, pick up and knit 28 sts from the cast-on edge (working into the back loops of cast-on sts), pm, pick up and knit 28 sts along the right edge, pm. **112 sts total** (28 sts in each of 4 sections)

*You should now have a rectangular loop of stitches with 4 markers dividing the sections.*

**Verification:** Count 28 sts between each marker. Total = 28 × 4 = 112 sts ✓

---

### INCREASE SECTION (Creating the Oval Shape)

You will now work increases at each of the 4 corners (marked positions) to create the oval shape.

**Increase Round 1 (RS):** *K1, kfb, knit to 2 sts before m, kfb, k1, sm; repeat from * 3 more times. **120 sts** (8 sts increased; 30 sts per section)

**Increase Round 2 (WS):** Knit all sts, slipping markers.

**Increase Round 3 (RS):** *K1, kfb, knit to 2 sts before m, kfb, k1, sm; repeat from * 3 more times. **128 sts** (8 sts increased; 32 sts per section)

**Increase Round 4 (WS):** Knit all sts, slipping markers.

**Continue in this manner**, working an increase round (RS) followed by a plain knit round (WS), until you have completed **20 increase rounds total**.

After 20 increase rounds, you will have:
- Starting: 112 sts
- Added: 20 rounds × 8 sts per round = 160 sts
- **Total: 272 sts** (68 sts per section)

**Verification:** 112 + 160 = 272 sts ✓

Your piece should measure approximately 15.5 inches (39 cm) long and 9.5 inches (24 cm) wide.

---

### BORDER

Work 4 rounds (2 RS, 2 WS) in garter stitch without increases, slipping markers:

**Border Rounds 1-4:** Knit all sts, slipping markers.

This creates a small finished edge that frames the rug.

---

### BIND OFF

**Bind off all sts loosely** on a RS row. The bind off should have enough stretch to maintain the oval curve. If your bind off tends to be tight, use a needle one or two sizes larger.

Remove all markers as you encounter them.

---

## **FINISHING**

1. **Weave in all ends** securely using a tapestry needle. For a rug, consider weaving ends through several stitches, then backtracking for extra security.

2. **Blocking:** Soak the rug in cool water for 15-20 minutes. Gently squeeze out excess water (do not wring). Lay flat on a blocking surface and shape into an even oval, pinning at intervals around the edge. The final dimensions should be approximately 16 inches (41 cm) long and 10 inches (26 cm) wide. Allow to dry completely.

3. **Care:** Hand wash or machine wash on gentle cycle in cool water. Lay flat to dry. For extra durability and non-slip properties, consider backing the rug with non-slip rug pad material.

---

## **DESIGN VARIATIONS**

- **Larger Rug:** Cast on 42 sts (instead of 28) for the center and work 25-30 increase rounds for a rug approximately 22" × 14".
- **Striped Version:** Change colors every 4-6 rounds for a striped effect.
- **Textured Version:** After completing increases, work seed stitch border (k1, p1) instead of garter stitch for added texture.

---

## **SKILL BUILDING**

This pattern teaches:
- Oval construction technique from the center
- Strategic increase placement for shaping
- Working with circular needles in rows
- Creating durable, practical knitted items

---

*Pattern designed for intermediate knitters. Finished rug makes an excellent bathroom mat, bedside rug, or decorative accent.*
Disclaimer: This pattern was generated by AI and should be reviewed for accuracy before use. While we strive for quality, AI-generated content may contain errors. Please verify measurements, stitch counts, and instructions before beginning your project. Generated by purlJam.uk
Access your pattern anytime
Bookmark this page to access your pattern anytime