Type
Knitting
Difficulty
beginner
Category
pullover
AI Thinking Process
Planning
Verification
Pattern
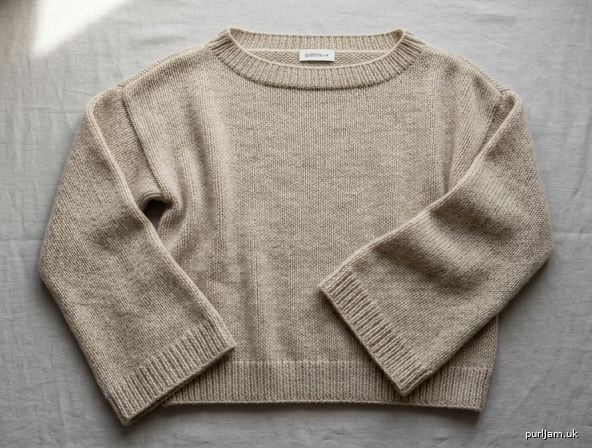
OVERSIZED BELL-SLEEVE DROP SHOULDER PULLOVER
Easy Boatneck Sweater • Worsted Weight • Beginner
Sizes: S (M, L, XL, 2XL)
To fit bust 32–34 (36–38, 40–42, 44–46, 48–50)" / 81–86 (91–97, 102–107, 112–117, 122–127) cm
Finished bust circumference: 44 (48, 52, 56, 60)" / 112 (122, 132, 142, 152) cm
Finished length (shoulder to hem): 23 (23.5, 24, 24.5, 25)" / 58.5 (59.5, 61, 62, 63.5) cm
Sleeve length (underarm to cuff): 17 (17.5, 18, 18, 18.5)" / 43 (44.5, 45.5, 45.5, 47) cm
Positive ease: approximately 10–12" / 25–30 cm (intentionally oversized and boxy)
Yarn
Worsted weight yarn (category 4); approximately 1100 (1200, 1350, 1500, 1650) yd / 1005 (1100, 1235, 1370, 1510) m
Sample uses a soft wool or wool-blend for drape and comfort.
Needles
- US 8 / 5 mm straight or circular needles for body and sleeves
- US 7 / 4.5 mm needles for ribbing (or size needed to obtain gauge)
- Spare needle or stitch holder for 3-needle bind-off (optional)
- Yarn needle, stitch markers, measuring tape
Gauge
20 stitches and 28 rows = 4" / 10 cm in stockinette stitch on larger needles, blocked.
Please swatch and adjust needle size to match gauge.
Abbreviations (US)
BO = bind off
CO = cast on
k = knit
p = purl
pm = place marker
rs = right side
st(s) = stitch(es)
St st = stockinette stitch (knit on RS, purl on WS)
ws = wrong side
m1L = make 1 left (lift bar between sts from front to back, knit through back loop)
m1R = make 1 right (lift bar between sts from back to front, knit through front loop)
Notes for Beginners
- This is a classic drop-shoulder construction: front and back are plain rectangles—no armhole shaping.
- Boatneck requires no neck shaping on the body; the opening is created when joining shoulders.
- Sleeves are picked up along the straight side edges and knit downward. Bell shape is made with simple, evenly spaced increases.
- All pieces are worked flat. Seaming is minimal and straightforward.
- When instructions give multiple numbers, work the number that matches your size: S (M, L, XL, 2XL).
BACK
With smaller needles, CO 110 (120, 130, 140, 150) sts.
Ribbing:
Row 1 (RS): *K1, p1; repeat from * to end.
Row 2 (WS): *K1, p1; repeat from * to end.
Repeat Rows 1–2 until ribbing measures 2" / 5 cm, ending after a WS row.
Change to larger needles.
Work in St st (knit RS rows, purl WS rows) until piece measures 23 (23.5, 24, 24.5, 25)" / 58.5 (59.5, 61, 62, 63.5) cm from cast-on edge, ending after a WS row.
Shoulder and Boatneck Setup (RS):
Knit 30 (33, 36, 39, 42) sts (right shoulder), BO center 50 (54, 58, 62, 66) sts loosely for boatneck, knit remaining 30 (33, 36, 39, 42) sts (left shoulder).
Place each shoulder group on a holder or spare needle. Fasten off.
(Validation: 30 + 50 + 30 = 110; 33 + 54 + 33 = 120; 36 + 58 + 36 = 130; 39 + 62 + 39 = 140; 42 + 66 + 42 = 150 ✓)
FRONT
Work exactly as for Back until piece measures same length as Back to shoulder, ending after a WS row.
Work shoulder and boatneck setup identical to Back:
Knit 30 (33, 36, 39, 42) sts, BO center 50 (54, 58, 62, 66) sts, knit remaining 30 (33, 36, 39, 42) sts.
Place shoulders on holders.
JOIN SHOULDERS
Turn pieces so RS of Front faces RS of Back.
Join right shoulders using 3-needle bind-off (or mattress stitch seam) across the 30 (33, 36, 39, 42) sts.
Repeat for left shoulders.
Center boatneck opening remains open: 50 (54, 58, 62, 66) sts / approximately 10 (10.75, 11.5, 12.5, 13.25)" / 25.5 (27.5, 29, 31.5, 33.5) cm wide.
SLEEVES (make 2) — Comfy Bell Shape
Sleeves are picked up along the side edges (armhole) and worked flat down to the cuff with increases for a gentle bell flare.
Determine armhole depth:
Measure 9 (9.5, 10, 10.5, 11)" / 23 (24, 25.5, 26.5, 28) cm down from each shoulder seam along the side edge of Front and Back; place markers. This is the armhole pick-up zone (total armhole length 18 (19, 20, 21, 22)" / 45.5 (48.5, 51, 53.5, 56) cm).
With larger needles and RS facing, beginning at one marker, pick up and knit 90 (95, 100, 105, 110) sts evenly between markers (approximately 5 sts per inch).
(Validation: 18" × 5 sts/in = 90; 19" × 5 = 95; 20" × 5 = 100; 21" × 5 = 105; 22" × 5 = 110 ✓)
Next row (WS): Purl.
Work in St st for 1" / 2.5 cm, ending after a WS row.
Begin Bell Increases:
Increase Row (RS): K1, m1R, knit to last st, m1L, k1. (2 sts increased)
Work 5 rows even in St st.
Repeat the last 6 rows (Increase Row + 5 even rows) 11 (12, 13, 14, 15) more times.
Total Increase Rows worked: 12 (13, 14, 15, 16).
Stitches after all increases: 114 (121, 128, 135, 142) sts.
(Validation: 90 + 24 = 114; 95 + 26 = 121; 100 + 28 = 128; 105 + 30 = 135; 110 + 32 = 142 ✓)
Continue even in St st until sleeve measures 15 (15.5, 16, 16, 16.5)" / 38 (39.5, 40.5, 40.5, 42) cm from pick-up edge, ending after a WS row.
(Length before cuff ribbing; total sleeve length including rib will be 17 (17.5, 18, 18, 18.5)".)
Cuff Ribbing:
Change to smaller needles.
Next row (RS): *K1, p1; repeat from * to last 0 (1, 0, 1, 0) st, k0 (1, 0, 1, 0).
Work in k1, p1 rib as established for 2" / 5 cm.
BO loosely in rib.
Finished cuff width approximately 14.25 (15.25, 16, 17, 17.75)" / 36 (38.5, 40.5, 43, 45) cm — wide and comfy bell.
Repeat for second sleeve.
NECKBAND
With smaller needles and RS facing, beginning at left shoulder seam, pick up and knit sts around boatneck as follows:
- 50 (54, 58, 62, 66) sts across Back boatneck bind-off,
- 2 sts down side of shoulder join,
- 50 (54, 58, 62, 66) sts across Front boatneck bind-off,
- 2 sts up remaining shoulder join.
Total: 104 (112, 120, 128, 136) sts.
(Validation: 50+2+50+2=104; 54+2+54+2=112; etc. ✓)
Join to work in the round if using circular needle (recommended). Place marker for beginning of round.
Round 1: *K1, p1; repeat from * to end.
Work in k1, p1 rib for 1" / 2.5 cm.
BO loosely in rib.
FINISHING
- Sew sleeve seams from underarm to cuff using mattress stitch.
- Sew side seams from hem ribbing to underarm (armhole marker), matching Front and Back.
- Weave in all ends.
- Block gently to finished measurements, encouraging the bell sleeves to flare softly. Do not overstretch the boatneck.
Schematic Key Measurements (blocked)
- Bust: 44 (48, 52, 56, 60)"
- Length: 23 (23.5, 24, 24.5, 25)"
- Armhole depth: 9 (9.5, 10, 10.5, 11)"
- Shoulder width each side: 6 (6.6, 7.2, 7.8, 8.4)"
- Boatneck width: 10 (10.75, 11.5, 12.5, 13.25)"
- Sleeve upper arm (at pick-up): 18 (19, 20, 21, 22)" circumference equivalent when seamed
- Sleeve cuff: ~14.25–17.75" wide (bell flare)
Beginner Tips
- Count stitches after every increase row on the sleeves.
- Use stitch markers every 10–20 sts when picking up sleeves for even distribution.
- If your row gauge differs, measure length in inches rather than counting rows.
- Loose bind-off on neck and cuffs keeps the boatneck and bells comfortable.
Enjoy your cozy oversized bell-sleeve sweater!
Disclaimer: This pattern was generated by AI and should be reviewed for accuracy before use. While we strive for quality, AI-generated content may contain errors. Please verify measurements, stitch counts, charts, and instructions before beginning your project. Generated by purlJam.uk
Love this pattern?
Save this pattern to your free PurlJam libraryAccess your pattern anytime
Bookmark this page to access your pattern anytime