Type
Knitting
Difficulty
beginner
Category
hat
AI Thinking Process
Planning
Verification
Pattern
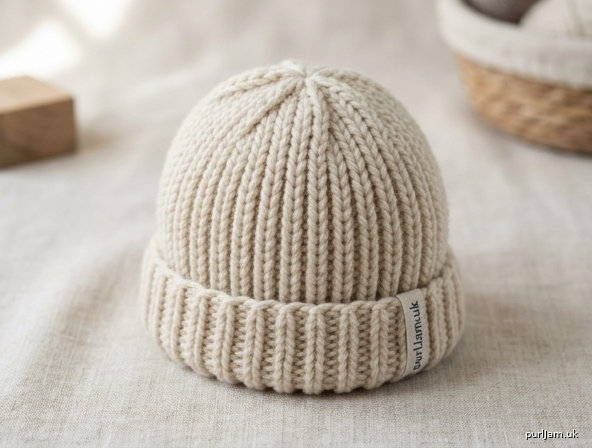
Quick Newborn Ribbed Beanie
A snug first hat in chunky yarn, worked in the round from the brim up. The whole hat is k2, p2 rib, so it stretches to fit and there is no separate brim to join. The crown is closed with simple decreases. This is a single-evening project once you can knit and purl.
Skill level: Beginner (knit, purl, k2tog, p2tog, and joining a round).
Size: Newborn only. Every figure below is for this one size.
Measurements
- To fit head circumference: 32–36 cm (12½–14 in)
- Finished circumference: 30 cm (11¾ in), unstretched; stretches to fit
- Finished height: 13.5 cm (5¼ in) at the tension given
- Rib before crown shaping: 11 cm (4¼ in)
- Crown shaping: 2.5 cm (1 in)
(48 sts ÷ 16 sts × 10 cm = 30 cm ✓. 22 rib rounds × 10 cm ÷ 20 rounds = 11 cm; 5 crown rounds × 10 cm ÷ 20 rounds = 2.5 cm; 11 + 2.5 = 13.5 cm ✓.)
The brim is worn unfolded and should cover the ears, sitting just above the eyebrows. There are no ties or fastenings.
Materials
- Yarn: Approximately 60 g (2 oz) / 80 m (87 yd) of baby-soft chunky yarn (UK chunky / US bulky), including the swatch. One standard 100 g ball is plenty. A springy fibre (machine-washable acrylic, or a soft acrylic/wool blend) is recommended. Cotton has less bounce, so the hat may not stretch as well.
- Needles: 6.5 mm (UK 3 / US 10.5) double-pointed needles, a set of 4 or 5, or a 6.5 mm (UK 3 / US 10.5) circular needle at least 80 cm (32 in) long for magic loop. Straight single-pointed needles will not work; the hat is worked in the round. The circumference is too small for a 40 cm circular needle.
- Notions: 1 stitch marker (a locking marker, or a short scrap of contrast-colour yarn); tapestry needle; scissors.
Standard stocking-stitch tension for chunky yarn is about 14 sts and 19 rows to 10 cm on 6–6.5 mm needles. This hat is worked in rib, which pulls in, so you must match the rib tension below. Start with 6.5 mm and change needle size if your swatch does not match.
Tension (gauge)
16 stitches and 20 rounds = 10 cm (4 in) over k2, p2 rib, measured flat and unstretched, using 6.5 mm needles.
Make a swatch before you cast on the hat. Cast on 32 sts and work every row *k2, p2; rep from * to end for 12 cm. (A flat swatch is acceptable for this project. In the round is ideal if you already know how.) Wash and dry the swatch as you will the hat. Slip it off the needles and measure without stretching. Rib still on the needle always looks wider than it is.
Unstretched, 16 sts and 20 rows should measure 10 cm (4 in). If you have more than 16 sts to 10 cm, change to a larger needle. If you have fewer than 16 sts to 10 cm, change to a smaller needle. Swatch again. Stitch tension must match or the hat will not fit. If only your row tension differs, follow the centimetre lengths in the pattern; the round counts are a guide.
Abbreviations
- k: knit
- p: purl
- k2tog: knit 2 stitches together as if to knit (1 stitch decreased)
- p2tog: purl 2 stitches together as if to purl (1 stitch decreased)
- rep: repeat
- st / sts: stitch / stitches
- rnd / rnds: round / rounds
Pattern notes
- The hat is worked in one piece from the brim to the crown. The right side is always facing you.
- Join carefully. The cast-on edge should lie in one smooth ring around the needle, not spiralling over it. If you notice a twist, pull the work back and rejoin before you continue. A twist cannot be fixed later.
- Do not decrease when you join. You still have 48 sts after the join.
- Keep a marker at the start of the round, and slip it as you come to it. If a ring marker falls off at the gap between double-pointed needles, use a locking marker in the first stitch, or let the cast-on tail hang at the start of the round.
- Choose a soft yarn. Newborn skin is easily irritated. Weave every end in on the inside so it cannot be pulled free.
- This pattern has no cords, ties, buttons, or beads. A chunky hat is warm: use it outdoors, and take it off indoors so the baby does not overheat. Do not cover the baby’s face.
Instructions
Brim and body
Using 6.5 mm needles, cast on 48 sts loosely with the long-tail cast-on. (48 ÷ 4 = 12 repeats of k2, p2 ✓.)
If your cast-on is usually tight, cast on over two needles held together, then slip one needle out.
Arrange the stitches evenly:
- 16 sts on each of 3 double-pointed needles, or
- 12 sts on each of 4 double-pointed needles, or
- 24 sts on each half of a magic-loop needle.
Join to work in the round, taking care not to twist the cast-on edge. Place a marker for the beginning of the round. 48 sts.
Round 1: *K2, p2; rep from * to end.
This round sets k2, p2 rib. Repeat Round 1 until the piece measures 11 cm (4¼ in) from the cast-on edge, unstretched. At the tension given, this is 22 rounds. (22 × 10 cm ÷ 20 rounds = 11 cm ✓.)
48 sts remain.
Stretch test: While the stitches are still on the needle, ease the brim open with your hands. It should stretch comfortably to about 36 cm (14 in) and spring back. If it will not stretch, the cast-on or the rib is too tight to fit a newborn. Pull the work back and start again on a needle 0.5 mm larger, casting on more loosely.
Crown shaping
Change to double-pointed needles when the stitches no longer reach comfortably around a circular needle. Rearrange stitches whenever a decrease would fall awkwardly across a needle tip. Keep the start-of-round marker in place.
The first two decrease rounds follow the rib. After that, the rib stops.
Round 1: *K2, p2tog; rep from * to end. 36 sts. (12 repeats; each 4-st repeat loses 1 st; 48 − 12 = 36 ✓. The pattern is now k2, p1.)
Round 2: *K2tog, p1; rep from * to end. 24 sts. (Each repeat uses one k2, p1 group from the round below; 12 repeats; 36 − 12 = 24 ✓.)
Stop following the rib. Knit every remaining decrease. Do not purl.
Round 3: *K2tog; rep from * to end. 12 sts. (24 ÷ 2 = 12 ✓.)
Round 4: *K2tog; rep from * to end. 6 sts. (12 ÷ 2 = 6 ✓.)
Round 5: *K2tog; rep from * to end. 3 sts. (6 ÷ 2 = 3 ✓.)
Finishing
Cut the yarn, leaving a tail of about 20 cm (8 in). Thread the tail onto a tapestry needle. Pass the needle through the remaining 3 sts, pull firmly to close the centre of the crown, and pass through those 3 sts once more to secure. Take a couple of small stitches across the inside of the opening so no hole remains. Weave the end in on the inside.
Weave in the cast-on tail on the inside. Trim ends only after they are woven, close to the fabric, so they cannot work loose.
Block only if the ball band allows. Wash gently, reshape with your hands, and dry flat. Do not pin the rib open and do not stretch it while it dries, or the hat will lose its spring.
On the finished hat, the brim should stretch easily to about 36 cm (14 in) and recover. Ears should be covered when the brim sits just above the eyebrows. If your row tension was loose and the hat is a little long, the rib brim may be turned up once. If you matched the stitch tension, do not expect to need a fold.
Optional pompom
A pompom was not requested and is not part of this pattern. It is better left off a newborn hat: a pompom is a choking hazard, and it should not be worn for sleep or unsupervised wear. If you add one for a photograph, make it small, about 5 cm (2 in), sew it through the crown several times with strong yarn, and remove it before the hat is worn for sleep or left with the baby.
Care
Follow the ball-band instructions. Wash gently and dry flat, without stretching the rib, so the hat keeps its elasticity. Check the inside before each wear and trim or re-sew any end that has worked loose.
Your hat is ready to wear.
Disclaimer: This pattern was generated by AI and should be reviewed for accuracy before use. While we strive for quality, AI-generated content may contain errors. Please verify measurements, stitch counts, charts, and instructions before beginning your project. Generated by purlJam.uk
Love this pattern?
Save this pattern to your free PurlJam libraryAccess your pattern anytime
Bookmark this page to access your pattern anytime