Type
Knitting
Difficulty
intermediate
Category
custom
AI Thinking Process
Planning
Verification
Pattern
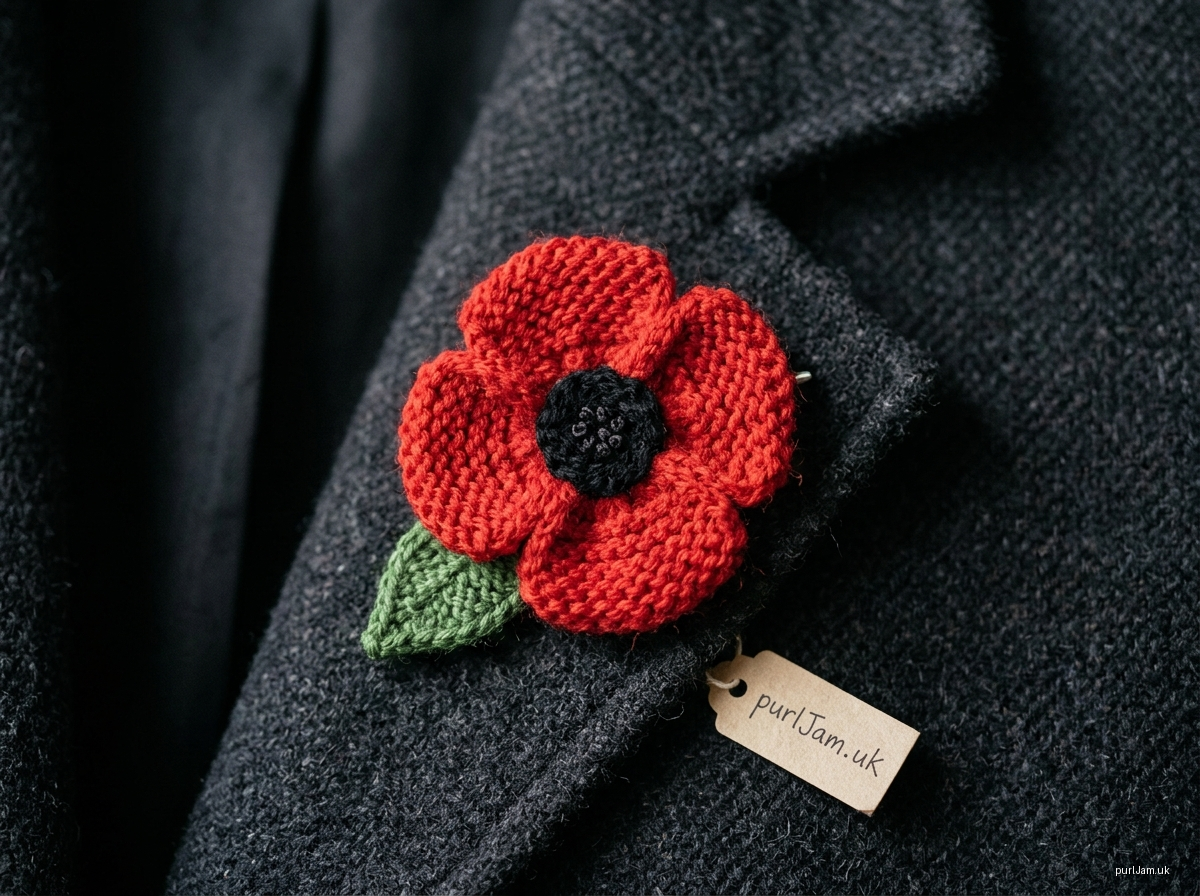
Quiet Remembrance Poppy Brooch
A small, respectful knitted red poppy lapel pin with a black center and a single green leaf, worn for Remembrance Day / Armistice Day. It is worked entirely in garter stitch, so it is ideal for beginners and quick enough to make several. There are no logos or lettering.
Note: I'm not able to save files to your account. This pattern has not been published or emailed. You can copy it into My Library and set it to Private.
Skill level: Beginner (knit stitch, k2tog, kfb, simple color change, basic sewing)
Finished Size
- Flower: about 2.5 in (6.5 cm) diameter
- Leaf: about 1.25 in long × 1 in wide (3 × 2.5 cm)
- Overall brooch: about 2.75 in (7 cm) across
Materials
- Worsted-weight yarn (wool or wool blend recommended for crisp stitches):
- Poppy Red: about 10 yd (9 m)
- Black: about 3 yd (2.75 m)
- Leaf Green: about 4 yd (3.7 m)
- Needles: US 6 (4 mm) straight needles. This is deliberately one size smaller than usual for worsted, to give a firm fabric.
- Notions:
- Tapestry needle
- 1 in (2.5 cm) bar pin brooch back, or a sturdy safety pin
- Optional: 1.5 in (4 cm) circle of black or red felt for backing
- Sewing needle and matching thread (optional, for attaching the pin)
- Scissors
Gauge
20 sts and 40 rows (20 garter ridges) = 4 in (10 cm) in garter stitch.
Gauge is not critical for this project. A slightly different gauge only changes the size a little. Do keep the fabric firm so the brooch holds its shape.
Abbreviations
- CO: cast on
- k: knit
- k2tog: knit 2 stitches together (1 st decreased)
- kfb: knit into the front and back of the same stitch (1 st increased)
- ssk: slip, slip, knit the 2 slipped stitches together through the back loops (1 st decreased)
- s2kp: slip 2 stitches together knitwise, k1, pass the 2 slipped stitches over (2 sts decreased)
- RS / WS: right side / wrong side
- st(s): stitch(es)
Pattern Notes
- Every row is knit (garter stitch).
- Row 1 is a RS row, so all odd-numbered rows are RS rows. You may want to mark the RS with a scrap of yarn.
- Always change color at the start of a RS row. This gives a clean black ring with no broken red "bumps."
- Leave long tails as directed. They are used for gathering and seaming.
Instructions
Flower (Poppy Red and Black)
With Poppy Red, use the long-tail method to CO 40 sts, leaving a 10 in (25 cm) tail for seaming.
Rows 1–6: Knit. This gives 3 garter ridges of petal edge. (40 sts)
Row 7 (RS): (K2tog, k3) 8 times. (8 decreases → 40 − 8 = 32 sts ✓)
Row 8: Knit.
Row 9: (K2tog, k2) 8 times. (32 − 8 = 24 sts ✓)
Row 10: Knit.
Cut Poppy Red, leaving a 4 in (10 cm) tail. Join Black, leaving a 4 in tail.
Row 11 (RS): With Black, (k2tog, k1) 8 times. (24 − 8 = 16 sts ✓)
Row 12: Knit.
Row 13: K2tog 8 times. (16 − 8 = 8 sts ✓)
Cut Black, leaving an 8 in (20 cm) tail. Thread the tail onto the tapestry needle and pass it through all 8 remaining sts. Pull firmly to close the center.
Total: 13 rows ≈ 1.3 in radius → about 2.5 in diameter once seamed ✓
Leaf (Green)
With Green, CO 3 sts, leaving a 6 in (15 cm) tail for attaching.
Rows 1–2: Knit. (3 sts)
Row 3 (RS): Kfb, k1, kfb. (3 + 2 = 5 sts ✓)
Rows 4–8: Knit. (5 sts)
Row 9: Ssk, k1, k2tog. (5 − 2 = 3 sts ✓)
Row 10: Knit.
Row 11: S2kp. (3 − 2 = 1 st ✓)
Cut the yarn and pull it through the last stitch to fasten off. Weave this tip tail into the leaf.
Stitch Chart (Flower, one of 8 identical wedges)
Each wedge starts with 5 sts and is repeated 8 times across the row. Read RS rows right to left. All rows are knit.
Row 13 (Blk)  /  /                    → 1 st/wedge  (8 total)
Row 12 (Blk)  - -                     ( - = knit on WS )
Row 11 (Blk)  /  .  .                 → 2 st/wedge  (16)
Row 10 (Red)  - - - -
Row 9  (Red)  /  .  .  .              → 3 st/wedge  (24)
Row 8  (Red)  - - - - -
Row 7  (Red)  /  .  .  .  .           → 4 st/wedge  (32)
Rows 1–6      . . . . .  knit         5 st/wedge    (40)
Key: .  = k on RS     - = k on WS     /  = k2tog
Finishing
- Seam the flower. Use the long Black tail to tighten the center once more. Then thread the Poppy Red cast-on tail and sew the two side edges together from the outer edge to the center, using mattress stitch or a neat whipstitch. The flower now lies flat as a circle about 2.5 in across.
- Shape the petals. With a 12 in (30 cm) length of Poppy Red, bring the needle up from the back at the outer edge. Take it over the front of the flower into the black center, then back down to the back. Pull gently to create a soft dip. Repeat at quarter points to form 4 petals, then knot securely on the WS.
- Add center detail (optional). With the Black tail, work 3–5 French knots or small straight stitches in the center for a seed-head look.
- Attach the leaf. Position the leaf base under the flower at about the 7 o'clock position, with the tip angled outward. Use the leaf's CO tail to stitch it securely to the back of the flower.
- Add the backing (optional but recommended). Whipstitch the felt circle to the back of the flower. This hides the yarn tails and the leaf join.
- Attach the pin back. Center the bar pin horizontally, slightly above the middle of the back. This placement keeps the poppy from tipping forward when worn. Sew it on firmly through the holes in the pin plate, using thread or split yarn and passing through the felt and fabric several times.
- Weave in and block. Weave in all remaining ends. Lightly steam the flower, or spritz it with water, pat it flat, and leave it to dry.
Wearing note: Traditionally the poppy is worn on the left side, over the heart.
Disclaimer: This pattern was generated by AI and should be reviewed for accuracy before use. While we strive for quality, AI-generated content may contain errors. Please verify measurements, stitch counts, charts, and instructions before beginning your project. Generated by purlJam.uk
Love this pattern?
Save this pattern to your free PurlJam libraryAccess your pattern anytime
Bookmark this page to access your pattern anytime