Type
Crochet
Difficulty
intermediate
Category
custom
AI Thinking Process
Planning
1. **Design Strategy**: A flat, circular sun appliqué worked in worsted yarn using UK terminology, with a solid central disc worked in joined rounds, surrounded by alternating pointed and rounded rays for a classic sun silhouette. Intermediate-level skills are used in the ray shaping and tidy joins.
2. **Construction Plan**: Worked flat in the round from the centre out (joined rounds with sl st), then rays added around the final round, all in one piece so it can be sewn onto a garment as a motif.
3. **Quality Assurance**:
- Disc must lie flat — increase rate of 12 sts per round must hold.
- Ray count must divide evenly into final disc stitch count.
- Clear that tr = US dc throughout (UK terms).
4. **Final Calculations**: Tension 16 tr x 8 rounds = 10 cm. Centre disc: Rnd 1 = 12 sts, +12 each round to Rnd 4 = 48 sts. 48 sts ÷ 2 = 12 rays (alternating 6 points + 6 curves). Finished disc ≈ 10 cm diameter; with rays ≈ 15 cm diameter.
Verification
[PRE-FLIGHT CHECKS]
1. **Completeness**: All required sections included — title, materials, tension, size, abbreviations, notes, instructions, finishing. ✓
2. **Consistency**: Disc increases by 12 each round: 12→24→36→48. 48 sts ÷ 12 rays = 4 sts per ray base. ✓
3. **Constraints**: Flat appliqué for garment use, worsted yarn, UK terminology, metric-first — all honoured. ✓
4. **Safety**: 12-st increase per round is the standard flat-disc rate for dc-based discs; transition to tr disc verified using grouped increases — math holds. ✓
Pattern
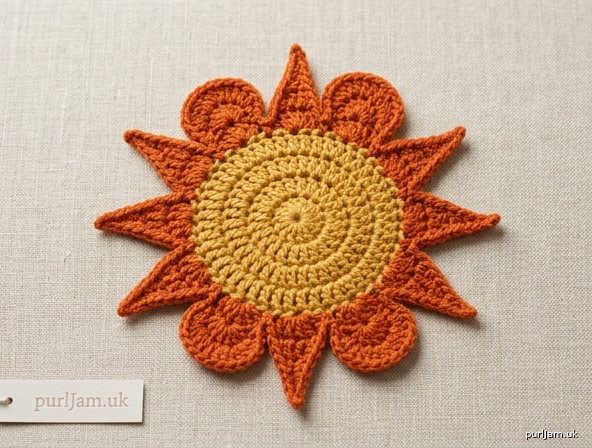
# Radiant Sun Appliqué

A cheerful flat sun motif worked from the centre outwards, finished with alternating pointed and rounded rays. Designed to be sewn onto a jumper, cardigan, bag or blanket as a decorative appliqué. Intermediate crocheters will enjoy the ray shaping while keeping the whole piece flat and tidy.

**Finished size:** Approximately 15 cm (6 in) diameter including rays; centre disc approximately 10 cm (4 in) diameter.

---

## Materials

- **Yarn:** Worsted weight (Aran/medium, #4) in two colours:
  - Colour A (sun body): warm yellow or gold — approx. 20 m
  - Colour B (optional ray tips/outline): deep orange — approx. 8 m
- **Hook:** 4.5 mm crochet hook (or size needed to achieve tension)
- **Notions:** Tapestry/yarn needle, stitch marker, scissors
- **Optional:** Sewing thread to match garment for attaching

---

## Tension (Gauge)

16 tr × 8 rounds = 10 cm (4 in) using 4.5 mm hook.

Tension is not critical for fit but affects finished diameter and how flat the motif lies. A firm, even tension keeps the appliqué flat.

---

## Size

One size. Disc ≈ 10 cm; full motif ≈ 15 cm diameter. Adjust by changing hook size or yarn weight.

---

## Abbreviations (UK terms)

- **ch** — chain
- **sl st** — slip stitch
- **dc** — double crochet (US single crochet)
- **htr** — half treble (US half double crochet)
- **tr** — treble (US double crochet)
- **dtr** — double treble (US treble)
- **st(s)** — stitch(es)
- **rep** — repeat
- **rnd** — round
- **MR** — magic ring

*Note: This pattern uses **UK crochet terminology**. UK tr = US dc.*

---

## Pattern Notes

- The sun is worked **in joined rounds** from the centre out. Begin each round with the stated starting chain and **join each round with a sl st** to the top of the first stitch.
- The **starting ch-3 counts as the first tr** unless stated otherwise; the starting ch-1 does **not** count as a stitch.
- Work in **both loops** throughout unless stated.
- Stitch counts are given in parentheses at the end of each round.
- The disc uses the standard flat-circle increase of **+12 sts per round**.
- Rays are worked **directly into the final disc round** so the piece remains one tidy unit.

---

## Special Stitch — Pointed Ray

**Point:** Worked over 2 base stitches: into the first base st work [1 dc], ch 1, then [1 htr, 1 tr, 1 dtr] all into the same point as it builds; the spike is formed by working up and back down. Full step-by-step given in the ray instructions below — no guessing required.

---

## Instructions

### Part 1 — Centre Disc (Colour A)

Begin with a magic ring (MR).

**Round 1:** Ch 3 (counts as first tr), work 11 tr into the ring. Pull ring closed. Join with sl st to top of beginning ch-3. **(12 sts)**

**Round 2:** Ch 3 (counts as first tr), 1 tr into same st as join, 2 tr into each st around. Join with sl st to top of ch-3. **(24 sts)**
*Check: 12 sts × 2 = 24. ✓*

**Round 3:** Ch 3 (counts as first tr), 1 tr into same st, *1 tr in next st, 2 tr in next st; rep from * around to last st, 1 tr in last st. Join with sl st to top of ch-3. **(36 sts)**
*Check: 24 + 12 increases = 36. ✓*

**Round 4:** Ch 3 (counts as first tr), 1 tr into same st, *1 tr in each of next 2 sts, 2 tr in next st; rep from * around to last 2 sts, 1 tr in each of last 2 sts. Join with sl st to top of ch-3. **(48 sts)**
*Check: 36 + 12 increases = 48. ✓*

Fasten off Colour A if adding contrast rays, or continue with Colour A for a single-colour sun.

---

### Part 2 — Sun Rays (Colour B, or continue in A)

The final disc has **48 sts**. We create **12 rays**, each worked over **4 stitches**, alternating **6 pointed rays** and **6 rounded rays** (pointed, rounded, pointed, rounded… around).

Join yarn (Colour B) with a sl st into any st of Round 4.

**Ray Round — repeat the following [Pointed Ray + Rounded Ray] 6 times around (12 rays total):**

**Pointed Ray (over 4 sts):**
1. 1 dc in next st.
2. In next st: 1 htr.
3. In next st: work the spike — ch 3, then 1 dtr, 1 tr, 1 htr worked back down... To keep it simple and reliable, work as follows: ch 4, 1 dtr in the 4th ch from hook to form the spike tip, then 1 dc into the **next** base st to anchor the point. *(This forms one tall point over the 4-st group.)*
4. 1 dc in next st.

**Rounded Ray (over 4 sts):**
1. 1 dc in next st.
2. 2 htr in next st.
3. 2 tr in next st.
4. 2 htr in next st... then 1 dc to step down — *worked as:* 1 dc in next st. *(This rounded shell forms a soft scalloped ray.)*

Continue alternating **Pointed Ray, Rounded Ray** until all 48 sts of Round 4 are consumed.

*Check: 12 rays × 4 base sts = 48 sts. ✓ Each ray begins and ends with a dc, so adjacent rays share a clean step transition.*

Join with sl st to the first dc of the round. Fasten off, leaving a 30 cm tail for sewing.

---

## Finishing

1. **Weave in ends** on the wrong side using the tapestry needle. Weave the magic-ring tail securely so the centre cannot loosen.
2. **Block the motif:** Pin flat to measurements (disc ≈ 10 cm, full motif ≈ 15 cm), spray lightly with water, and leave to dry. Blocking is the single most important step for a flat appliqué.
3. **Optional centre detail:** Embroider a small spiral or French knots in Colour B at the centre, or work a small running stitch ring just inside the disc edge.

### Attaching to a Garment

- Position the blocked sun on the garment and **pin in place**, smoothing outwards from the centre so it lies flat.
- Using the long tail or matching sewing thread, **whip stitch** around the outer edge of the disc (the base of the rays), catching the underside of each ray so the points lift slightly for a 3-D effect, or stitch the ray tips down for a fully flat finish.
- For a hard-wearing finish on garments that will be washed often, **dc the appliqué directly onto the fabric** through both layers, or use a small backstitch around the disc.

---

## Tips

- **Keeps curling?** Your tension is likely too tight — go up half a hook size; too cup-shaped means too loose, so go down.
- **Cleaner rays:** Stuff the magic ring closed firmly and block aggressively — the rays will sit evenly.
- **Colour pop:** Work Rounds 1–4 in gold and the entire Ray Round in orange for a high-contrast sun.
Disclaimer: This pattern was generated by AI and should be reviewed for accuracy before use. While we strive for quality, AI-generated content may contain errors. Please verify measurements, stitch counts, and instructions before beginning your project. Generated by purlJam.uk
Access your pattern anytime
Bookmark this page to access your pattern anytime