Type
Knitting
Difficulty
intermediate
Category
custom
AI Thinking Process
Planning
Verification
Pattern
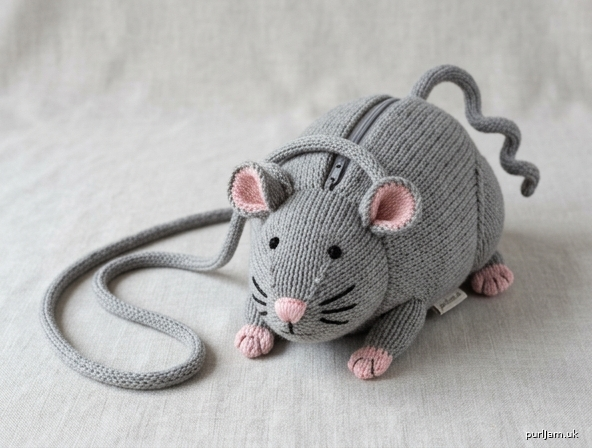
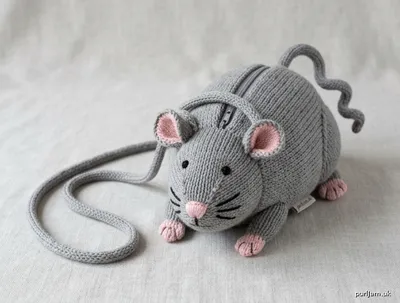
Remy Rat Purse
A charming intermediate knitted shoulder purse shaped like a plump little rat. The body is worked in the round with short-row shaping for a rounded belly, a discreet back zipper opening, and sewn-on ears, feet, and curly tail. Perfect for carrying phone, keys, and treats. Finished size is approximately 11" long (nose to tail base) × 5" tall × 4" deep, with a 40" strap.
Materials
- Worsted weight yarn (approx. 180 yds / 165 m total):
- MC (rat gray): 140 yds / 128 m
- CC1 (pink): 25 yds / 23 m (ears, nose, feet pads, inner ears)
- CC2 (black): 10 yds / 9 m (eyes, nose tip, whiskers)
- CC3 (off-white or cream): 5 yds / 5 m (optional belly highlight)
- US 7 (4.5 mm) 16" circular needle and set of DPNs (or size to obtain gauge)
- US 5 (3.75 mm) DPNs for i-cord strap and tail (optional, for firmer cord)
- Stitch markers (4)
- Tapestry needle
- Polyester fiberfill (small amount for head and feet only)
- 7" (18 cm) all-purpose zipper (gray or black)
- Sewing needle and matching thread for zipper
- Optional: ½ yd cotton fabric for lining, sewing machine or hand-sewing supplies
Gauge
20 sts and 28 rnds = 4" (10 cm) in stockinette stitch worked in the round on US 7 (4.5 mm), blocked. Take time to check gauge. Finished measurements depend on gauge.
Size
One size: approx. 11" (28 cm) long × 5" (12.5 cm) tall × 4" (10 cm) deep, 40" (102 cm) strap. (To adjust size, change needle size or add/subtract sts in multiples of 4 while keeping gauge proportional.)
Abbreviations
- BO: bind off
- CC: contrasting color
- CO: cast on
- dec: decrease
- DPN(s): double-pointed needle(s)
- inc: increase
- k: knit
- k2tog: knit 2 together
- kfb: knit into front and back of stitch (1 st increased)
- m: marker
- m1L: make 1 left (lift bar between sts from front to back, k through back loop)
- m1R: make 1 right (lift bar between sts from back to front, k through front loop)
- MC: main color
- p: purl
- pm: place marker
- rnd(s): round(s)
- RS: right side
- ssk: slip, slip, knit (slip 1 kwise, slip 1 kwise, insert left needle into fronts and k2tog)
- st(s): stitch(es)
- St st: stockinette stitch
- w&t: wrap and turn
- WS: wrong side
- wyib: with yarn in back
- wyif: with yarn in front
- yo: yarn over
Pattern Notes
- Body is worked in the round from the base upward. Short rows create the rounded belly. A vertical slit is left open on the back for the zipper.
- Head is shaped with paired decreases and lightly stuffed; face is embroidered after assembly.
- Ears, feet, and tail are worked separately and sewn on.
- Strap is a 4-st i-cord.
- All stitch counts are confirmed after every shaping section (shown as “XX sts”).
- Intermediate skills required: working in the round, short rows (w&t), i-cord, basic embroidery, zipper insertion.
- Keep floats loose if carrying CC3 for optional belly stripe.
Instructions
Body
With MC and circular needle, CO 40 sts. Pm for beg of rnd and join to work in the round, being careful not to twist. (40 sts = 8" circumference at gauge ✓)
Base rnds: Knit 6 rnds even. Inc rnd 1: *K4, kfb; rep from * to end. (48 sts — 8 increases → 40 + 8 = 48 ✓) Knit 4 rnds even. Inc rnd 2: *K5, kfb; rep from * to end. (56 sts — 8 increases → 48 + 8 = 56 ✓) Knit 3 rnds even.
Belly short-row shaping (worked over next 20 sts only): Short Row 1 (RS): K20, w&t. Short Row 2 (WS): P20, w&t. Short Row 3: K18, w&t. Short Row 4: P18, w&t. Short Row 5: K16, w&t. Short Row 6: P16, w&t. Short Row 7: K14, w&t. Short Row 8: P14, w&t. Next rnd: Knit all the way around, picking up wraps and knitting them together with their sts as you meet them. (56 sts)
Resume working even in St st for 28 rnds (body length now approx. 6" from CO edge). (28 rnds × 4"/28 = 4"; plus earlier 13 rnds ≈ 1.9" + short rows ≈ 6" total body ✓)
Zipper slit setup: On next rnd, k28, BO 2 sts (center back), k to end. (54 sts remain) From this point, work back and forth in rows (no longer in the round) to create the open slit: Row 1 (RS): K to end. Row 2 (WS): P to end. Rep Rows 1–2 for 20 more rows (22 rows total of flat working = approx. 3.1"). End after a WS row. (22 rows × 4"/28 ≈ 3.1" slit length ✓)
Rejoin for head: Next rnd (RS): K across all sts, then CO 2 sts over the gap using backward-loop CO. Pm for new beg of rnd at center of the 2 CO sts (center back). Resume working in the round. (56 sts)
Head shaping: Knit 4 rnds even. Dec rnd 1: *K5, k2tog; rep from * to end. (48 sts — 8 decreases → 56 – 8 = 48 ✓) Knit 3 rnds even. Dec rnd 2: *K4, k2tog; rep from * to end. (40 sts — 8 decreases → 48 – 8 = 40 ✓) Knit 2 rnds even. Dec rnd 3: *K3, k2tog; rep from * to end. (32 sts — 8 decreases → 40 – 8 = 32 ✓) Knit 2 rnds even. Dec rnd 4: *K2, k2tog; rep from * to end. (24 sts — 8 decreases → 32 – 8 = 24 ✓) Knit 1 rnd even. Dec rnd 5: *K1, k2tog; rep from * to end. (16 sts — 8 decreases → 24 – 8 = 16 ✓) Knit 1 rnd even. Dec rnd 6: *K2tog; rep from * to end. (8 sts — 8 decreases → 16 – 8 = 8 ✓)
Break yarn, thread tail through remaining 8 sts, pull tight to close, and secure. Lightly stuff the head only (do not stuff the body—leave hollow for purse function). Weave in end.
Ears (make 2)
With CC1 and DPNs, CO 12 sts. Join to work in the round; pm. Rnd 1: Knit. Rnd 2: *K2, kfb; rep from * to end. (16 sts — 4 increases → 12 + 4 = 16 ✓) Rnds 3–5: Knit. Rnd 6: *K2, k2tog; rep from * to end. (12 sts — 4 decreases → 16 – 4 = 12 ✓) Rnd 7: Knit. Rnd 8: *K1, k2tog; rep from * to end. (8 sts — 4 decreases → 12 – 4 = 8 ✓) Rnd 9: *K2tog; rep from * to end. (4 sts) Break yarn, thread through remaining sts, pull tight. Flatten ear into a rounded triangle. With MC, embroider a few sts on the lower outer edge if desired for outer-ear contrast. Set aside.
Front Feet (make 2)
With MC and DPNs, CO 8 sts. Join; pm. Rnds 1–4: Knit. Rnd 5: *K1, kfb; rep from * to end. (12 sts — 4 increases → 8 + 4 = 12 ✓) Rnds 6–8: Knit. Rnd 9: *K1, k2tog; rep from * to end. (8 sts) Lightly stuff. Break yarn, thread through sts, pull tight, and secure. With CC1, embroider a small oval pad on the sole. Set aside.
Back Feet (make 2)
Work same as Front Feet but CO 10 sts and work 6 rnds before the increase rnd, then continue identically (final stuffed foot is slightly larger). (Inc rnd: *K1, kfb; rep from * → 15 sts; after dec back to 10 sts before closing.)
Tail
With MC and smaller DPNs, CO 5 sts. Work 5-st i-cord for 10" (or desired length): *K5, do not turn, slide sts to other end of DPN, pull yarn snug across back; rep from * until tail measures 10". Next row: K1, k2tog, k2tog. (3 sts) K3tog, fasten off. Curl the tail gently into a loose spiral and steam-block to set the curve.
Strap
With MC and smaller DPNs, CO 4 sts. Work 4-st i-cord for 40": *K4, do not turn, slide sts to other end of DPN, pull yarn snug; rep from * until strap measures 40". BO all sts.
Finishing
- Zipper: Pin the 7" zipper into the back slit (teeth facing inward). Using sewing needle and thread, hand-stitch zipper tapes securely to the knitted edges with backstitch or whipstitch. Test zipper function.
- Optional lining: Cut fabric to fit body + head opening allowance. Sew side and bottom seams, insert into purse, and hand-stitch top edge just below zipper.
- Attach ears: Position ears on top of head about 1" apart, angled slightly outward. Sew firmly with MC around the base.
- Attach feet: Sew front feet to lower front sides of body (about 2" up from base and 1.5" either side of center). Sew back feet similarly toward the rear, slightly splayed.
- Attach tail: Sew wide end of tail securely to center back just above the zipper top.
- Strap: Sew one end of i-cord strap to each side of the body at the “shoulder” area (approx. 1" below ear line and 1" forward of zipper). Reinforce with several passes.
- Face embroidery (use photos of rats for reference or freehand):
- Eyes: With CC2, make two small satin-stitch ovals or French-knot eyes spaced about 1" apart on the head.
- Nose: With CC1, satin-stitch a small triangle or oval at the tip of the head; add a tiny CC2 stitch at the very tip.
- Whiskers: With CC2, make 3 long straight stitches on each side of the nose.
- Mouth (optional): Small curved backstitch in CC2.
- Weave in all remaining ends. Gently block by stuffing with clean towels and steaming (avoid crushing the zipper). Allow to dry completely.
Your Remy Rat Purse is ready to scurry out into the world! Stuff with essentials and enjoy.
Disclaimer: This pattern was generated by AI and should be reviewed for accuracy before use. While we strive for quality, AI-generated content may contain errors. Please verify measurements, stitch counts, and instructions before beginning your project. Generated by purlJam.uk
Love this pattern?
Save this pattern to your free PurlJam libraryAccess your pattern anytime
Bookmark this page to access your pattern anytime