Type
Knitting
Difficulty
intermediate
Category
hat
AI Thinking Process
Planning
Verification
Pattern
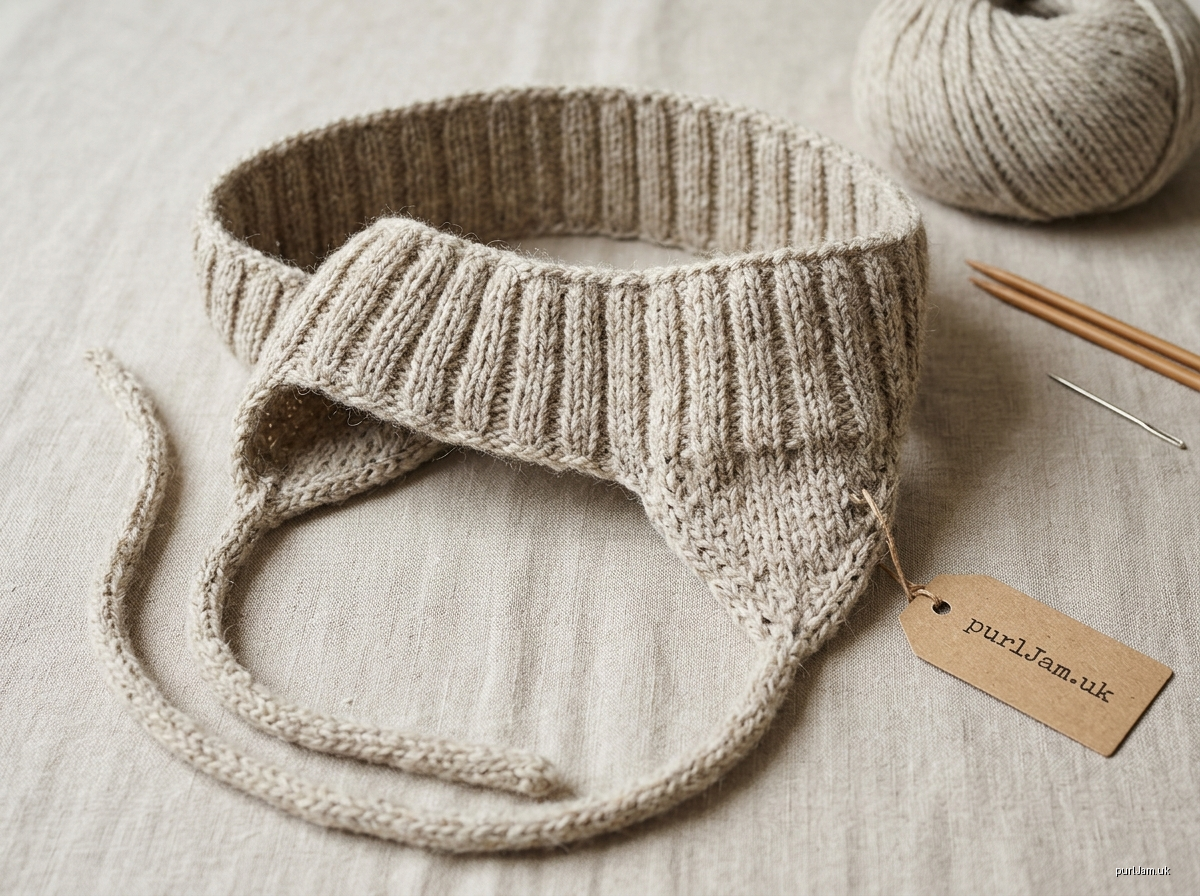
Ribbed Headband with Earflaps and I-Cord Ties
Style: Adapted from the Brimmed and Shaped Hats template. This is a ribbed band with integrated earflaps and ties, similar to a bonnet-style tie closure but open at the crown. No crown shaping is required.
Skill level: Intermediate. You will work 2x2 rib in the round, pick up stitches, work shaped flat rib, and knit i-cord.
Sizes
Baby (Child, Adult S/M, Adult L)
| Baby | Child | Adult S/M | Adult L | |
|---|---|---|---|---|
| Head circumference | 16 in (41 cm) | 19 in (48 cm) | 21 in (53 cm) | 23 in (58 cm) |
| Finished band circumference, unstretched | 14.67 in (37 cm) | 17.33 in (44 cm) | 19.33 in (49 cm) | 21.33 in (54 cm) |
| Negative ease | 1.33 in | 1.67 in | 1.67 in | 1.67 in |
| Band depth | 2.5 in | 3.25 in | 3.5 in | 3.5 in |
| Earflap width at base | 3 in | 3.67 in | 4.33 in | 5 in |
| Earflap depth | 2.5 in | 3 in | 3.5 in | 4.25 in |
| I-cord tie length | 8 in | 10 in | 12 in | 12 in |
Materials
- Yarn: Worsted weight (4) wool or wool blend, approximately 60 (80, 100, 120) yd / 55 (73, 91, 110) m.
- Needles:
- US 7 (4.5 mm) 16 in circular needle for Child, Adult S/M and Adult L.
- For Baby, use DPNs or a long circular for magic loop, since 88 sts is too few for a 16 in circular.
- Two US 7 (4.5 mm) DPNs for the earflaps and i-cord.
- Adjust needle size as needed to obtain gauge.
- Notions: 1 stitch marker, tapestry needle.
Gauge
24 sts and 28 rnds = 4 in (10 cm) in 2x2 rib, worked in the round. Measure unstretched (relaxed, not pulled open) after blocking.
This works out to 6 sts and 7 rnds per inch. If you get more stitches per inch, go up a needle size; if fewer, go down a size. A loose gauge produces a band that slips off the head.
Abbreviations (US)
| Abbreviation | Meaning |
|---|---|
| k | knit |
| p | purl |
| k2tog | knit 2 together (1 st decreased, leans right) |
| ssk | slip 2 sts knitwise one at a time, then knit them together through the back loops (1 st decreased, leans left) |
| rnd(s) | round(s) |
| RS / WS | right side / wrong side |
| pm | place marker |
| st(s) | stitch(es) |
| patt | pattern |
Construction Notes
- The band is knit in the round from the lower (cast-on) edge up and bound off in rib.
- The earflaps are picked up from the cast-on loops at each side. They are worked flat in 2x2 rib and decreased every RS row to 4 sts.
- Those 4 sts become the i-cord ties, so there is nothing to sew on.
- The beginning of the round sits at the center back.
BAND
- Using a stretchy cast-on such as long-tail, cast on 88 (104, 116, 128) sts. Pm and join to work in the round, being careful not to twist.
- Check: 88 ÷ 4 = 22 ✓, 104 ÷ 4 = 26 ✓, 116 ÷ 4 = 29 ✓, 128 ÷ 4 = 32 ✓. All counts are multiples of 4, so the rib repeats evenly.
- Rib rnd: *K2, p2; rep from * to end.
- Repeat the Rib rnd until you have worked 18 (22, 24, 24) rnds in total.
- Check: 18 ÷ 7 = 2.57 in; 22 ÷ 7 = 3.14 in; 24 ÷ 7 = 3.43 in ✓.
- Bind off loosely in patt, knitting the knits and purling the purls. A stretchy bind-off is recommended, such as Jeny's Surprisingly Stretchy Bind-Off. Do not cut the yarn until you have checked that the bound-off edge stretches over the head.
EARFLAPS
Hold the band with the cast-on edge at the top and the RS facing you. The start-of-round position (center back) is marked by the cast-on tail.
Earflap 1
- Counting cast-on sts from the tail in the direction of the round, skip 13 (15, 16, 17) sts.
- With a DPN or the circular needle and new yarn, pick up and knit 1 st in each of the next 18 (22, 26, 30) cast-on loops.
Earflap 2
- From the tail, skip 57 (67, 74, 81) sts.
- Pick up and knit 18 (22, 26, 30) sts as for Earflap 1.
Placement check (front gap equals back gap, so the flaps sit exactly at the sides):
- Baby: back gap 13 + 13 = 26; front gap 57 − 31 = 26 ✓
- Child: back gap 15 + 15 = 30; front gap 67 − 37 = 30 ✓
- Adult S/M: back gap 16 + 16 = 32; front gap 74 − 42 = 32 ✓
- Adult L: back gap 17 + 17 = 34; front gap 81 − 47 = 34 ✓
You can work both flaps at the same time on separate needles, or one after the other. Work each earflap as follows.
Earflap Shaping
- Row 1 (WS): P2, *k2, p2; rep from * to end.
- Row 2 (RS): K2, *p2, k2; rep from * to end.
- Rows 3 and 5: Repeat Row 1. Row 4: Repeat Row 2. That is 5 straight rows in total, ending with a WS row.
- Dec Row (RS): K1, ssk, work in patt as the sts appear to the last 3 sts, k2tog, k1. (2 sts decreased.)
- Next Row (WS): P1, work the sts as they appear to the last st, p1.
- Repeat the last 2 rows until 4 sts remain, ending after a Dec Row. Do not turn.
- You will work 7 (9, 11, 13) Dec Rows in total.
Running stitch counts after each Dec Row:
- Baby: 16, 14, 12, 10, 8, 6, 4 (18 − 14 = 4 ✓)
- Child: 20, 18, 16, 14, 12, 10, 8, 6, 4 (22 − 18 = 4 ✓)
- Adult S/M: 24, 22, 20 … 6, 4 (26 − 22 = 4 ✓)
- Adult L: 28, 26, 24 … 6, 4 (30 − 26 = 4 ✓)
Earflap depth check:
- Baby: 5 + 13 = 18 rows ≈ 2.5 in ✓
- Child: 5 + 17 = 22 rows ≈ 3.1 in ✓
- Adult S/M: 5 + 21 = 26 rows ≈ 3.7 in ✓
- Adult L: 5 + 25 = 30 rows ≈ 4.3 in ✓
I-CORD TIES
- With the 4 sts on a DPN, slide them to the other end of the needle without turning the work. Pull the yarn snugly across the back and k4.
- Repeat Step 1 until the tie measures 8 (10, 12, 12) in from the tip of the earflap.
- Cut the yarn, leaving a 6 in tail. Thread the tail through all 4 sts, pull tight, and pass the tail down through the center of the cord to hide it.
Repeat for the second earflap.
FINISHING
- Weave in all ends, working them along the rib columns so they stay hidden.
- Wet block by soaking the headband, pressing out the water, and laying it flat or over a bowl of similar head size. Do not stretch the rib; pat the earflaps into a smooth taper. Leave to dry.
- Optionally, add a 2 in pompom or a small tassel to the end of each tie.
Notes
- Colorwork and crown shaping: These template sections do not apply, because the headband has an open top and is a solid ribbed design. For a two-tone look, work the earflaps and ties in a contrast color, joining the new color at the pick-up.
- Safety: For Baby size, consider shortening the ties to 6 in. Always supervise a baby wearing ties, and never leave this headband on a sleeping infant.
- Fit: If the band feels tight, cast on 4 more sts. This adds 0.67 in and keeps the rib multiple.
Disclaimer: This pattern was generated by AI and should be reviewed for accuracy before use. While we strive for quality, AI-generated content may contain errors. Please verify measurements, stitch counts, charts, and instructions before beginning your project. Generated by purlJam.uk
Love this pattern?
Save this pattern to your free PurlJam libraryAccess your pattern anytime
Bookmark this page to access your pattern anytime