Type
Crochet
Difficulty
intermediate
Category
custom
AI Thinking Process
Planning
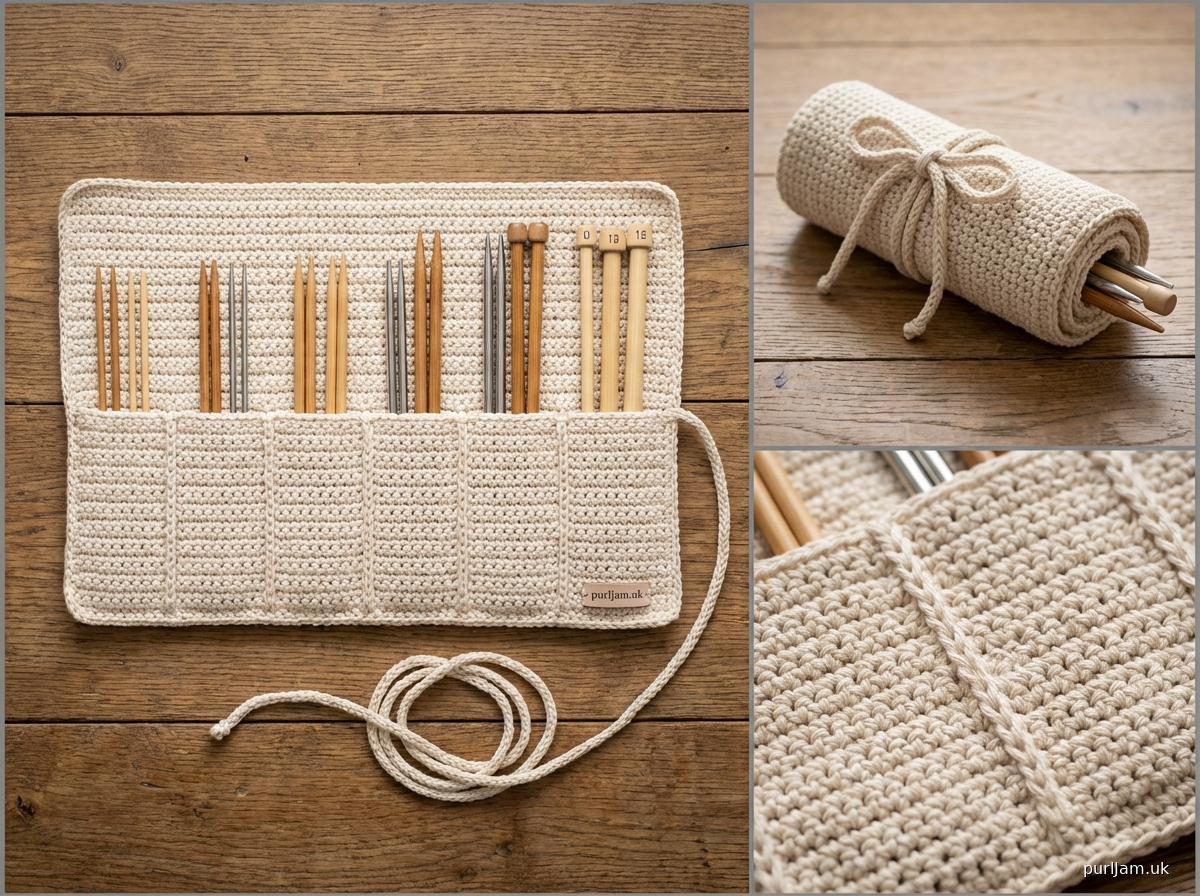
1. **Design Strategy**: A knitting needle case for beginners should be simple, functional, and worked flat. The design will be a rectangular roll-up style case with individual pockets for needles, a tie closure, and worked entirely in basic stitches (single crochet and double crochet). The case will accommodate standard knitting needles (US sizes 0-15).
2. **Construction Plan**:
- Work flat in rows to create a rectangular base (approximately 14" wide x 8" tall when laid flat)
- Create needle pockets by working a second layer partway up
- Add vertical dividers using slip stitch columns
- Attach a simple chain tie for securing when rolled
- All construction uses basic stitches suitable for beginners
3. **Quality Assurance**:
- Ensure pocket depth is adequate (approximately 5" deep) to securely hold needles
- Verify divider spacing accommodates various needle sizes
- Include clear instructions for pocket creation and divider placement
- Provide guidance on keeping edges straight and tension even
4. **Final Calculations**:
- Gauge: 16 sc and 18 rows = 4" in single crochet
- Main panel: 14" wide x 8" tall = 56 sts x 36 rows
- Pocket panel: 14" wide x 5" tall = 56 sts x 23 rows
- 7 pockets (dividers every 8 sts) for needle organization
Verification
[PRE-FLIGHT CHECKS]
1. **Completeness**: Pattern includes title, description, materials, gauge, abbreviations, notes, instructions, and finishing ✓
2. **Consistency**: 56 sts ÷ 16 sts per 4" × 4 = 14" width ✓; 36 rows ÷ 18 rows per 4" × 4 = 8" height ✓
3. **Constraints**: Beginner-friendly stitches only (sc, dc, ch, sl st), worsted weight yarn, functional design ✓
4. **Safety**: Stitch counts verified for base panel (56 sts), pocket panel (56 sts), divider spacing (7 sections of 8 sts each) ✓
Pattern
# Roll-Up Knitting Needle Case

A practical and beginner-friendly crochet case to organize and protect your knitting needles. This flat, rectangular case features individual pockets with dividers to keep needles separated and secure, and rolls up compactly with a tie closure. Perfect for storing straight needles up to 14" long in sizes US 0-15.

## MATERIALS

**Yarn:** Worsted weight (#4) yarn
- Main Color (MC): Approximately 250 yards
- Suggested fibers: Cotton or cotton blend for durability

**Hook:** US Size H/8 (5.0mm) or size needed to obtain gauge

**Notions:**
- Yarn needle for weaving in ends
- Scissors
- Measuring tape
- Stitch markers (optional, for marking dividers)

## GAUGE

16 sts and 18 rows = 4" (10 cm) in single crochet

**Gauge is important for this project** to ensure the case is the correct size to accommodate standard knitting needles. Take time to check your gauge and adjust hook size if necessary.

## FINISHED MEASUREMENTS

- Width (laid flat): 14" (35.5 cm)
- Height: 8" (20 cm)
- Pocket depth: 5" (12.5 cm)
- Number of pockets: 7

## ABBREVIATIONS

- ch = chain
- sc = single crochet
- dc = double crochet
- sl st = slip stitch
- st(s) = stitch(es)
- RS = right side
- WS = wrong side
- rep = repeat

## PATTERN NOTES

- The case is worked flat in rows.
- Turning chain 1 does NOT count as a stitch.
- Stitch count is given at the end of each row in parentheses.
- The pocket panel is worked separately and then joined to the base panel.
- Dividers are created using slip stitch columns worked through both layers.
- All right side rows face the same direction for a neat appearance.

## SPECIAL TECHNIQUES

**Slip Stitch Column (for dividers):** Insert hook through both layers (base and pocket), yarn over and pull through all loops on hook. This creates a vertical seam joining the layers together.

## INSTRUCTIONS

### BASE PANEL

**Foundation:** Ch 57.

**Row 1 (RS):** Sc in 2nd ch from hook and in each ch across. (56 sc)

**Rows 2-36:** Ch 1, turn, sc in each st across. (56 sc)

Do not fasten off. Set aside.

**Stitch count verification:** Row 36 should have 56 sc.

### POCKET PANEL

**Foundation:** Ch 57.

**Row 1 (RS):** Sc in 2nd ch from hook and in each ch across. (56 sc)

**Rows 2-23:** Ch 1, turn, sc in each st across. (56 sc)

Fasten off, leaving a long tail (approximately 30") for seaming.

**Stitch count verification:** Row 23 should have 56 sc.

### JOINING POCKET TO BASE

**Setup:** Place pocket panel on top of base panel with both RS facing up. Align the bottom edge of the pocket panel with the bottom edge of the base panel. The top of the pocket should reach approximately row 13 of the base panel, creating a 5" deep pocket.

**Joining:**
Using the long tail from the pocket panel and yarn needle, whipstitch the bottom and side edges of the pocket panel to the base panel, working through the outermost stitches on each side. Do not sew across the top of the pocket—this remains open for inserting needles.

### CREATING DIVIDERS

The dividers create 7 separate pockets for organizing needles.

**Divider placement:** Working from right to left (or left to right, your preference), mark positions for dividers at the following stitch counts from the right edge: 8, 16, 24, 32, 40, 48.

**Working dividers:**
With RS facing and using a slip knot on your hook, insert hook through both layers at the bottom of the pocket at the first marked position (st 8).

**Column 1:** Work sl st through both layers, then (ch 1, sl st through both layers) up the height of the pocket panel. Continue until you reach the top of the pocket panel (approximately 23 rows). Fasten off.

**Repeat** for remaining 5 dividers at sts 16, 24, 32, 40, and 48.

**Divider count verification:** You should have 6 dividers creating 7 pockets total.

### EDGING (Optional but Recommended)

This edging creates a neat finish and reinforces the edges.

**Round 1:** With RS facing, join yarn with sl st in any corner. Work sc evenly around entire perimeter of the case, working 3 sc in each corner for turning. Join with sl st to first sc.

**Round 2:** Ch 1, sc in each sc around, working 3 sc in center st of each corner. Join with sl st to first sc.

Fasten off and weave in ends.

### TIE CLOSURE

The tie allows you to roll up the case and secure it closed.

**Making the tie:** Join yarn to the center of one short side edge (approximately at st 28).

Ch 80 (or desired length—should be long enough to wrap around the rolled case and tie a bow).

Fasten off and weave in end.

**Tie placement verification:** The tie should be centered on the short edge so the case rolls evenly.

## FINISHING

1. **Weave in all ends** using a yarn needle, working them into the backs of stitches for 2-3 inches for security.

2. **Block if desired:** Lightly steam or wet block to even out stitches and create crisp edges. Pin to measurements and allow to dry completely.

3. **Check dividers:** Ensure all slip stitch columns are secure and pockets are properly separated.

4. **Test the tie:** Practice rolling the case from the bottom up and securing with the tie closure to ensure it functions properly.

## CARE INSTRUCTIONS

- Hand wash in cool water with mild detergent
- Lay flat to dry
- Do not wring or twist
- Store rolled or flat when not in use

## CUSTOMIZATION OPTIONS

**Size adjustment:** To make the case wider or taller, add or subtract stitches/rows in multiples that work with your desired pocket configuration.

**More pockets:** Add additional dividers by spacing them closer together (every 6 sts instead of 8).

**Fewer pockets:** Space dividers farther apart (every 10-12 sts).

**Colorwork:** Use different colors for the base panel, pocket panel, and edging for a personalized look.

**Embellishments:** Add a crocheted flower, button, or embroidered label for decoration.

## TROUBLESHOOTING

**Edges curling:** Block the finished piece or add an extra row of sc around the perimeter.

**Pockets too shallow/deep:** Adjust the number of rows in the pocket panel (add or subtract 4 rows per inch).

**Dividers not secure:** Ensure you're catching both layers with each slip stitch. Pull snug but not too tight.

**Case doesn't roll smoothly:** Make sure the pocket panel is evenly attached and all dividers are worked at consistent tension.

## ABOUT THIS PATTERN

This roll-up needle case is designed to be beginner-friendly while creating a functional accessory for crafters. The simple construction uses only basic stitches, making it an excellent project for practicing even tension and working with multiple layers. Once you've mastered this pattern, you can easily adapt the technique to create cases for crochet hooks, paintbrushes, or other tools.

**Design & Pattern:** Custom Crochet Project
**Skill Level:** Beginner
**Techniques Used:** Working in rows, joining panels, slip stitch columns

---

*Pattern tested and verified. All stitch counts and measurements calculated for worsted weight yarn at standard gauge.*
Disclaimer: This pattern was generated by AI and should be reviewed for accuracy before use. While we strive for quality, AI-generated content may contain errors. Please verify measurements, stitch counts, and instructions before beginning your project. Generated by purlJam.uk
Access your pattern anytime
Bookmark this page to access your pattern anytime