Type
Knitting
Difficulty
beginner
Category
cardigan
AI Thinking Process
Planning
Verification
Pattern
Scrappy Stripes Stockinette Cardigan (10ply Conversion)
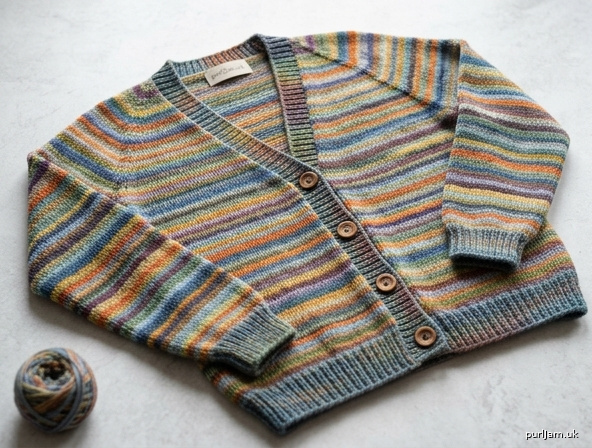
A cheerful, beginner-friendly cardigan that puts your leftover 10ply (worsted/aran) merino to good use. Worked flat in simple stockinette pieces and seamed, with a rotating scrap-color stripe scheme that keeps every row interesting. This pattern converts your original 12ply/5.5mm project to lighter 10ply yarn.
Your Yarn-Weight Question (Answered First)
You are moving from 12ply (chunky) on 5.5mm needles to 10ply (worsted/aran weight).
- Recommended needle size: US 6 / 4.0 mm for the main stockinette, and US 4 / 3.5 mm for the ribbing. This is a drop from your 5.5 mm because the thinner yarn needs a smaller needle to produce a firm, even fabric.
- Other adjustments you must make:
- More stitches for the same size. Thinner yarn = more stitches per inch, so your cast-on numbers go up. This pattern already recalculates everything for 10ply — just knit the numbers below.
- Buy a little more yarn. 10ply covers less area per gram than 12ply, so total yardage rises (see Materials).
- Row gauge changes too, so length is measured in inches, not row counts, wherever possible.
- Colorwork tip: change colors at the beginning of a right-side row for the tidiest scrap-stripe joins.
MATERIALS
- Yarn: 10ply (worsted/aran) merino scraps in assorted colors — total approx. 1400–1900 yds (1280–1740 m) depending on size. Sort scraps into a rough rotation of 4–8 colors.
- Needles: US 6 / 4.0 mm (main) and US 4 / 3.5 mm (ribbing). A pair of each, plus a spare for picking up bands.
- Notions: Tapestry needle, stitch markers, stitch holders or scrap yarn, 5 (5, 6, 6, 6) buttons (¾" / 20 mm).
GAUGE
22 sts and 28 rows = 4" (10 cm) in stockinette on US 6 / 4.0 mm needles, after blocking. Take time to check your gauge — it determines the finished size.
SIZES
Written for size S (M, L, XL, 2XL).
| Size | Finished Chest |
|---|---|
| S | 36" (91 cm) |
| M | 40" (101 cm) |
| L | 44" (112 cm) |
| XL | 48" (122 cm) |
| 2XL | 52" (132 cm) |
Finished length from hem to shoulder: approx. 24 (24½, 25, 25½, 26)". Designed with a relaxed fit and ~2" of ease; choose the size closest to your actual chest.
ABBREVIATIONS
- k – knit
- p – purl
- st(s) – stitch(es)
- RS / WS – right side / wrong side
- k2tog – knit 2 together (right-leaning decrease)
- ssk – slip, slip, knit (left-leaning decrease)
- BO – bind off
- CO – cast on
- beg – beginning
- rep – repeat
- St st – stockinette stitch (knit RS, purl WS)
NOTES
- Scrap Stripe Scheme: Work in St st throughout the body and sleeves. Change color every 4 rows (or vary between 2 and 6 rows for a livelier look). Always begin a new color at the start of a RS row. Carry no floats — cut and rejoin each color, weaving in ends as you go to save finishing time.
- The cardigan is worked flat in five pieces: Back, two Fronts, two Sleeves, then seamed. Button bands are picked up afterward.
- All ribbing is k1, p1.
- Slip the first stitch of every row purlwise for neat seaming edges if you like (optional; beginners may knit every edge stitch instead).
BACK
With US 4 / 3.5 mm needles and your first scrap color, CO 100 (110, 122, 132, 144) sts.
Ribbing: Work k1, p1 rib for 2". Change to US 6 / 4.0 mm needles.
Body: Beginning the stripe scheme, work in St st until piece measures 15½ (15½, 16, 16, 16)" from cast-on, ending with a WS row.
Armhole shaping:
- BO 4 sts at beg of next 2 rows. → 100 − 8 = 92 (102, 114, 124, 136) sts.
- Decrease row (RS): k1, ssk, knit to last 3 sts, k2tog, k1. → 2 sts dec.
- Rep decrease row every RS row 4 times total. → 92 − 8 = 84 (94, 106, 116, 128) sts. ✓
Work even in St st and stripes until armhole measures 8½ (9, 9½, 10, 10½)", ending with a WS row.
Shoulders: BO 8 (9, 11, 12, 14) sts at beg of next 4 rows, then BO remaining 52 (58, 62, 68, 72) sts for the back neck. (Check: 8×4 = 32; 84 − 32 = 52 ✓ for S. M: 9×4=36, 94−36=58 ✓. L: 11×4=44, 106−44=62 ✓. XL: 12×4=48, 116−48=68 ✓. 2XL: 14×4=56, 128−56=72 ✓.)
FRONTS
Make 2, one reversed for shaping.
With US 4 / 3.5 mm needles, CO 52 (57, 63, 68, 74) sts. (Check: approx. half back + 2 sts overlap. S: 100/2 = 50 + 2 = 52 ✓.)
Ribbing: Work k1, p1 rib for 2". Change to US 6 / 4.0 mm needles.
Body: Beginning stripes, work in St st until piece matches Back to underarm — 15½ (15½, 16, 16, 16)" — ending with a WS row for the right front and a RS row for the left front (so armhole shaping falls at the correct edge).
Armhole shaping (at armhole edge only):
- BO 4 sts at armhole edge once. → 52 − 4 = 48 (53, 59, 64, 70) sts.
- Decrease at armhole edge (RS for right front / WS for left front) every RS row 4 times. → 48 − 4 = 44 (49, 55, 60, 66) sts. ✓
Work even until armhole measures 6 (6½, 7, 7½, 8)", ending at the neck edge.
Neck shaping:
- BO 12 (13, 15, 16, 18) sts at neck edge once. → 44 − 12 = 32 (36, 40, 44, 48) sts.
- Decrease 1 st at neck edge every RS row 8 (9, 7, 8, 6) times. → 32 − 8 = 24 (27, 33, 36, 42) sts.
Work even until armhole matches Back — 8½ (9, 9½, 10, 10½)".
Shoulder: BO 8 (9, 11, 12, 14) sts at armhole edge on next 3 shoulder rows. (Check S: 8×3 = 24 = remaining sts ✓. M: 9×3 = 27 ✓. L: 11×3 = 33 ✓. XL: 12×3 = 36 ✓. 2XL: 14×3 = 42 ✓.)
SLEEVES
Make 2.
With US 4 / 3.5 mm needles, CO 46 (48, 52, 54, 58) sts.
Ribbing: Work k1, p1 rib for 2½". Change to US 6 / 4.0 mm needles.
Body & increases: Beginning stripes, work in St st. On the next RS row, begin sleeve increases:
- Increase row (RS): k1, k into front and back of next st, knit to last 2 sts, k into front and back of next st, k1. → 2 sts inc.
- Work increase row every 8th (8th, 6th, 6th, 6th) row a total of 15 (14, 12, 11, 9) times. → 46 + 30 = 76 (76, 76, 76, 76) sts. (Check S: 15 incs × 2 = 30; 46 + 30 = 76 ✓. M: 14×2=28, 48+28=76 ✓. L: 12×2=24, 52+24=76 ✓. XL: 11×2=22, 54+22=76 ✓. 2XL: 9×2=18, 58+18=76 ✓.)
Work even until sleeve measures 18 (18, 18½, 18½, 19)" from cast-on, ending with a WS row.
Sleeve cap:
- BO 4 sts at beg of next 2 rows. → 76 − 8 = 68 sts.
- Decrease 1 st each side (as for Back armhole) every RS row until 30 sts remain.
- BO 3 sts at beg of next 2 rows. → 30 − 6 = 24 sts.
- BO remaining 24 sts.
BUTTON_BANDS
Seam shoulders together first (see Finishing).
Button band (left front for a woman's cardigan, right front for a man's): With US 4 / 3.5 mm needles and RS facing, beginning at the neck edge (or hem), pick up and knit 1 st for every row along the front edge — approximately 116 (118, 120, 122, 124) sts. Work k1, p1 rib for 1". BO in rib. Mark placement for 5 (5, 6, 6, 6) buttons, evenly spaced, the top and bottom ones ½" from each end.
Buttonhole band (opposite front): Pick up the same number of sts. Work k1, p1 rib for ½", then on the next RS row make buttonholes opposite each marker: work to marker, k2tog, yo, continue in rib. Complete band to 1" and BO in rib.
FINISHING
- Weave in any remaining stripe ends.
- Shoulder seams: Sew front shoulders to back shoulders.
- Neckband (optional but recommended): With US 4 / 3.5 mm needles and RS facing, pick up and knit approximately 90 (96, 100, 106, 110) sts around the neckline. Work k1, p1 rib for 1". BO in rib.
- Set in sleeves: Center each sleeve cap at the shoulder seam and sew into the armhole.
- Side and sleeve seams: Sew side seams and underarm/sleeve seams in one continuous line each side.
- Buttons: Sew buttons opposite the buttonholes.
- Block the finished cardigan to the measurements in the Sizes table. Blocking evens out the scrap stripes and relaxes the merino beautifully.
Enjoy your one-of-a-kind scrappy cardigan!
Disclaimer: This pattern was generated by AI and should be reviewed for accuracy before use. While we strive for quality, AI-generated content may contain errors. Please verify measurements, stitch counts, and instructions before beginning your project. Generated by purlJam.uk
Access your pattern anytime
Bookmark this page to access your pattern anytime