Type
Knitting
Difficulty
beginner
Category
gloves
AI Thinking Process
Planning
Verification
Pattern
Simple Fingerless Gloves
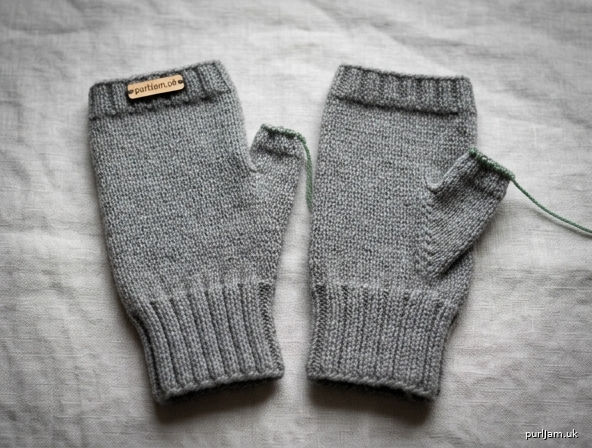
Basic fingerless gloves worked in the round from the cuff up. A stretchy ribbed cuff, easy stockinette hand, and a simple thumb gusset make them a quick, practical knit — perfect for gifts. Both gloves are worked the same way; there is no left or right.
Skill Level: Beginner (knitting in the round, kfb increases, picking up stitches)
Sizes
Child (Adult S, Adult M, Adult L)
To fit hand circumference: 6½–7 (7¼–8, 8–8¾, 8¾–9½)" [16.5–18 (18.5–20.5, 20.5–22, 22–24) cm]
Choose the size closest to the wearer’s bare palm circumference, measured around the knuckles (fingers closed, thumb excluded). If between sizes, choose the smaller size for a snugger fit.
Finished Measurements
Palm circumference: 6½ (7¼, 8, 8¾)" [16.5 (18.5, 20.5, 22) cm]
Length (cuff to top edge): 6 (6½, 7, 7½)" [15 (16.5, 18, 19) cm]
Length is easy to adjust; try the glove on as you go.
Yarn
Worsted weight yarn (CYC 4)
Shown/recommended: A smooth wool or wool-blend worsted; light or medium colors make stitches easier to see.
Yardage (pair): 90 (110, 130, 155) yd [82 (100, 119, 142) m]
One typical 100 g / 220 yd [201 m] skein is enough for any size, often with leftovers.
Needles
US 7 (4.5 mm), or size needed to obtain gauge:
- A set of 4 or 5 double-pointed needles, or
- A 32" (80 cm) circular needle for magic loop, or
- A 9" (23 cm) circular needle (you will still need DPNs or magic loop for the thumb)
A spare DPN or spare circular is helpful when working the thumb.
Optional: US 8 (5 mm) for binding off, so the top and thumb edges are not tight.
Notions
- 2 stitch markers
- Waste yarn or a small stitch holder
- Tapestry needle
- Scissors
- Tape measure
Gauge
20 stitches and 28 rounds = 4" (10 cm) in stockinette stitch in the round, after light blocking.
Please swatch in the round. A flat swatch will not match in-the-round gauge. Fit depends on gauge; if you have too many stitches in 4" (10 cm), go up a needle size, and if you have too few, go down a size. A firm fabric wears better than a loose one.
Abbreviations (US)
BO — bind off
CO — cast on
k — knit
k1, p1 — knit 1, purl 1 ribbing
k2, p2 — knit 2, purl 2 ribbing
kfb — knit into the front and then the back of the same stitch (1 stitch increased)
p — purl
pm — place marker
rnd(s) — round(s)
sm — slip marker
st(s) — stitch(es)
St st — stockinette stitch (knit every round, when working in the round)
Notes
- Instructions are written for Child with Adult S, M, and L in parentheses. When only one number is given, it applies to all sizes.
- Both gloves are identical. Make two.
- Join to work in the round being careful not to twist the cast-on edge. Place a unique marker for the beginning of the round if you like; the first gusset marker can also serve as the beginning of the round.
- If using magic loop, keep both gusset markers on the same half of the loop so the thumb stitches stay together.
- Try the glove on as you knit. Hands vary; inches are a guide, not a rule.
- Bind off loosely at the top edge and thumb so the openings stretch over the hand.
How to kfb: Knit the next stitch but do not slide it off the left needle. Swing the right needle to the back of that same stitch and knit through the back loop. Slide the original stitch off. You have made 2 stitches from 1.
Gloves (make 2)
Cuff
Using the long-tail method, CO 32 (36, 40, 44) sts. Divide evenly across your needles and join to work in the round, being careful not to twist.
Ribbing rnd: *K2, p2; repeat from * to end of rnd.
Repeat the Ribbing rnd until the cuff measures 2½ (2½, 3, 3)" [6.5 (6.5, 7.5, 7.5) cm] from the cast-on edge.
32 (36, 40, 44) sts.
Lower Hand
Knit 4 rnds even in St st (knit every st of every rnd).
32 (36, 40, 44) sts.
Thumb Gusset
Setup rnd: K1, pm, k2, pm, knit to end of rnd.
2 gusset sts between markers; 32 (36, 40, 44) sts total.
Increase rnd: Knit to marker, sm, kfb, knit to 1 st before next marker, kfb, sm, knit to end of rnd.
2 sts increased.
Knit rnd: Knit all sts.
Work the Increase rnd, then the Knit rnd. Repeat these 2 rnds 3 (4, 5, 6) more times.
You have worked 4 (5, 6, 7) Increase rnds.
4 (5, 6, 7) × 2 = 8 (10, 12, 14) sts increased.
32 + 8 = 40 (36 + 10 = 46, 40 + 12 = 52, 44 + 14 = 58) ✓
10 (12, 14, 16) gusset sts between markers; 40 (46, 52, 58) sts total.
Divide for Thumb
Next rnd: Knit to first gusset marker, remove marker, slip the next 10 (12, 14, 16) gusset sts onto waste yarn or a holder, remove the second marker, CO 2 sts over the gap using the backward-loop method (e-wrap), knit to end of rnd.
40 − 10 + 2 = 32 (46 − 12 + 2 = 36, 52 − 14 + 2 = 40, 58 − 16 + 2 = 44) ✓
32 (36, 40, 44) sts on the needles. The thumb stitches wait on waste yarn.
Upper Hand
Knit every rnd until the piece measures 5¼ (5¾, 6¼, 6¾)" [13.5 (14.5, 16, 17) cm] from the cast-on edge, or until the fabric reaches the base of the fingers (the knuckles) when tried on.
32 (36, 40, 44) sts.
Top Edge
Ribbing rnd: *K2, p2; repeat from * to end of rnd.
Repeat the Ribbing rnd until the top edge measures ¾" (2 cm), about 5–6 rnds.
BO loosely in pattern (k the knits and p the purls). Using a needle one size larger to bind off helps keep the edge stretchy.
Thumb
Return the 10 (12, 14, 16) held gusset sts to the needles. With the working yarn, pick up and knit 2 sts along the 2 cast-on stitches at the gap. Join to work in the round.
10 + 2 = 12 (12 + 2 = 14, 14 + 2 = 16, 16 + 2 = 18) ✓
12 (14, 16, 18) sts.
Distribute the stitches across DPNs (or use magic loop).
Knit every rnd until the thumb measures ½ (½, ¾, ¾)" [1.5 (1.5, 2, 2) cm] from the pickup round.
Ribbing rnd: *K1, p1; repeat from * to end of rnd.
Repeat the Ribbing rnd for ½" (1.5 cm), about 4 rnds.
BO loosely in pattern (k the knits and p the purls).
Finishing
Weave in all ends on the wrong side.
At the base of the thumb, small holes sometimes appear on either side of the picked-up stitches. Use the yarn tail at the thumb join to close them: take a small stitch through each gap, snug it, and weave in the rest of the tail.
Make the second glove the same way.
Block lightly if desired: mist with water, shape, and lay flat to dry. Do not stretch the ribbing.
Fit Tips
- Too loose: Go down one needle size, or choose the next smaller size.
- Too tight: Go up one needle size, or choose the next larger size.
- Too short or too long in the hand: After dividing for the thumb, knit more or fewer plain rounds before the top rib. Keep at least ½" (1.5 cm) of stockinette above the thumb split so the top rib does not sit on the thumb web.
- Thumb too snug: Pick up 1 extra stitch at each corner of the gap (+2 sts), then on the next rnd work k2tog at each extra pickup to return to 12 (14, 16, 18) sts — this also helps close holes.
- Cuff flares or sags: A wool or wool-blend yarn with some spring holds the cuff better than a limp acrylic.
Quick Reference — Stitch Counts
| Stage | Child | S | M | L |
|---|---|---|---|---|
| Cast on / cuff / lower hand | 32 | 36 | 40 | 44 |
| After all gusset increases | 40 | 46 | 52 | 58 |
| Gusset sts on holder | 10 | 12 | 14 | 16 |
| After divide (upper hand / top rib) | 32 | 36 | 40 | 44 |
| Thumb | 12 | 14 | 16 | 18 |
Disclaimer: This pattern was generated by AI and should be reviewed for accuracy before use. While we strive for quality, AI-generated content may contain errors. Please verify measurements, stitch counts, charts, and instructions before beginning your project. Generated by purlJam.uk
Love this pattern?
Save this pattern to your free PurlJam libraryAccess your pattern anytime
Bookmark this page to access your pattern anytime