Type
Crochet
Difficulty
easy
Category
flower
Pattern
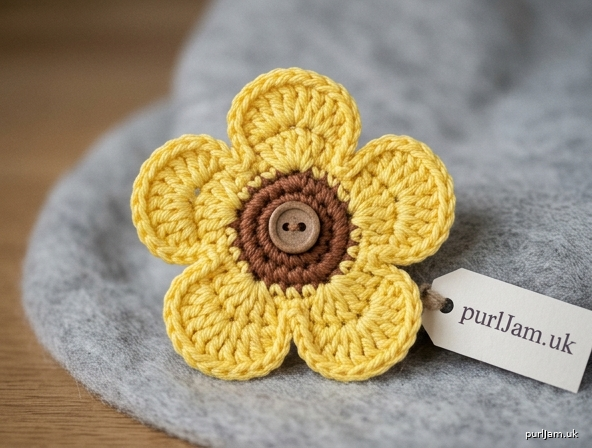
# Simple Layered Crochet Flower

A cheerful 5-petal flower perfect for beginners! Use it as an appliqué for hats, bags, headbands, or stitch several together into a garland. This project introduces working in the round, basic stitches, and simple shaping — all in under 30 minutes.

**Finished Size:** Approximately 3 to 3½ inches (7.5–9 cm) across

---

## Materials

- **Yarn:** Worsted weight (CYC #4), approximately 15–20 yards
  - Suggested: any smooth acrylic or cotton worsted (e.g., Red Heart Super Saver, Lion Brand 24/7 Cotton)
  - Small amount of a contrasting color for center is optional
- **Hook:** US H/8 (5 mm)
- **Notions:**
  - Yarn needle (for weaving in ends)
  - Scissors
  - Optional: small button or pom-pom for center embellishment

---

## Gauge

Gauge is **not critical** for this decorative project. Any tension that produces a firm, non-floppy fabric is fine. If your flower curls badly, go up a hook size; if it's loose and gappy, go down a hook size.

---

## Abbreviations (US Terms)

- **ch** — chain
- **sl st** — slip stitch
- **sc** — single crochet
- **hdc** — half double crochet
- **dc** — double crochet
- **st(s)** — stitch(es)
- **MR** — magic ring
- **rnd** — round

---

## Pattern Notes

- Worked in **joined rounds** from the center outward.
- **Ch-3 at the start of a petal counts as 1 dc.**
- Stitch counts are given in parentheses at the end of each round.
- If you're not comfortable with a magic ring, substitute: **ch 4, sl st in 1st ch to form a ring**, then work Rnd 1 stitches into the ring.
- Each petal is worked into a ch-3 loop from Rnd 2; do not work into individual chain stitches — insert the hook under the whole loop.

---

## Instructions

### Round 1 — Center Circle
With main color (or center color, if using two colors):

Make a magic ring.
**Ch 1** (does not count as a stitch), work **10 sc** into the ring.
Pull the ring closed.
**Join** with a sl st to the first sc. **(10 sc)**

✅ *Math check: 10 sc in ring = 10 sts.*

> **Tip:** If switching colors for the petals, fasten off here and join the new color with a sl st into any sc before starting Rnd 2.

### Round 2 — Chain-Loop Base for Petals

**Ch 3** (counts as the first ch-3 loop), **skip 1 sc**, **sl st** in the next sc.
*[Ch 3, skip 1 sc, sl st in next sc]* repeat 4 more times — you will work around the circle 5 times total.

On your last repeat, instead of making another sl st, **join with a sl st to the base of the beginning ch-3**. **(5 ch-3 loops and 5 sl sts)**

✅ *Math check: 5 loops × 2 sc used per loop = 10 sc, matches Rnd 1 total.*

### Round 3 — Petals

Into **each ch-3 loop** around, work the following petal:
**(sc, hdc, 3 dc, hdc, sc)** — this is 7 sts per petal.

Specifically:
1. **Sl st into the first ch-3 loop** of Rnd 2 (this positions your hook).
2. In that same loop, work: **1 sc, 1 hdc, 3 dc, 1 hdc, 1 sc**. (Petal 1 complete.)
3. **Sl st into the next ch-3 loop** (this "jumps" over the Rnd 2 sl st and seats the next petal).
4. In that loop, work: **1 sc, 1 hdc, 3 dc, 1 hdc, 1 sc**. (Petal 2 complete.)
5. Repeat steps 3–4 three more times, until all 5 petals are made.
6. **Join** with a sl st to the base of the first petal's first sc.

**Fasten off**, leaving a 6-inch (15 cm) tail for sewing the flower onto your project (or for weaving in). **(5 petals; 35 petal sts + 5 anchoring sl sts)**

✅ *Math check: 5 petals × 7 sts each = 35 sts. Each petal is anchored in its own ch-3 loop from Rnd 2 — 5 loops = 5 petals. ✓*

---

## Finishing

1. **Weave in the starting tail** from the magic ring on the back of the flower using the yarn needle.
2. If you fastened off to change color, weave in those ends too.
3. **Shape the flower:** Gently pat the petals flat with your fingers. If desired, lightly spritz with water and press flat under a towel to block.
4. **Optional embellishments:**
   - Sew a small button to the center.
   - Add a contrasting French knot or pom-pom in the middle.
   - Attach to a hair clip, headband, bag, or hat using the long tail and a yarn needle, or with a hot-glue gun for non-washable projects.

---

## Quick Reference (One-Line Pattern)

- **Rnd 1:** MR, ch 1, 10 sc in ring, join. *(10)*
- **Rnd 2:** *Ch 3, sk 1 sc, sl st in next sc;* rep 5× total, join to base of beg ch-3. *(5 ch-3 loops)*
- **Rnd 3:** In each ch-3 loop: *(sc, hdc, 3 dc, hdc, sc)*; sl st between loops; join. Fasten off. *(5 petals)*

---

Enjoy your flower! Once you've made one, try experimenting with:
- **Larger flowers:** work 12 sc in Rnd 1, make 6 loops, 6 petals.
- **Taller petals:** replace the 3 dc with 3 tr (treble crochet) for pointier petals.
- **Two-tone flowers:** use one color for Rnds 1–2 and a different color for Rnd 3.

Happy crocheting! 🌸
Disclaimer: This pattern was generated by AI and should be reviewed for accuracy before use. While we strive for quality, AI-generated content may contain errors. Please verify measurements, stitch counts, and instructions before beginning your project. Generated by purlJam.uk
Access your pattern anytime
Bookmark this page to access your pattern anytime