Type
Knitting
Difficulty
intermediate
Category
custom
AI Thinking Process
Planning
Verification
Pattern
Sophie Hood
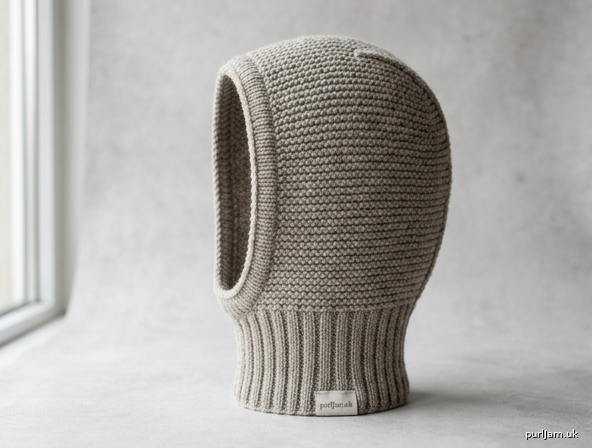
A cozy pull-on hood for chilly days. The neck is worked in stretchy 1x1 rib so it sits neatly under a coat. The hood itself is all garter stitch — thick, squishy, and fully beginner-friendly — with a simple center-back dart and a three-needle bind-off to round the crown. No short rows, no cables, no picking up stitches required to finish.
Sizes
S (M, L)
To fit head circumference: 20–21 (22–23, 24–25)" / 51–53 (56–58, 61–63.5) cm
Finished measurements
- Neck circumference, unstretched: about 14 (16, 18)" / 35.5 (40.5, 45.5) cm; stretches to fit the sizes above
- Hood width (face edge to face edge around the back): 18¾ (21¼, 24)" / 47.5 (54, 61) cm
- Hood height (start of garter to crown seam): about 8½ (9¾, 11)" / 21.5 (25, 28) cm
Choose the size closest to your head circumference. If you are between sizes, choose the larger size for more drape.
Materials
Yarn Worsted weight (category 4), 280 (350, 430) yards / 255 (320, 395) m.
Approximately 2 (2, 2) skeins of a 220-yard / 200 m hank, or 2 (2, 3) skeins of a 200-yard / 183 m skein.
Wool, wool blend, or a soft acrylic all work. A springy wool gives the ribbing the most bounce.
Needles
- US 8 / 5 mm circular needle, 16" (40 cm), for the collar
- US 8 / 5 mm circular needle, 24" (60 cm), for the hood
- One spare needle, US 8 / 5 mm (straight, DPN, or a second circular), for the three-needle bind-off
If you prefer one needle for the whole project, use a 24" or 32" (60 or 80 cm) circular and the magic-loop method for the collar.
Notions
- Stitch marker
- Removable stitch marker or safety pin (to mark the right side)
- Tapestry needle
- Scissors
Gauge
18 stitches and 32 rows = 4" (10 cm) in garter stitch, blocked, on US 8 / 5 mm.
4.5 stitches per inch; 8 rows per inch.
Check gauge over a 4" (10 cm) square in garter stitch (knit every row). If you have too many stitches per 4", go up a needle size. If you have too few, go down a needle size. Gauge matters here — it sets both the neck stretch and the hood depth.
Abbreviations
- BO – bind off
- CO – cast on
- k – knit
- k2tog – knit 2 stitches together (1 stitch decreased, slants right)
- kfb – knit into the front and then the back of the same stitch (1 stitch increased)
- p – purl
- pm – place marker
- rep – repeat
- RS – right side
- sl – slip stitch purlwise
- sm – slip marker
- ssk – slip 1 knitwise, slip 1 knitwise, insert left needle into the fronts of those 2 stitches and knit them together (1 stitch decreased, slants left)
- st(s) – stitch(es)
- WS – wrong side
- wyif – with yarn in front
Pattern Notes
- Numbers are written as S (M, L). Circle your size before you begin.
- The collar is worked in the round. The hood is worked flat (back and forth) to open the face.
- Garter stitch, worked flat: knit every row.
- 1x1 rib, worked in the round: *k1, p1; rep from * to end of round.
- Slipped face edge: on every hood row after the increase row, slip the first stitch purlwise wyif, then knit to the end. This makes a tidy chain along each side of the face.
- kfb: knit the stitch as usual but do not slide it off; knit into the back loop of the same stitch, then slide it off. You have made 2 stitches from 1.
- ssk: slip 2 stitches one at a time knitwise, then knit them together through the back loops.
- Place a removable marker on the RS after the increase row. Garter looks the same on both sides; you need the RS marked so the crown decreases stay on the public side.
- The collar must stretch over the head. Long-tail cast-on is recommended for a stretchy edge. Do not cast on tightly.
- To make the hood deeper, work extra even rows before crown shaping. To make it shallower, work fewer. Every 8 rows added or removed changes the height by 1" (2.5 cm).
Instructions
Collar
With US 8 / 5 mm, 16" (40 cm) circular needle and long-tail cast-on, CO 70 (80, 90) sts. Place a marker and join to work in the round, taking care not to twist.
Rib round: *K1, p1; rep from * to end of round.
Repeat the Rib round until the collar measures 4 (4½, 5)" / 10 (11.5, 12.5) cm from the cast-on edge.
The beginning-of-round marker sits at center front. This is where the face opening will start.
Increase for hood
Change to the 24" (60 cm) circular needle if you are using two needles.
Remove the beginning-of-round marker. You will now work back and forth (flat) to open the hood at center front.
Row 1 (RS — Increase Row): *K4, kfb; rep from * to end of row, placing a stitch marker when 42 (48, 54) stitches are on the right needle. Do not join. Turn.
14 (16, 18) repeats × 5 sts = 70 (80, 90) sts worked; 14 (16, 18) increases → 70 + 14 = 84 ✓, 80 + 16 = 96 ✓, 90 + 18 = 108 ✓.
84 (96, 108) sts.
The marker is at exact center back: 42 + 42 = 84 ✓, 48 + 48 = 96 ✓, 54 + 54 = 108 ✓.
Place a removable marker on this side of the work to mark the RS.
Row 2 (WS): Sl 1 wyif, knit to end.
Hood body
Continue in garter stitch, slipping the first stitch of every row:
Every row: Sl 1 wyif, knit to end (slip the center-back marker as you come to it).
Work as established until the hood measures 7½ (8½, 9½)" / 19 (21.5, 24) cm from the beginning of garter stitch (Row 1), ending with a WS row.
Stitch count remains 84 (96, 108).
Crown shaping
Keep the slipped edge. Decreases are worked on RS rows only, 2 stitches before and 2 stitches after the center-back marker, so they lean in and form a small dart.
Decrease row (RS): Sl 1 wyif, knit to 2 sts before marker, ssk, sm, k2tog, knit to end. 2 sts decreased.
Next row (WS): Sl 1 wyif, knit to end.
Repeat the last 2 rows 3 (4, 5) more times. 4 (5, 6) decrease rows total.
4 × 2 = 8 sts decreased → 84 − 8 = 76 ✓ 5 × 2 = 10 sts decreased → 96 − 10 = 86 ✓ 6 × 2 = 12 sts decreased → 108 − 12 = 96 ✓
76 (86, 96) sts — 38 (43, 48) sts on each side of the marker.
End after a WS row.
Join the crown (three-needle bind-off)
The marker is the fold line at center back.
- Turn the hood inside out so the right sides are together and the wrong side faces you.
- Fold at the marker. Slide the first 38 (43, 48) sts (one side of the hood) onto one needle tip. The remaining 38 (43, 48) sts sit on the other needle tip. 38 + 38 = 76 ✓, 43 + 43 = 86 ✓, 48 + 48 = 96 ✓. Remove the center-back marker.
- Hold the two needle tips parallel in your left hand, with both points facing the same way (toward your right hand). The face-edge stitches are at the tips; the center-back stitches are at the fold.
- With the spare US 8 / 5 mm needle in your right hand: insert it knitwise into the first stitch on each left-hand needle (2 stitches at once) and knit them together. Knit the next pair the same way. You have 2 stitches on the right needle. Pass the first stitch over the second to bind off 1 stitch.
- Continue: knit 1 pair together, then pass the previous stitch over, until all stitches are bound off.
Cut yarn, leaving a 6" (15 cm) tail, and pull through the last stitch.
(Alternative if you prefer not to use three-needle bind-off: bind off all stitches knitwise on the RS, fold the bind-off edge in half, and mattress-stitch the two halves together from the face opening to center back.)
Finishing
- Turn the hood right side out.
- Weave in all ends on the wrong side with a tapestry needle. At the center-front split (where the collar becomes the hood), take a moment to snug the join so there is no gap, then weave the tail down into the ribbing.
- Wet block: soak in lukewarm water for 15–20 minutes, press out water in a towel (do not wring), and lay flat. Shape the collar into a smooth tube and the hood into a gentle dome. Let dry completely.
- Optional: with steam and a press cloth, lightly steam the crown seam so it lies flat.
Wear and adjust
Pull on over the head like a hat. The ribbing hugs the neck; the garter hood stands away from the face.
- Too tall: next time, stop the even section 1" / 2.5 cm sooner (8 rows fewer).
- Too shallow: add 8 rows (1" / 2.5 cm) before crown shaping.
- Pointier crown: skip 1–2 decrease repeats and three-needle bind off with more stitches.
- Rounder crown: work 1 extra decrease repeat (check you still have an even stitch count so the two halves match).
Quick stitch-count path
| Step | S | M | L |
|---|---|---|---|
| Cast on (collar) | 70 | 80 | 90 |
| After increase row | 84 | 96 | 108 |
| After crown decreases | 76 | 86 | 96 |
| Each side at bind-off | 38 | 43 | 48 |
Disclaimer: This pattern was generated by AI and should be reviewed for accuracy before use. While we strive for quality, AI-generated content may contain errors. Please verify measurements, stitch counts, charts, and instructions before beginning your project. Generated by purlJam.uk
Love this pattern?
Save this pattern to your free PurlJam libraryAccess your pattern anytime
Bookmark this page to access your pattern anytime