Type
Knitting
Difficulty
intermediate
Category
custom
AI Thinking Process
Planning
Verification
Pattern
Sparkles
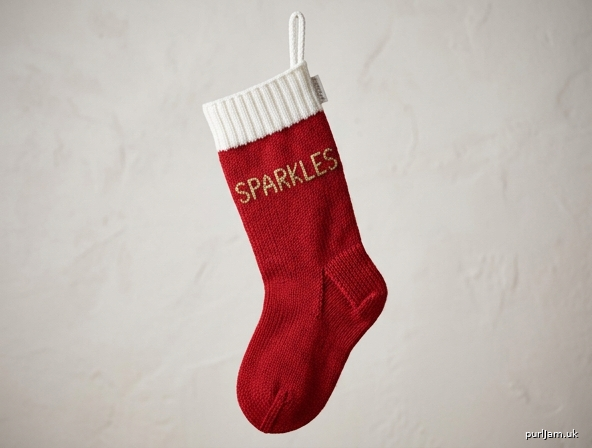
Large knitted Christmas stocking
A generously sized, classic cuff-down Christmas stocking with a white ribbed cuff, a sturdy slipped-stitch heel, and the name SPARKLES Swiss-darned across the leg. Worked in the round in worsted/Aran-weight yarn. Intermediate: heel flap and gusset, Kitchener grafting, and duplicate stitch.
Materials
Yarn (worsted / Aran-weight, 10-ply; approx. 180–200 m per 100 g)
- MC (Christmas red): 400 m / 200 g
- CC1 (off-white): 80 m / 40 g
- CC2 (gold, cream, or a sparkly metallic blend): 40 m / 20 g — for the name
A wool or wool-blend gives the stocking good structure; acrylic is fine if you prefer easy care. Holding a fine metallic thread with CC2 adds extra sparkle.
Needles
- 4.5 mm (UK 7) circular needle, 80 cm, for magic loop or a set of 4.5 mm DPNs
- Spare 4.5 mm DPN for the i-cord loop
Notions
- 4 stitch markers (one distinct for beginning of round)
- Stitch holder or waste yarn
- Tapestry needle
- Scissors
Tension (gauge)
20 sts and 28 rows/rounds = 10 cm over stocking stitch on 4.5 mm needles, after light blocking.
Swatch in the round (or knit a flat swatch and match the round tension). If you have too many stitches to 10 cm, switch to 5 mm; too few, try 4 mm. Tension is essential — it sets both the 40 cm circumference and the name width.
Size
One size: large decorative stocking.
Finished measurements (after blocking)
- Circumference: 40 cm
- Length, top of cuff to toe: approx. 50 cm
- Name: approx. 23.5 cm wide × 5 cm high
Abbreviations
| Abbrev. | Meaning |
|---|---|
| BOR | beginning of round |
| CC | contrast colour |
| k | knit |
| k2tog | knit 2 together (right-leaning decrease) |
| MC | main colour |
| p | purl |
| p2tog | purl 2 together |
| pm | place marker |
| pu | pick up and knit |
| rnd(s) | round(s) |
| RS | right side |
| sl | slip stitch purlwise |
| sm | slip marker |
| ssk | slip, slip, knit (left-leaning decrease: sl 1 knitwise twice, knit those 2 sts together through the back loop) |
| st(s) | stitch(es) |
| st st | stocking stitch |
| WS | wrong side |
| wyib | with yarn in back |
| wyif | with yarn in front |
Pattern notes
- Worked top down in the round from the cuff. Use magic loop or DPNs, whichever you prefer.
- Stocking stitch in the round is knit every round. Flat (heel flap and turn): knit RS rows, purl WS rows.
- Join in the round carefully so the cast-on is not twisted. The BOR sits at centre back until the heel; after the gusset it sits at the start of the instep.
- The slipped-stitch heel is durable and gives a classic stocking shape. It is not sized to a foot.
- SPARKLES is added after the stocking is knitted, using duplicate stitch (Swiss darning). This keeps the letters centred and avoids intarsia in the round.
- Cast on with a stretchy method (long-tail). Cast off the i-cord firmly.
- Read the heel turn fully before you begin it — you will work to a gap, decrease across it, and work one extra stitch each time.
Cuff
With CC1 and 4.5 mm needles, cast on 80 sts. Join to work in the round, being careful not to twist, and pm for BOR.
Rib rnd: *K2, p2; rep from * to end.
Repeat the rib rnd until the cuff measures 8 cm from the cast-on edge.
Knit 1 rnd in CC1.
Cut CC1, leaving a 15 cm tail.
Leg
Join MC.
Work in stocking stitch (knit every rnd) until the piece measures 26 cm from the cast-on edge, including the cuff (that is, 18 cm of red stocking stitch).
Tip: Do not place the name yet. Duplicate stitch is worked after the stocking is complete, when you can centre it on the hanging front.
Heel flap
The heel is worked flat over the first 40 sts. Leave the remaining 40 sts on hold for the instep (on the cable, a holder, or spare needles).
Set-up: Knit 40 sts. Turn. These 40 sts are the heel flap. (Instep = 40 sts on hold ✓)
Row 1 (WS): Sl 1 wyif, purl to end. Turn.
Row 2 (RS): *Sl 1 wyib, k1; rep from * to end. Turn.
Row 3 (WS): Sl 1 wyif, purl to end. Turn.
Row 4 (RS): *Sl 1 wyib, k1; rep from * to end. Turn.
Repeat Rows 3–4 a further 10 times, then work Row 3 once more.
You have worked 24 rows of heel flap (12 slipped-chain stitches along each edge). Flap height ≈ 8.5 cm. Heel sts remain 40.
Heel turn
Worked flat on the 40 heel sts.
Row 1 (RS): Sl 1 wyib, k22, ssk, k1, turn. (14 sts left unworked; 39 sts ✓)
Row 2 (WS): Sl 1 wyif, p7, p2tog, p1, turn. (14 sts unworked each side; 38 sts ✓)
Row 3: Sl 1 wyib, knit to 1 st before the gap, ssk (the stitch before the gap together with the stitch after the gap), k1, turn.
Row 4: Sl 1 wyif, purl to 1 st before the gap, p2tog, p1, turn.
Repeat Rows 3–4 until all stitches have been worked, ending with a WS row.
You will work Rows 3–4 seven times after Row 2 (14 unworked sts each side, consumed 2 per side per repeat). Final heel sts: 24 (40 − 16 decreases = 24 ✓). RS is now facing.
Gusset
Resume working in the round.
Set-up rnd:
- Knit across the 24 heel sts.
- Pick up and knit 12 sts along the left side of the heel flap (1 st in each slipped-chain edge st).
- Pm (side marker), knit the 40 held instep sts, pm (this second marker is the new BOR — start of instep).
- Pick up and knit 12 sts along the right side of the heel flap.
- Knit to the BOR.
88 sts (24 heel + 40 instep + 12 + 12 = 88 ✓).
You now have 40 instep sts and 48 sole/gusset sts.
Gusset decrease rnd: Knit 40 instep sts, sm, k1, ssk, knit to 3 sts before BOR, k2tog, k1. (2 sts decreased; sole −2)
Even rnd: Knit to end.
Work the last 2 rnds a further 3 times (4 decrease rnds in total).
Sole: 48 − 8 = 40. Total 80 sts (40 instep + 40 sole ✓).
Remove the side marker; keep the BOR at the start of the instep. Place a new side marker after 40 sts if you find it helpful for the toe.
Foot
With MC, knit every rnd until the foot measures 8 cm from the end of the gusset decreases, or until the stocking (from the back of the heel to the needles) measures 16 cm, whichever you prefer. For a longer toe-box, work an extra 1–2 cm here.
Toe
80 sts, arranged 40 instep / 40 sole.
Decrease rnd: K1, ssk, knit to 3 sts before the side (40-st point), k2tog, k1, k1, ssk, knit to 3 sts before BOR, k2tog, k1. (4 sts decreased)
Even rnd: Knit to end.
Work the last 2 rnds 6 times. (6 decrease rnds → 80 − 24 = 56 sts ✓)
Now work the decrease rnd only, every round, until 16 sts remain (8 instep + 8 sole). (56 − 16 = 40 sts decreased / 4 = 10 rnds ✓)
Cut MC, leaving a 40 cm tail. Graft the remaining 16 sts together with Kitchener stitch (see Finishing).
The name: SPARKLES
Add the name in CC2 with duplicate stitch (Swiss darning) after the stocking is knitted, before or after blocking.
Placement
- Centre the 47-st-wide chart on the front of the leg.
- Begin the bottom of the letters 4 cm below the colour-change from cuff to MC.
- BOR was at centre back on the leg, so the front is the opposite 40 sts. With 47 chart sts, the name sits with about 16 sts of margin on each side and wraps only a stitch or two onto the sides — this is intended and looks balanced when the stocking hangs.
- Work each chart row twice (duplicate-stitch the same chart row on two consecutive rounds of fabric). Finished name ≈ 5 cm high.
How to duplicate stitch Thread CC2 on a tapestry needle. Bring the needle up at the base of a knit stitch, follow the two legs of that stitch (in through the right shoulder of the stitch above, out through the left), and return into the same point you started. Tension should match the knitted fabric — too tight puckers the leg; too loose looks sloppy. Weave in ends on the WS.
Reading the charts
Charts are shown as the finished letter appears, with Row 1 at the bottom. X = duplicate stitch in CC2; . = skip (leave MC showing). Leave 1 blank stitch between letters. Work letters in order: S P A R K L E S.
S (5 sts)
Row 7: .XXXX
Row 6: X....
Row 5: X....
Row 4: .XXX.
Row 3: ....X
Row 2: ....X
Row 1: XXXX.
P (5 sts)
Row 7: XXXX.
Row 6: X...X
Row 5: X...X
Row 4: XXXX.
Row 3: X....
Row 2: X....
Row 1: X....
A (5 sts)
Row 7: .XXX.
Row 6: X...X
Row 5: X...X
Row 4: XXXXX
Row 3: X...X
Row 2: X...X
Row 1: X...X
R (5 sts)
Row 7: XXXX.
Row 6: X...X
Row 5: X...X
Row 4: XXXX.
Row 3: X.X..
Row 2: X..X.
Row 1: X...X
K (5 sts)
Row 7: X...X
Row 6: X..X.
Row 5: X.X..
Row 4: XX...
Row 3: X.X..
Row 2: X..X.
Row 1: X...X
L (5 sts)
Row 7: X....
Row 6: X....
Row 5: X....
Row 4: X....
Row 3: X....
Row 2: X....
Row 1: XXXXX
E (5 sts)
Row 7: XXXXX
Row 6: X....
Row 5: X....
Row 4: XXXX.
Row 3: X....
Row 2: X....
Row 1: XXXXX
S — repeat the S chart.
Full name width: 8 × 5 letter-sts + 7 × 1 space = 47 sts ✓.
Optional extra sparkle: after the letters are in, couch a single strand of metallic thread around each letter, or sew a small star or sequin at each end of the name.
Finishing
Kitchener stitch (toe) Hold the 8 instep sts and 8 sole sts on two needles, WS together, RS facing you. Thread the MC tail.
Set-up: Front needle — go through first st purlwise, leave on. Back needle — go through first st knitwise, leave on.
Then repeat:
- Front: through first st knitwise, slip off; through next st purlwise, leave on.
- Back: through first st purlwise, slip off; through next st knitwise, leave on.
Until 1 st remains on each needle, then drop them off as in step 1–2. Tighten the graft so it matches the surrounding tension. Weave in the tail.
Hanging loop (i-cord) With CC1 and a DPN, cast on 4 sts. *Knit 4, do not turn, slide sts back to the right end of the needle; rep from * until the cord measures 12 cm. Cast off. Fold into a loop and sew both ends securely to the inside of the cuff at centre back, using CC1. Reinforce with several stitches — this loop takes the stocking’s weight.
Weave in ends on the WS. Close any small gaps at the top of the gusset pick-ups with the MC tail if needed.
Blocking Soak in lukewarm water with a little wool wash for 15 minutes. Squeeze (do not wring). Roll in a towel. Shape to 40 cm circumference and 50 cm length, flattening the name so the letters sit square. Dry flat, away from heat. A light steam on the WS (hover the iron; do not press the name) sets the stitches.
Hang from the i-cord loop and fill with treasures.
Disclaimer: This pattern was generated by AI and should be reviewed for accuracy before use. While we strive for quality, AI-generated content may contain errors. Please verify measurements, stitch counts, charts, and instructions before beginning your project. Generated by purlJam.uk
Love this pattern?
Save this pattern to your free PurlJam libraryAccess your pattern anytime
Bookmark this page to access your pattern anytime