Type
Knitting
Difficulty
beginner
Category
pullover
AI Thinking Process
Planning
Verification
Pattern
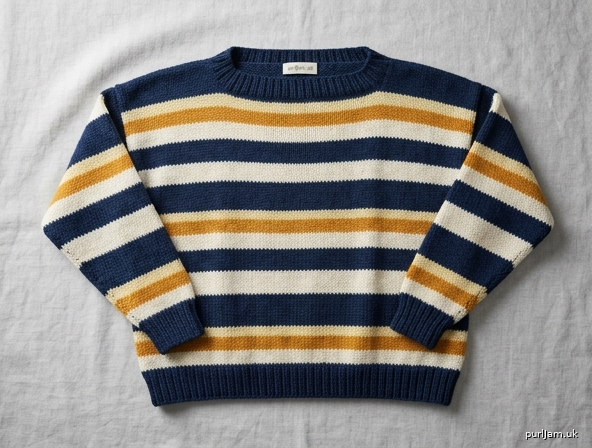
Striped Drop-Shoulder Boatneck Pullover
Beginner Worsted-Weight Multi-Color Sweater
Skill Level: Beginner
Sizes: S (M, L, XL, 2XL)
Finished Bust: 40 (44, 48, 52, 56)" / 101.5 (112, 122, 132, 142) cm with approx. 6–10" positive ease for a boxy, oversized fit
Finished Length: 24" / 61 cm (all sizes; measured from shoulder to hem)
Armhole Depth: 9 (9.5, 10, 10.5, 11)" / 23 (24, 25.5, 26.5, 28) cm
Yarn
Worsted weight yarn (approx. 180–200 yd / 165–183 m per 100 g skein) in 3 colors:
- MC (Main Color): 650 (720, 800, 880, 970) yd / 595 (660, 730, 805, 885) m
- CC1 (Contrast Color 1): 220 (245, 270, 300, 330) yd / 200 (225, 245, 275, 300) m
- CC2 (Contrast Color 2): 220 (245, 270, 300, 330) yd / 200 (225, 245, 275, 300) m
Sample suggestion: soft wool or wool-blend worsted. Choose high-contrast colors for clear stripes.
Needles
- US 8 / 5 mm straight or circular needles (or size needed to obtain gauge) for body and sleeves
- US 7 / 4.5 mm straight or circular needles for ribbing
- Spare needle (US 8 or similar) for 3-needle bind-off (optional)
Notions
- Tapestry needle
- Stitch markers
- Scrap yarn or stitch holders
- Measuring tape
Gauge
20 sts and 28 rows = 4" / 10 cm in Stockinette Stitch with larger needles, after blocking.
Adjust needle size if necessary to match gauge. Row gauge is important for stripe matching and length.
Abbreviations (US)
BO = bind off
CO = cast on
k = knit
p = purl
pm = place marker
RS = right side
st(s) = stitch(es)
St st = Stockinette Stitch (knit RS rows, purl WS rows)
WS = wrong side
Stripe Sequence (used throughout)
Work in the following 12-row repeat for all Stockinette sections:
- Rows 1–4: MC
- Rows 5–6: CC1
- Rows 7–10: MC
- Rows 11–12: CC2
Repeat these 12 rows for the entire body and sleeves. Always change colors on a RS row. Carry unused yarn loosely up the side (or cut and weave ends if preferred). Begin each piece with MC.
Beginner tip: When changing colors, leave 6" tails and weave them in later on the WS. Keep floats/carries loose so edges don’t pull.
Pattern Notes
- This is a classic drop-shoulder construction: front and back are plain rectangles with no armhole shaping. Shoulders are joined, then sleeves are picked up along the straight side edges and worked downward.
- Boatneck requires no neck shaping—simply leave the center stitches unjoined.
- Work flat throughout.
- Slip the first stitch of every row purlwise with yarn in front for a neat edge (optional but recommended for seaming).
- Block pieces before seaming for best results and accurate measurements.
- All measurements are after light blocking.
BACK
With smaller needles and MC, CO 100 (110, 120, 130, 140) sts.
Ribbing:
Work in k1, p1 ribbing for 2" / 5 cm, ending after a WS row.
Switch to larger needles.
Body:
Begin Stripe Sequence and work in St st until piece measures 24" / 61 cm from CO edge, ending after a WS row.
(Approx. 154 total St st rows after ribbing; adjust slightly if needed to end on a clean stripe boundary—prefer ending after a full MC stripe block.)
Shoulder & Boatneck Divide:
Next row (RS): BO 28 (32, 36, 40, 44) sts for right shoulder, k until 28 (32, 36, 40, 44) sts remain on left needle (these are left shoulder sts), place remaining center 44 (46, 48, 50, 52) sts on holder or scrap yarn for boatneck.
Turn and BO the remaining 28 (32, 36, 40, 44) left-shoulder sts on the following WS row (or continue and BO all remaining shoulder sts).
Alternatively (cleaner): Work across, placing markers to indicate shoulder sections, then BO the two shoulder sections separately while leaving center sts on holder.
Fasten off. Make note of final stripe color for matching Front.
Math check: 28 + 44 + 28 = 100 ✓; 32 + 46 + 32 = 110 ✓; 36 + 48 + 36 = 120 ✓; 40 + 50 + 40 = 130 ✓; 44 + 52 + 44 = 140 ✓.
FRONT
Work exactly as for Back until piece measures 24" / 61 cm from CO edge, ending after a WS row (match Back stripe ending exactly).
Shoulder & Boatneck Divide:
Identical to Back: BO 28 (32, 36, 40, 44) sts, place center 44 (46, 48, 50, 52) sts on holder, BO remaining 28 (32, 36, 40, 44) sts.
Fasten off.
JOIN SHOULDERS
Block Front and Back lightly to measurements.
With RS together, join right shoulders using mattress stitch or 3-needle bind-off (28 (32, 36, 40, 44) sts).
Repeat for left shoulders.
Center boatneck sts remain open on holders (Front and Back).
Boatneck width = 8.8 (9.2, 9.6, 10, 10.4)" / 22.5 (23.5, 24.5, 25.5, 26.5) cm.
SLEEVES (make 2)
Pick-up:
With larger needles, RS facing, and starting at the bottom of the armhole edge (side seam line), pick up and knit 90 (95, 100, 105, 110) sts evenly along one armhole edge (from hem-side of armhole up to shoulder seam and down the other side).
Pick up approx. 5 sts per inch. End at the opposite bottom of the armhole.
Math check: Armhole depth 9 (9.5, 10, 10.5, 11)" each side × 2 = 18 (19, 20, 21, 22)" total upper sleeve width. At 5 sts/in: 90 (95, 100, 105, 110) sts ✓.
Join yarn in the color that matches the body stripe at the shoulder line as closely as possible (or begin a new Stripe Sequence with MC for simplicity—stripes will be horizontal on sleeves).
Sleeve Body:
Beginning with a WS row, work in St st and continue (or restart) Stripe Sequence.
Work even for 2" / 5 cm.
Shape sleeve (decreases):
Decrease Row (RS): k1, ssk, knit to last 3 sts, k2tog, k1. (2 sts decreased)
Work 5 rows even in St st (and stripes).
Repeat the last 6 rows 14 (15, 16, 17, 18) more times.
Sts remaining: 60 (63, 66, 69, 72).
Math check: 90 – 2×15 = 60 ✓; 95 – 2×16 = 63 ✓; 100 – 2×17 = 66 ✓; 105 – 2×18 = 69 ✓; 110 – 2×19 = 72 ✓. (Initial even section + 15 (16, 17, 18, 19) decrease rounds total.)
Continue even in St st and stripes until sleeve measures 16 (16.5, 17, 17, 17.5)" / 40.5 (42, 43, 43, 44.5) cm from pick-up edge, or 2" / 5 cm less than desired total sleeve length, ending after a WS row. (Standard total sleeve length from shoulder drop is approx. 18–19.5".)
Cuff:
Switch to smaller needles and MC (or current color).
Next row (RS): knit, decreasing 12 (13, 14, 15, 16) sts evenly across.
Sts remaining: 48 (50, 52, 54, 56).
Work in k1, p1 ribbing for 2" / 5 cm.
BO loosely in rib.
Repeat for second sleeve.
FINISHING
Side and Sleeve Seams:
With mattress stitch (or preferred seam), sew side seams from hem ribbing to underarm, matching stripes carefully.
Continue seaming each sleeve from underarm to cuff, again matching stripes where possible.
Boatneck Finishing:
Place held Front boatneck sts on smaller needle. With MC and smaller needles, work 4 rows of k1, p1 ribbing. BO loosely in rib.
Repeat for Back boatneck sts.
Optionally, pick up a few sts at each shoulder join and work a tiny rib tab, or simply seam the short rib ends to the shoulder edges for a clean finish. For a true open boatneck, leave the Front and Back neck ribs separate (they will sit flat).
Weave ends: Weave in all yarn tails securely on WS, especially at color changes.
Block: Gently wet-block or steam-block the finished sweater to measurements, pinning to open the boxy shape and even the stripes. Do not overstretch ribbing.
Final Measurements Summary (after blocking)
| Size | Bust | Length | Upper Sleeve Width | Sleeve Length (pick-up to cuff) | Boatneck Width |
|---|---|---|---|---|---|
| S | 40" | 24" | 18" | 18" | 8.8" |
| M | 44" | 24" | 19" | 18.5" | 9.2" |
| L | 48" | 24" | 20" | 19" | 9.6" |
| XL | 52" | 24" | 21" | 19" | 10" |
| 2XL | 56" | 24" | 22" | 19.5" | 10.4" |
Beginner Tips for Success
- Swatch in stripes to practice color changes and confirm gauge.
- Count rows for each stripe so Front, Back, and Sleeves match.
- Use locking stitch markers every 10–20 sts when picking up sleeve stitches for even distribution.
- Mattress stitch is ideal for invisible side seams on St st.
- If stripes don’t match perfectly at underarms, a slight jog is normal and will be less noticeable after blocking.
- Try on after seaming one sleeve to check length and ease before finishing the second.
Enjoy your cozy, colorful drop-shoulder pullover!
Disclaimer: This pattern was generated by AI and should be reviewed for accuracy before use. While we strive for quality, AI-generated content may contain errors. Please verify measurements, stitch counts, charts, and instructions before beginning your project. Generated by purlJam.uk
Love this pattern?
Save this pattern to your free PurlJam libraryAccess your pattern anytime
Bookmark this page to access your pattern anytime